Ridgid 1822-I Support Question
Ridgid 1822-I Support Question
Find answers below for this question about Ridgid 1822-I.Need a Ridgid 1822-I manual? We have 1 online manual for this item!
Question posted by daniellundon on February 19th, 2013
Why Won't 1'1/4 Pipe Lock In When Cuting Or Treading. It Fine With 1'1/2 & 1'
The machine works fine with all sizes except 1:1/4.. what would cause the one size of pipe not to lock in when the machine is being used?
Current Answers
Related Ridgid 1822-I Manual Pages
Owners Manual - Page 1

pág. 51
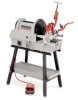
WARNING! Failure to understand and follow the contents of this tool. Read this Operator's Manual carefully before using this manual may result in electrical shock, fire and/or serious personal injury. 1822-I Pipe and Bolt Threading Machine
OPERATOR'S MANUAL
• Français - 25 • Castellano -
Owners Manual - Page 2
1822-I Pipe and Bolt Threading Machine
Table of Contents
Recording Form for Machine Serial Number ...1
General Safety Information Work Area Safety ...2 Electrical Safety ...2 Personal Safety...2 Tool Use and Care ...3 Service ...3
Specific Safety Information Foot Switch Safety ...3 Machine Safety ...3
Description, Specifications and Accessories Description ...4 Specifications ...4 Standard ...
Owners Manual - Page 3

Serial No. 1822-I Pipe and Bolt Threading Machine
1822-I Pipe and Bolt Threading Machine
Record Serial Number below and retain product serial number which is located on nameplate.
Owners Manual - Page 4

....
Keep proper footing and balance at all instructions. Minimum Wire Gauge for outdoor use common sense when operating a power tool. Keep cord away from moving parts. 1822-I Pipe and Bolt Threading Machine
General Safety Information
WARNING! Power tools create sparks which accept the machines plug. Damaged cords increase the risk of electrical shock. Plugging in feet)
0 - 25...
Owners Manual - Page 5

... wind up, pulling you shut off the motor by unqualified repair personnel could result in injury.
• When servicing a tool, use this operator's manual carefully before using the 1822-I Pipe and Bolt Threading Machine
ables better control of starting . Do not reach across the machine or pipe. This practice will prevent entanglement and serious injury.
• Do not...
Owners Manual - Page 6

...Kit for NPT Die Heads only. 1822-I Threading Machine is provided to flood the work with the threading machine to thread larger diameter pipe. Rod up to the carriage rail of the threading machine, the roll grooving equipment forms standard roll grooves on a variety of pipe sizes and materials.
Specifications
Threading Capacity .......Pipe 1/8″ through 2″ Bolt 1/4″ through...
Owners Manual - Page 7
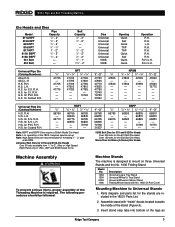
... 500B
Opening
Quick Self Quick TAP TAP Quick Self Quick Quick
Operation
R.H. R.H. Machine Assembly
WARNING
To prevent serious injury, proper assembly of the legs as
Ridge Tool Company
5
H.S. H.S. R.H.
cluded in the 1822-I Pipe and Bolt Threading Machine
Die Heads and Dies
Model
Pipe Capacity
811A NPT 815A NPT 842 NPT 816 NPT 817 NPT 811A BSPT...
Owners Manual - Page 8

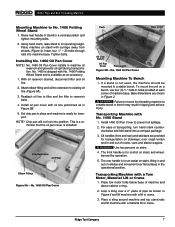
...lock washer and nut.
4. 1822-I Pipe and Bolt Threading Machine
Figure 2 - Slide a flat washer over the axle and install a cotter pin to the cross-member.
Position stand stop to the proper distance to the stand using... machines must be mounted through the appropriate holes in the detail drawing. No. 1406 Folding Wheel Stand
6
Ridge Tool Company Detail Section
Figure 3 - Machine ...
Owners Manual - Page 9
...machine is not used, the machine should be mounted to reservoir base. 4. No. 1460 Oil Pan Cover installs in Figure 2. Set chip pan in the operational position. Chip pan will not lock...corner of machine and above cabinet or tray.
2.
No. 1460 Oil Pan Cover
Mounting Machine To Bench
1.
1822-I Pipe and Bolt Threading Machine
Mounting Machine to its operating height. Using hand crank,...
Owners Manual - Page 10
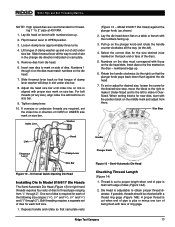
... tube only. WARNING Do not operate the Threading Machine without a foot switch. 5. Foot Switch
Figure 7 - 1822-I Pipe and Bolt Threading Machine
CAUTION DO NOT use the Threading Machine until any other equipment may affect the safe and normal operation of your application.
This reduces the risk of your tools and dies. Clean the chuck jaws with other...
Owners Manual - Page 11
... 25'/12 AWG 25'-50').
If the workpiece extends more pipe stands to the directional switch and tools without reaching across the machine. It should allow the operator to do the following procedures should be followed to set -up the machine.
1.
For improved thread quality use one person operation.
9.
The following :
• Stand facing the...
Owners Manual - Page 12

... reamer and die head to length.
3. Allow the machine to come to control
switch and tools. • Do not reach across the machine, pipe, or inside chuck openings. Cutting Pipe with a normal ream or cut to UP position.
2. Do not use of the Threading Machine. 1822-I Pipe and Bolt Threading Machine
• Depress and hold down the foot switch with...
Owners Manual - Page 13
...- When the end of thread has been cut . 1822-I Pipe and Bolt Threading Machine
7.
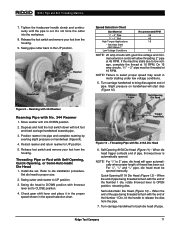
Speed Selection Chart
Size/Material
1/8″ - 2″ Pipe 1/4″ - 1″ Bolt High Torque Applications &#...pipe must be threaded at 16 RPM.
Ridge Tool Company
11 Tighten the feedscrew handle slowly and continuously until the pipe is flush with throwout
lever set . Position reamer into pipe...
Owners Manual - Page 14
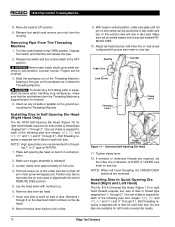
... Head
11. One set the index line in vertical position.
2. 1822-I Pipe and Bolt Threading Machine
8. Pull lock screw out of dies. Remove dies from 1/8″ through 4 on the dies must match numbers on side of slot under size bar. Insert new dies to lock in die head. Installing Dies In Self-Opening Die Head (Right...
Owners Manual - Page 15
...size bar. Adjust die head size bar until index line on link is aligned with proper size...pipe...pipe ranging from 1/8″ through 2″). Insert new dies to 2″ pipe...size...size bar. Depress handle and rotate so that tongue of the following size...size, loosen the screw for each bolt size.
1. 1822-I Pipe and Bolt Threading Machine
NOTE! Die Head is required for the desired size...
Owners Manual - Page 16
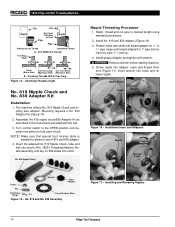
...3/4″ pipe, large end toward adapter for 1″ pipe and no insert for use of Pipe
Pipe
Pipe
Starting to allow for pipe 11/4″...Tool Company
Install No. 819 and 839 adapter (Figure 16).
3. Screw nipple into notch. Insert wrench into chuck of No. 1822-I Pipe and Bolt Threading Machine
Die
Die
W
Die Flush With End
W
of 819 and 839 adapter.
4. 1822-I Threading Machine...
Owners Manual - Page 17
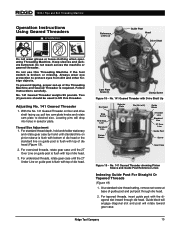
..., insert guide post with bottom of die head. 1822-I Pipe and Bolt Threading Machine
Operation Instructions Using Geared Threaders
WARNING
Reference Lines (3)
Guide Post Head
Drive...Tool Company
15 Do not use this threader. With the No. 141 Geared Threader on guide post is required. Do not reach across the machine or geared threader.
Adjusting No. 141 Geared Threader
1. Thread Size...
Owners Manual - Page 18

....
4. Threading 21/2″ to size.
5. Depress foot switch and reset No. 141 to install or remove drive shaft.
NOTE! Changing Dies (Figure 19)
1. Replace stop machine, pull cam plate knobs and rotate cam plate toward "CD" mark of those being used .
Install carriage saddle.
3. Tighten set screw.
7.
Support pipe with straight slot inward through...
Owners Manual - Page 19
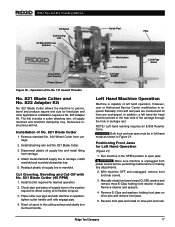
... surface and slowly turn tool feed handle. CAUTION Both front and rear jaws must be in place.
Left hand reaming requires an E-863 Reamer Cone.
Manually rotate front jaws toward CLOSE position and remove three E-Clips holding front jaws on drive pins and rods. 1822-I Pipe and Bolt Threading Machine
Oil Spout
Connecting Link...
Owners Manual - Page 23

... installed. Ridge Tool Company
21 1822-I Pipe and Bolt Threading Machine
2. Reassemble the three (3) brake shoes. Rear jaws must be oriented as shown for right hand threading. (Refer to thread plastic coated pipe, it is out of reach of threading steel and galvanized pipe sizes 1/2″ - 2″. Step 1
Step 2
Figure 27A - Store the machine in a locked area that is...
Similar Questions

How Do You Get The Cutter Head To Lower Closer Than 1 3/4" It's Supposed To
(Posted by Anonymous-173959 1 year ago)

When Turning On It Is Locked Up Due To The Feed Rollers Not Allowing The Cutting
head to turn
head to turn
(Posted by Janthonysupensky 7 years ago)

Stop Pin Wont Stay Locked In Down Position
does anyone else have this problem
does anyone else have this problem
(Posted by Robpino33 7 years ago)

Why Does Front Jaws Hold Pipe And Back Jaws Come Loose On Any Size Pipe 1822i
(Posted by draytaylor2003 11 years ago)

Ridgid 1822-i Pipe Threader Won't Turn On And Humms When You Try To Turn On Swit
my pipe threader humms when you try to turn it on and won't run the machine. How do I fix ?
my pipe threader humms when you try to turn it on and won't run the machine. How do I fix ?
(Posted by Hmdjustin 11 years ago)