Ricoh SP4100N Support Question
Ricoh SP4100N Support Question
Find answers below for this question about Ricoh SP4100N - Aficio SP B/W Laser Printer.Need a Ricoh SP4100N manual? We have 3 online manuals for this item!
Question posted by blundy on December 3rd, 2013
Rear Paper Exit Cover
My machine says to close the rear/paper exit cover. It is covered as far as I can tell. I have tried to turn off and reset several times.
Current Answers
Answer #1: Posted by freginold on September 16th, 2020 2:50 AM
freginold

Member since:
December 20th, 2011 Points: 23,253,885

Member since:
December 20th, 2011 Points: 23,253,885
Generally when you see this message, it's because the back cover isn't completely closed -- one side may be slightly ajar. Open the back cover and close it firmly. Ensure that both sides of the cover are flush with the machine.
If the cover is firmly closed and you still see the "back cover open" message, there may be a dirty or defective door open sensor. Clean the sensors with compressed (canned) air and see if that resolves the issue. If not, you may need to replace that sensor.
If the cover is firmly closed and you still see the "back cover open" message, there may be a dirty or defective door open sensor. Clean the sensors with compressed (canned) air and see if that resolves the issue. If not, you may need to replace that sensor.
Related Ricoh SP4100N Manual Pages
Operating Instructions - Page 5
... from the image on the computer 159 When Printer is Not Functioning Properly 161 Additional Troubleshooting...162 Using the Envelope Lever...164 10. Removing Misfed Paper Removing Misfed Paper...167 When "Remove Misfeed Paper Tray" Appears 167 When "Remove Misfeed Internal Path" Appears 169 When "Remove Misfeed Paper Exit Cover" Appears 171 When "Remove Misfeed Duplex Unit...
Operating Instructions - Page 14
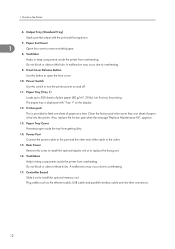
Paper Exit Cover
1
Open this cover to install the optional duplex unit or to remove misfed paper.
8. Ventilator
Helps to keep components inside the printer from getting dirty.
14. Friction pad
This is fed into the printer. Rear Cover
Remove this cover to replace the fusing unit.
16. Ventilators
Help to feed one sheet of paper at a time. A malfunction may occur due to...
Operating Instructions - Page 45
AUB222S
AUB225S
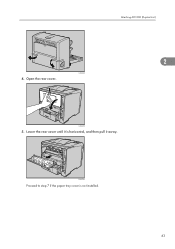
5. Open the rear cover. AUB234S
Proceed to step 7 if the paper tray cover is horizontal, and then pull it away. Lower the rear cover until it is not installed.
43
Attaching AD1000 (Duplex Unit)
2
4.
Operating Instructions - Page 92
... standard length.
90
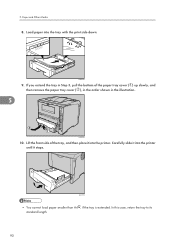
Carefully slide it into the printer until it into the tray with the print side down. AUB110S
9. If you extend the tray in the illustration.
5
AUB236S
10. Lift the front side of the paper tray cover ( ) up slowly, and then remove the paper tray cover ( ), in the order shown in Step 3, pull...
Operating Instructions - Page 128

Replacing Consumables and Maintenance Kit
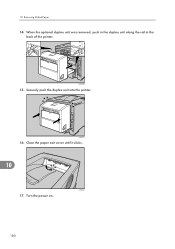
10. When the optional duplex unit was removed, push in the duplex unit along the rails in the printer's interior.
11. Close the rear cover. AUB316S
6
AUB317S
12. Position the rear cover horizontally and align it with the grooves in the back of the printer.
126
AUB226S
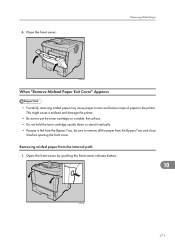
6.
Operating Instructions - Page 151

... tray is full.
• Remove the paper from the input paper tray and then reload paper. The printer is jammed under the rear cover.
• See p.167 "Removing Misfed Paper". Remove Misfeed Internal Path/Open Front Cover Paper is time to the correct user name and password. Then open the front cover and then close it again, so the error message disappears...
Operating Instructions - Page 173
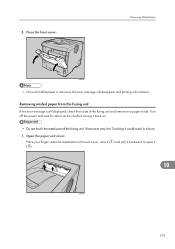
Removing Misfed Paper
AUB107S
When "Remove Misfeed Paper Exit Cover" Appears
• Forcefully removing misfed paper may cause paper to remove all the paper from the internal path 1. Removing misfed paper from the Bypass Tray and close
it before opening the front cover. This might cause a misfeed and damage the printer.
• Be sure to put the toner cartridge on a stable, flat...
Operating Instructions - Page 175
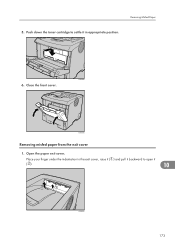
Close the front cover. Open the paper exit cover. Push down the toner cartridge to open it in the exit cover, raise it ( ) and pull it backward to settle it
( ).
10
AUB402S
173 Place your finger under the indentation in appropriate position.
6.
Removing Misfed Paper
5.
AUB105S
AUB107S
Removing misfed paper from the exit cover
1.
Operating Instructions - Page 176
AUB403S
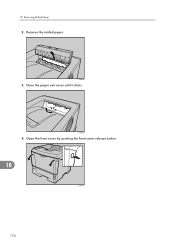
3. Open the front cover by pushing the front cover release button.
10
AUB101S
174
Remove the misfed paper. Close the paper exit cover until it clicks. 10. AUB404S
4. Removing Misfed Paper
2.
Operating Instructions - Page 177
... continue. Open the paper exit cover. Place your finger under the indentation in a burn.
1. Removing Misfed Paper
AUB107S
• Once all misfed paper is still displayed, check the inside of the fusing unit.
Turn off the power and wait for about an hour before turning it
10
AUB402S
175
It becomes very hot. 5.
Close the front cover. Touching it...
Operating Instructions - Page 181

Close the rear cover. 11.
AUB316S
AUB317S
10
179 Push the lock levers of the fusing unit down until they click. Position the rear cover horizontally and align it with the grooves in the printer's interior.
13. Removing Misfed Paper
AUB315S
Proceed to step 13 if the optional duplex unit is installed. 12.
Operating Instructions - Page 182
AUB227S
16. AUB404S
180 10. When the optional duplex unit was removed, push in the duplex unit along the rail in the back of the printer.
Turn the power on. Securely push the duplex unit into the printer. Removing Misfed Paper
14. AUB226S
15. Close the paper exit cover until it clicks.
10
17.
Operating Instructions - Page 200
... 17, 22, 85, 192 Paper Not Supported by this Printer 82 Paper Recommendations 78 Paper Size Dial 91 Plain Paper 78 Port Connection 154 Print Area 83 Print Cartridge 107, 187 Printer Does Not Print 153
R
Reducing Paper Curl 144 Registration Roller 135 Remove Misfed Paper 167
Duplex Unit 181 Internal Path 169 Paper Exit Cover 171 Paper Tray 167 Replacing Consumables...
Software User Guide - Page 55

... to install it from the CD-ROM provided.
1. When Auto Run starts, click [Exit]. 7. Turn on using the USB cable. If the printer driver has already been installed, plug and play instructions of the printer to the "USB001" port is off. 2. Found New Hardware Wizard starts, and USB Printing Support is enabled, and the...
Software User Guide - Page 56

... computer using an account that the power of the printer. USB
• Installing a printer driver requires Administrators permission. Check that has Administrators permission. If Auto Run starts, click [Cancel], and then [Exit]. 6.
Found New Hardware Wizard starts, and USB Printing Support is off. 2. Turn on using the USB cable. 1. Windows XP, Windows Server 2003...
Software User Guide - Page 137
...Reset Time
Auto Del. System
5
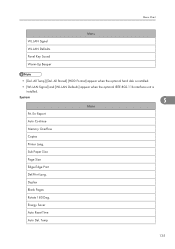
Menu
Prt.
Temp
135 All Temp] [Del. All Stored] [HDD Format] appear when the optional hard disk is installed.
• [WL.LAN Signal] and [WL.LAN Defaults] appear when the optional IEEE 802.11b interface unit is installed. Sub Paper... Size
Page Size
Edge-Edge Print
Def.Print Lang. Err Report
Auto Continue
Memory Overflow
Copies
Printer ...
Software User Guide - Page 192
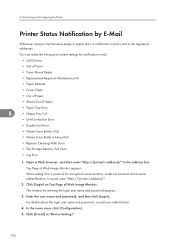
... becomes empty or paper jams, a notification e-mail is issued, enter "https://(printer's address)/".
2. Click [Login] on Top Page of Web Image Monitor appears. Open a Web browser, and then enter "http://(printer's address)/" in "Device Settings".
190 Enter the user name and password, and then click [Login]. You can make the timing and content settings...
Software User Guide - Page 341

... for Mac 301, 302 Printing a PDF File Directly 89 Printing after Resetting the Printer 50 Printing Commands 271 Printing Files Directly from Windows 269 Printing Font Catalog 304 Printing Font Sample 305 Printing Method 89 ... the Displayed Information........237 UNIX 92 upnp 223 USB Connection 19, 51, 53, 54 User Code 296 User Information 181 User Paper Type 127, 129, 130, 131
339
User Manual - Page 8

... e-mail addresses, printer, fax machine, ftp servers, web site, or someone else's computer on the network. Features
Digital Copying: Since the product includes a laser printer, it is /are first scanned and converted into an image file, and then transmitted to remote recipients within minutes.
The product offers an unprecedented document delivery technology, transmitting paper documents...
User Manual - Page 24
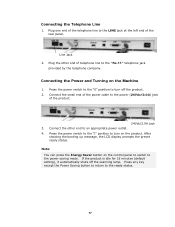
... prompts the preset ready status. Connecting the Power and Turning on the control panel to switch to the power (24Vdc/2.0A) jack
of the rear panel. Connect the small end of the power cable ...to turn off the scanning lamp. Press the power switch to the "I" position to the "RJ-11" telephone jack
provided by the telephone company. Note: You can press the Energy Saver button on the Machine
...
Similar Questions

Reset Print Cartridige Ricoh Aficio Sp 4210n
How to reset print cartridigeRicoh Aficio SP 4210N ? it s so difficult to do this
How to reset print cartridigeRicoh Aficio SP 4210N ? it s so difficult to do this
(Posted by tarekhadedyfr 8 years ago)

How To Install Ricoh Aficio Sp 4100n Oem Fuser Maintenance Kit
(Posted by Zodke 9 years ago)

Ricoh Aficio Sp 4100 How To Reset Print Cartridge
(Posted by domaz 9 years ago)

How To Read The Meter On Aficio Sp 4310n Printer
I need to read the meter on the Aficio SP 4310 N printer. How do I do this
I need to read the meter on the Aficio SP 4310 N printer. How do I do this
(Posted by Anonymous-130231 10 years ago)

Aficio Sp 4100n Close Rear/paper Exit Cover Error Message
I can't get my printer to work. Keeps showing the Close Rear/Paper Exit Cover error message. I have ...
I can't get my printer to work. Keeps showing the Close Rear/Paper Exit Cover error message. I have ...
(Posted by kevinsander 12 years ago)