
Ricoh Aficio MP C7501SP Support Question
Ricoh Aficio MP C7501SP Support Question
Find answers below for this question about Ricoh Aficio MP C7501SP.Need a Ricoh Aficio MP C7501SP manual? We have 3 online manuals for this item!
Question posted by Tiddatats on June 8th, 2011
Programmed Buttons
We have just had a new Ricoh printer.scanner installed at work and I have programmed the buttons for emailing scanned documents. How do I edit the name and email address and how can I delete a programmed button when someone leaves and it is no longer required?
Current Answers
Answer #1: Posted by p33mp33ui on June 10th, 2011 10:26 AM
p33mp33ui

Member since:
June 10th, 2011 Points: 107,580

Member since:
June 10th, 2011 Points: 107,580
at the machine click on user tools then open the system settings. then click on the admin tools tab. in there you will find address book management and you can edit or delete entries within there. Or at your computer, enter the IP address of the machine in a web browser and it will bring up the web interface where you can edit the address book after logging in. use admin for the username and do not put anything in for the password
Related Ricoh Aficio MP C7501SP Manual Pages
Security Policy - Page 1

... target written in Japanese. Copyright (c) 2011 RICOH COMPANY, LTD. All rights reserved. All rights reserved. This document is a translation of imagio MP C6001/C7501 series Security Target are reprinted with written permission from IEEE, 445 Hoes Lane, Piscataway, New Jersey 08855, from IEEE 2600.1, Protection Profile for Hardcopy Devices, Operational Environment A, Copyright © 2009 IEEE...
Security Policy - Page 11

...documents in the TOE. Telephone line A public line for folder transmission of the stored documents in the TOE to relay communications between the MFP and maintenance centre. Firewall A device to prevent the office environment from the IT devices... documents using the printer driver installed on the client computer, -
Storage and printing of documents using a Web browser installed...
Security Policy - Page 15

... Instructions Drivers&Utilities imagio MP C6001/C6001SP/C7501/C7501SP D081-7700A
- imagio MP C7501/C6001 series Operating Instructions D081-7685
- Help 83NHBNJAR1.10 v110
Copyright (c) 2011 RICOH COMPANY, LTD. USB Port The USB Port is an external interface to connect a client computer to an Ethernet (100BASE-TX/10BASE-T) LAN. During installation, this TOE are stored...
Security Policy - Page 26

... (c) 2011 RICOH COMPANY, LTD. Documents copied by using Printer Function. One of the document data attributes. This list is selected as an attribute of stored documents according to operate the TOE. Page 25 of 89
Terms +SCN
+CPY +FAXOUT +FAXIN +DSR
Document user list
Stored documents Stored document type
Document Server documents Printer documents
Scanner documents Fax documents Received...
Security Policy - Page 37

...MFP shall ensure that those logs are protected from unauthorised access, deletion and modifications. O.AUDIT.LOGGED
Management of audit log records The... conceal the communication data on the HDD. Copyright (c) 2011 RICOH COMPANY, LTD. OE.AUDIT_ACCESS.AUTHORIZED
Audit log access control in... TOE
The TOE shall manage the operation of storage devices The TOE shall ensure that the data is encrypted...
Security Policy - Page 81

... reliably identifies and authenticates the input information from the IT device matches the one installed in the TOE so that the IT device is identified as RC Gate, the IT device whose user role is RC Gate is to allow authorised TOE users to operate document data and user jobs in accordance with (1) access control...
Quick Use Guide - Page 3
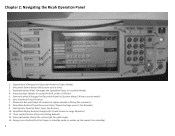
... of copies needed / Dialing Fax numbers) 8. Document Server button (Not active at this time) 3. Scanner button (Changes the Operation Panel to Scanner Mode / Allows scan to Start Copy, Fax & Scan) 10. Interrupt button (Pause the current job for quick copy) 13. Simplified display button (Changes the Touch Screen to Facsimile Mode) 4. Facsimile button (Fax) (Changes the Operation Panel to...
Quick Use Guide - Page 4

OR
In Copy Mode, you have many options
4 Chapter 3: Making a Copy
Copies can be made from two sources: The top feeder (place originals face up)
From the glass (place originals on the left side face down)
Select the Copy button to switch to Copy Mode.
Quick Use Guide - Page 5
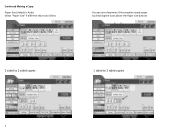
Continued Making a Copy:
Paper Size (default is Auto) Select "Paper Size" if different than Auto Select
You can also determine if the machine needs paper by checking the icons above the Paper size buttons
2 sided to 2 sided copies
1 sided to 2 sided copies
5
Quick Use Guide - Page 8
Press the "green" Start button Your Fax will then be Sent.
8
Type your fax number including 9 to enter a fax number.
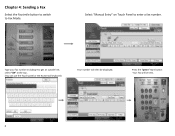
Select "Manual Entry" on Touch Panel to get an outside line, select "OK" at the top . (You can use the Touch panel or the Numerical keyboard)
Your number will be displayed. Chapter 4: Sending a Fax
Select the Facsimile button to switch to Fax Mode.
Quick Use Guide - Page 9
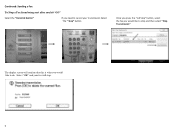
Continued: Sending a Fax
To Stop a Fax from being sent after you hit "GO"
Select the "Facsimile button"
IF you need to do.
Select "OK" and your transmission Select The " Stop" button. Once you press the "red Stop" button, select the fax you would like to cancel your fax will confirm that this is what...
Quick Use Guide - Page 10
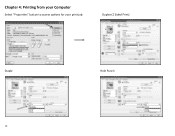
Duplex (2 Sided Print)
Staple
10
Hole Punch Chapter 4: Printing from your Computer
Select "Properties" button to access options for your print job.
Quick Use Guide - Page 11
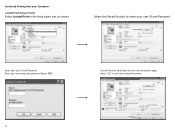
Continued Printing from your Computer
Locked Print (Secure Print)
Select Locked Print in the drop down box as shown
Select the Details button to enter your user ID and Password
Enter your user ID and Password Enter your user name and password Select "OK"
You will then be taken back to print you locked document.
11 Select "OK" to your main properties page.
Quick Use Guide - Page 12
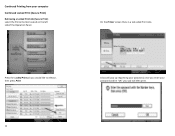
Continued Printing from your job will then print. On the Printer screen there is a tab called Print Jobs
Press the Locked Print job you would like to release, then press Print
12
A box... you enter your password and hit "OK" your computer
Continued Locked Print (Secure Print)
Retrieving a Locked Print Job (Secure Print) select the Printer button located on the left sideof the Operation Panel.
Quick Use Guide - Page 14
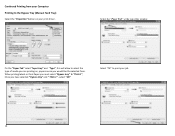
... must select "Bypass tray" & "Thick 1", Once you would like the selected from your Computer Printing to the Bypass Tray (Manual Feed Tray)
Select the "Properties" button on , paper source you have selected " Bypass tray" and " Thick 1" , select "OK"
Select "OK" to select the type of the window
On the "Paper Tab...
Quick Use Guide - Page 15
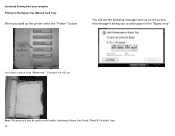
..., Heavy Card Stock (Think) & Printable Tabs
15 Continued Printing from your computer Printing to the Bypass Tray (Manual Feed Tray)
When you walk up the printer select the "Printer" button
You will start.
Quick Use Guide - Page 16
Select the letter that corresponds with your last name, next use the arrow key to email.
16
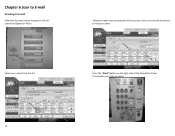
Chapter 6 Scan to E‐mail
Scanning to E‐mail
Select the Scanner button located on the right side of the Operations Panel To complete your scan to find your name
Select your name from the list
Press the "Start" Button on the left sideof the Operation Panel.
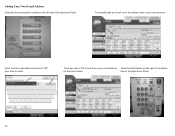
Quick Use Guide - Page 17
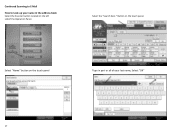
Button on the touch panel
Type in the address book
Select the Scanner button located on the left sideof the Operation Panel.
Select "Name" button on the touch panel. Select the "Search Dest." Continued Scanning to E‐Mail
How to Look up your name in part or all of your last name, Select "OK"
17
Quick Use Guide - Page 18
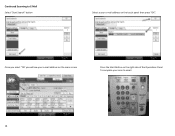
Once you select "OK' you will see your e‐mail address on the main screen
Press the Start Button on the right side of the Operations Panel To complete your e‐mail address on the touch panel then press "OK". Continued Scanning to E‐Mail
Select "Start Search" button
Select a your scan to email.
18
Quick Use Guide - Page 19
... Your Own E-mail Address
Select the Scanner button located on the main screen. Once you select "OK' you will see your scan to email. To manually add an e‐mail not in the address book, select manual entry
Enter the full e‐mail address and press "OK" your e‐mail address Press the Start Button on the right To...
Similar Questions

How To Scan To Email Address Using A Ricoh Aficio Mp 5001
(Posted by Ivvyo 9 years ago)

How Do I Program Email Address Into Ricoh Aficio Mp C4501
(Posted by tinaScamp1 9 years ago)

How To Get The Scanner To Work On My Aficio Mp 3500 Scanner
(Posted by martitraba 9 years ago)

Ricoh Aficio Mp C3001 How To Use Saved Email Addresses
(Posted by rowodat 10 years ago)

Cannot Scan And Email 40 Page Document
From Our Mp 7501
received content of scanned 40 page document is scrambled garbage. The size of the document is 2mb. ...
received content of scanned 40 page document is scrambled garbage. The size of the document is 2mb. ...
(Posted by foleyjohnv 12 years ago)