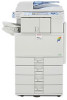
Ricoh Aficio MP C2551 Support Question
Ricoh Aficio MP C2551 Support Question
Find answers below for this question about Ricoh Aficio MP C2551.Need a Ricoh Aficio MP C2551 manual? We have 1 online manual for this item!
Question posted by patricialmcisaac on May 28th, 2013
Scanning A Colored Document
Trying to scan a colored document however it won't scan in color. Will scan in black even though the appropiate color functions are selected.
Current Answers
Answer #1: Posted by masetti880 on August 29th, 2013 1:29 PM
masetti880

Member since:
July 31st, 2013 Points: 66,310

Member since:
July 31st, 2013 Points: 66,310
There really isn't much you can do here. If you are going into 'scan settings' and choosing 'Full color text/photo' or 'Full color glossy photo' and getting a B&W scan then it is very likely you have an electronic issue. I'd would be asking you if you can make color copies because it could be the IP PCB or the CCD assembly. I'm assuming you are able to make color copies. If you are selecting 'Full Color' in the scan settings and your selection is staying highlighted then you might try changing to a different resolution or going into 'File name and type' and changing to tiff/jpeg just to see if that makes a difference. If you are using User Authentication then that could also cause that issue.
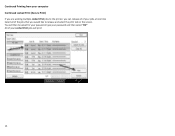
Related Ricoh Aficio MP C2551 Manual Pages
Quick Use Guide - Page 3
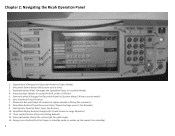
... button (Clears all setting default) 12. Scanner button (Changes the Operation Panel to Scanner Mode / Allows scan to Locked Print & Online / Off Line) 5. User Interface (Touch Screen) 7. Simplified display button (...Operation Panel to Start Copy, Fax & Scan) 10. Start button (Used to Copier Mode) 2. Document Server button (Not active at this time) 3. Chapter 2: Navigating the Ricoh ...
Quick Use Guide - Page 4

Chapter 3: Making a Copy
Copies can be made from two sources: The top feeder (place originals face up)
From the glass (place originals on the left side face down)
Select the Copy button to switch to Copy Mode.
OR
In Copy Mode, you have many options
4
Quick Use Guide - Page 5
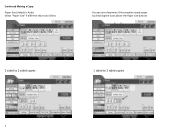
Continued Making a Copy:
Paper Size (default is Auto) Select "Paper Size" if different than Auto Select
You can also determine if the machine needs paper by checking the icons above the Paper size buttons
2 sided to 2 sided copies
1 sided to 2 sided copies
5
Quick Use Guide - Page 8
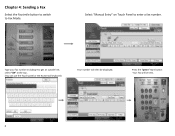
Chapter 4: Sending a Fax
Select the Facsimile button to switch to get an outside line, select "OK" at the top . (You can use the Touch panel or the Numerical keyboard)
Your number will be displayed. Press the "green" Start button Your Fax will then be Sent.
8
Type your fax number including 9 to Fax Mode.
Select "Manual Entry" on Touch Panel to enter a fax number.
Quick Use Guide - Page 9
Once you press the "red Stop" button, select the fax you would like to stop .
9 Select "OK" and your fax will stop and then select "Stop Transmission"
The display screen will confirm that this is what you need to cancel your transmission Select The " Stop" button. Continued: Sending a Fax
To Stop a Fax from being sent...
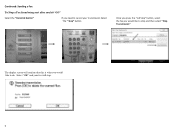
Quick Use Guide - Page 10
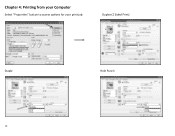
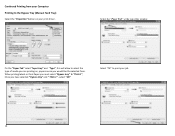
Chapter 4: Printing from your Computer
Select "Properties" button to access options for your print job. Duplex (2 Sided Print)
Staple
10
Hole Punch
Quick Use Guide - Page 11
Continued Printing from your Computer
Locked Print (Secure Print)
Select Locked Print in the drop down box as shown
Select the Details button to enter your user ID and Password
Enter your user ID and Password Enter your user name and password Select "OK"
You will then be taken back to print you locked document.
11 Select "OK" to your main properties page.
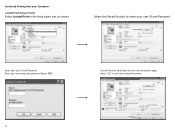
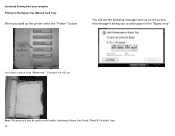
Quick Use Guide - Page 12
... up requesting your password, once you enter your password and hit "OK" your computer
Continued Locked Print (Secure Print)
Retrieving a Locked Print Job (Secure Print) select the Printer button located on the left sideof the Operation Panel.
On the Printer screen there is a tab called Print Jobs
Press the Locked Print...
Quick Use Guide - Page 13
...
13 Continued Printing from your computer Continued Locked Print (Secure Print)
If you can release all of your jobs at one time Select all of your password and then select "OK" All of the jobs that you would like to the printer, you are sending mulitple Locked Print jobs to release and...
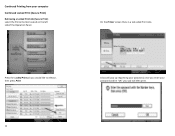
Quick Use Guide - Page 14
... the top of the window
On the "Paper Tab" select "Input tray" and "Type", this will allow to select the type of media you are printing on, paper source you have selected " Bypass tray" and " Thick 1" , select "OK"
Select "OK" to the Bypass Tray (Manual Feed Tray)
Select the "Properties" button on your job
14 Continued...
Quick Use Guide - Page 15
... the "Bypass tray" Your print job will see the following message come up on the screen, this message is asking you walk up the printer select the "Printer" button
You will start.
Quick Use Guide - Page 16
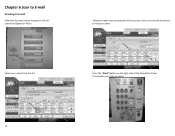
Select the letter that corresponds with your last name, next use the arrow key to find your name
Select your name from the list
Press the "Start" Button on the right side of the Operations Panel To complete your scan to E‐mail
Select the Scanner button located on the left sideof the Operation Panel. Chapter 6 Scan to E‐mail
Scanning to email.
16
Quick Use Guide - Page 17
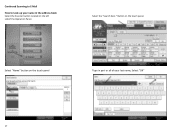
Select "Name" button on the touch panel
Type in part or all of your name in the address book
Select the Scanner button located on the touch panel. Button on the left sideof the Operation Panel. Select the "Search Dest." Continued Scanning to E‐Mail
How to Look up your last name, Select "OK"
17
Quick Use Guide - Page 18
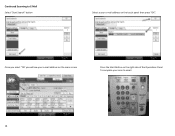
Once you select "OK' you will see your e‐mail address on the main screen
Press the Start Button on the right side of the Operations Panel To complete your e‐mail address on the touch panel then press "OK". Continued Scanning to E‐Mail
Select "Start Search" button
Select a your scan to email.
18
Quick Use Guide - Page 19
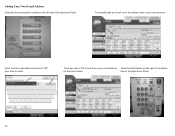
...' you will see your scan to email. side of the Operations Panel
19
To manually add an e‐mail not in the address book, select manual entry
Enter the full e‐mail address and press "OK" your e‐mail address Press the Start Button on the right To complete
on ...
Similar Questions

Aficio Mp C2051 Set Default Scan Settings To Scan Black And White
Aficio MP C2051how so i set default scan settings to scan black and white
Aficio MP C2051how so i set default scan settings to scan black and white
(Posted by myates16443 9 years ago)

Ricoh Aficio Mp C2551 How To Scan In Color Every Time
(Posted by bootasni 10 years ago)

How Can I Disable The Color Function?
How can I disable the color function?
How can I disable the color function?
(Posted by macauceo 11 years ago)

Can We Scan The Documents Directly To The Usb 3.0 Pen Drive?
My USB Pen drive is not getting recognised by the machine. Please explain what might be the problem?
My USB Pen drive is not getting recognised by the machine. Please explain what might be the problem?
(Posted by ramuiily 11 years ago)

How To Scan In Color On Ricoh Aficio Mp C2551
Please tell me how to scan a document in color on a Ricoh Aficio MP C2551. Thank you
Please tell me how to scan a document in color on a Ricoh Aficio MP C2551. Thank you
(Posted by mariastevens 12 years ago)