Get support for ProForm Gl35 Bike

ProForm Gl35 Bike Support Question

ProForm Gl35 Bike Support Question

Find answers below for this question about ProForm Gl35 Bike.
Need a ProForm Gl35 Bike manual? We have 1 online manual for this item!
Question posted by ppiotter on December 14th, 2023

How To Change The Battery

I need to change the batteries and don't know where they are

Current Answers

Answer #1: Posted by SonuKumar on December 14th, 2023 11:49 PM
This answer was accepted by the poster of the original question.
SonuKumar

Member since:
May 9th, 2021

Points: 16,598,000
1,100
points


Please respond to my effort to provide you with the best possible solution by using the "Acceptable Solution" and/or the "Helpful" buttons when the answer has proven to be helpful.

Regards,
Sonu
Your search handyman for all e-support needs!!

Answer #2: Posted by Technicalproblemsolver on December 15th, 2023 12:04 AM
Technicalproblemsolver

Member since:
September 25th, 2023

Points: 190,500
100
points
To change the battery of a ProForm GL35 Exercise Bike, you can follow these steps:

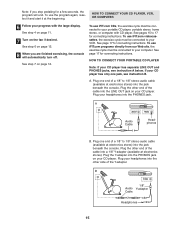
1. Locate the battery compartment: The battery compartment is typically located on the console of the exercise bike. It may be secured with a screw or a latch that requires simple tools like a screwdriver to open.

2. Remove the old battery: Once you have accessed the battery compartment, carefully remove the old battery by disconnecting the wires attached to it. Take note of the orientation of the battery and how it is connected, as you will need to replicate this when installing the new battery.

3. Choose the replacement battery: The ProForm GL35 Exercise Bike likely uses a standard battery type, such as AA or AAA batteries, but it's essential to verify the specific type and voltage required. You can refer to the user manual for this information or check the label inside the battery compartment.

4. Install the new battery: Insert the new battery into the compartment in the same orientation as the old battery. Reconnect the wires to the corresponding terminals on the new battery, ensuring a secure connection.

5. Close the battery compartment: If there is a latch or screw securing the battery compartment, fasten it securely to ensure the battery is properly enclosed and protected.

6. Test the bike: Once the new battery is installed, power on the exercise bike to verify that the console functions properly.

If the bike powers on and operates as expected, the battery replacement process is complete.


"Hi there,

I hope my response was helpful in addressing your question or concern. If you found it valuable, I kindly ask you to consider accepting my answer by clicking the designated button. Your support will not only acknowledge my efforts but also guide others in finding useful solutions. Thank you for your trust and I'm ready to assist you further if needed.

Best regards,
Technicalproblemsolver"

Related ProForm Gl35 Bike Manual Pages

English Manual - Page 1

... instructions in this manual before using this manual for future reference. USER'S MANUAL Patent Pending Visit our website at www.proform.com new products, prizes, fitness tips, and much more! Model No.
English Manual - Page 2

TABLE OF CONTENTS IMPORTANT PRECAUTIONS 3 BEFORE YOU BEGIN 4 ASSEMBLY 5 HOW TO OPERATE THE EXERCISE CYCLE 9 MAINTENANCE AND TROUBLESHOOTING 20 CONDITIONING GUIDELINES 21 PART LIST 22 EXPLODED DRAWING 23 HOW TO ORDER REPLACEMENT PARTS Back Cover LIMITED WARRANTY Back Cover PROFORM is a registered trademark of ICON IP, Inc. 2
English Manual - Page 3

... setting. 13. Apply the decal in this or any worn parts immediately. 14. do not arch your back straight when using the exercise cycle. 1. Use the exercise cycle only as an exercise aid in determining heart rate trends in this product. 3 Always keep your back. 12. do not wear loose clothing that all...
English Manual - Page 4

... Foot RIGHT SIDE 4 If you use the exercise cycle. Before reading further, please familiarize yourself with the parts that are labeled in the convenience and privacy of the most effective exercises for selecting the new PROFORM® GL35 exercise cycle. BEFORE YOU BEGIN Congratulations for increasing cardiovascular fitness, building endurance, and toning the entire body...
English Manual - Page 5

...screw- ASSEMBLY Assembly requires two persons. If a part is completed. Place all parts of the exercise cycle in the parts bag, check to identify the small parts used in assembly. Use the ...part drawings below each drawing refers to the quantity needed for assembly. The second number refers to the key number of the packing materials until ...
English Manual - Page 7

...10 49 7 51 74 74 66 13 64 16 66 66 13 6 36 Wire Harness 16 Batteries 7. Close the battery drawer and reattach the screw. Attach the Console (16) to the Left and Right Handlebars (50... (64), two M8 Nylon Locknuts (10), and an M8 x 14mm Button Screw (49). 5. Insert four batteries into the Frame (1), and then release the Knob. 4. Attach the Handlebar Bracket (15) to the Upright (13...
English Manual - Page 8

... the Seat Bracket (6) into one week, retighten the Pedals. Important: Tighten both Pedals as firmly as possible. Place a mat beneath the exercise cycle to loosen it is completed, some extra parts may be kept tight- Adjust the Right Pedal Strap (not shown) in the Seat ...6 28 10 5 25 42 Tab 24 10.Make sure that all parts are properly tightened before you use the exercise cycle. 8.
English Manual - Page 9

...into one of the holes in the seat post. Before Seat adjusting the seat, dismount the exercise cycle; Move the seat bracket forward and back- Then, turn the indicated knob counterclockwise two or... the height of the holes in the upright. Pedal Strap Tab 9 HOW TO OPERATE THE EXERCISE CYCLE HOW TO ADJUST THE SEAT POST HOW TO ADJUST THE UPRIGHT For effective exer- Then,...
English Manual - Page 10

... through every step of your workouts more information. Using a stereo audio cable (available at electronics stores), you can be changed with the touch of a button. Highenergy music provides added motivation. With the exercise cycle connected to your home stereo, portable stereo, computer, or VCR and play special iFIT.com CD and video...
English Manual - Page 11

Note: The console requires four 1.5V "D" batteries (see assembly step 6 on page 10 to the other every few seconds. There are pressed, ... button repeatedly until only the word DISTANCE, CALORIES, or FAT CALORIES appears in the small display. 3 Begin pedaling and change from one number to identify the On/Reset button.) 2 Select the manual mode. If you use the handgrip pulse sensor...
English Manual - Page 12

...button for about six seconds. Avoid moving your pulse is selected. If the pedals are finished exercising, the console will turn on the fan at low speed, press the fan button. To ...the fan button a second Fan Button Thumb Wheel time. To change the system of the console to pivot the fan to conserve the batteries. grips, peel off . For the most accurate heart rate reading...
English Manual - Page 13

... to each segment of the pedals and prompt you to increase or decrease your exercise program. To Arrows pedal at a pace that is a high-performance interval-training...pace until there is intended only to show exercise feedback. 4 Follow your pace until there is completed, the resistance of the pedals will automatically change your progress with the large display. To...
English Manual - Page 14

...to change the target heart rate, press the Enter button. buttons to enter your exercise program. If program 2 is selected, the letters PLS (pulse) will appear in memory until the batteries are... rate. 5 Begin pedaling to start the program, simply begin pedaling. Your actual pace may automatically change.) If program 2 is estimated by pressing the + and - To select a Heart Rate program,...
English Manual - Page 15

... PHONES LINE OUT LINE OUT PHONES Audio Cable Headphones B. To use iFIT.com videocassettes, the exercise cycle must be connected to 17 for a few seconds, the program will automatically turn off....17 for connecting instructions. To use iFIT.com programs directly from our Web site, the exercise cycle must be connected to 1/8" stereo audio cable (available at the beginning. See ...
English Manual - Page 18

.... Follow the steps below to use iFIT.com CDs or videocassettes, the exercise cycle must be selected. See HOW TO CONNECT YOUR CD PLAYER, VCR, OR COMPUTER on the console....properly connected and that the indicator near the button will light and the letters IF will be connected to change when a "chirp" is heard: • Make sure that it is fully plugged in the small display...
English Manual - Page 19

... COMPUTER on , the manual mode will be selected. Each time the console is about to change. 8 Follow your progress with the large display. When the on page 11. 9 Measure your...on page 11. 2 Select the iFIT.com mode. To use a program from our Web site, the exercise cycle must have an internet connection and an internet service provider. A list of specific system requirements will alert...
English Manual - Page 20

... one or both ends of front stabilizer are the result of the leveling feet under the front stabilizer until the exercise cycle can be used, make sure that both of low batteries. doing so may interfere with heart rate readings. • For the most console problems are touching the Leveling Foot floor...
English Manual - Page 21

...may affect the accuracy of heart rate readings. WARNING: Before beginning this or any exercise program, consult your muscles and will help to 10 minutes of time. The proper...plan three workouts each week, if desired. A cool-down, with 5 to prevent post-exercise problems. EXERCISE FREQUENCY To maintain or improve your age. This will increase the flexibility of your physician. ...
English Manual - Page 22

... x 12mm Round Head Screw Belt Motor Washer M8 x 22mm Button Screw User's Manual Allen Wrench Note: "#" indicates a non-illustrated part. Qty. Specifications are subject to change without notice. See the back cover of this manual for information about ordering replacement parts. 22 PFEX17932 R0604A Key No. EXPLODED DRAWING-Model No.
English Manual - Page 24

...state to state. Some states do not allow limitations on page 22) LIMITED WARRANTY ICON Health & Fitness, Inc. (ICON), warrants this product to be pre-authorized by or attributable to the original ... The MODEL NUMBER of the product (PFEX17932) • The NAME of the product (PROFORM® GL35 exercise cycle) • The SERIAL NUMBER of the product (see the PART LIST on how long an ...

Similar Questions

Gl35 Screen Won't Turn Off
Changed batteries and now screen won't turn off.
(Posted by grammyannie1960 9 months ago)
How Do You Change Batteries In Proform Sr 30 Exercise Bike?
how do you remove battery cover?
(Posted by csonnenblick 3 years ago)
985c Exercise Bike. Loss Of Resistance. Changed Batteries & Reset Reed Switch
What can I do next. Chevrons not showing on start up as described in manual.
(Posted by tonywhitehead37 9 years ago)
Diplay
new batteries but display will not power up. fan runs all the time the battery tray is installed
(Posted by bobmoff65 10 years ago)
Ask a New Question
Use the box below to post a new question about this ProForm product .
Points & Prizes
  • You can earn points for nearly everything you do on HelpOwl.com
  • You can trade in those points for gift cards at leading retailers such as Amazon.com and Walmart
  • It's that simple!
See How it Works
Create a Free Account

ProForm Manuals

Find free ProForm Gl35 Bike manuals and user guides available at ManualOwl.com. Try out our unique manual viewer allowing you to interact with manuals from directly within your browser!

ProForm Reviews

View thousands of ProForm user reviews and customer ratings available at ReviewOwl.com.

Contact Information

Complete ProForm customer service contact information including steps to reach representatives, hours of operation, customer support links and more from ContactHelp.com.

Scoreboard Ratings

See detailed ProForm customer service rankings, employee comments and much more from our sister site.