Get support for Maytag MMV5208WW

Maytag MMV5208WW Support Question

Maytag MMV5208WW Support Question

Find answers below for this question about Maytag MMV5208WW.
Need a Maytag MMV5208WW manual? We have 4 online manuals for this item!
Question posted by Mikeshannon48500 on September 26th, 2014

The Door No Longer Closes Correctly And Appears To Need To Be Tightened Or Adjus

How do I remove or take apart the door so that I can identify what is broken?

Current Answers

There are currently no answers that have been posted for this question.
Be the first to post an answer!

Remember that you can earn up to 1,100 points for every answer you submit. The better the quality of your answer, the better chance it has to be accepted.

Related Maytag MMV5208WW Manual Pages

Installation Instructions - Page 1

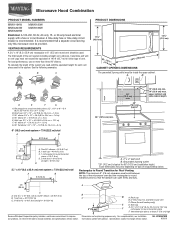
...appearance of Contents MICROWAVE HOOD COMBINATION SAFETY 1 INSTALLATION REQUIREMENTS 2 Tools and Parts 2 Remove Cardboard Template 2 Location Requirements 2 Product Dimensions 3 Electrical Requirements 3 INSTALLATION INSTRUCTIONS 4 Remove... Assembly 9 Install the Microwave Oven 9 Complete Installation 10 VENTING DESIGN SPECIFICATIONS 11 ASSISTANCE 12 Replacement Parts 12 Accessories ...
Installation Instructions - Page 2

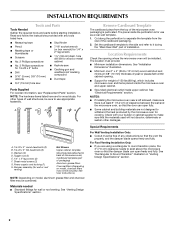
... (1) H. Remove Cardboard Template The cardboard piece from the rest of the microwave oven packaging is for cooking. Cut along the perforation to exist above the microwave oven so that the door can open ... Parts Tools Needed Gather the required tools and parts before starting installation. NOTE: The hardware items listed here are not designed to back of microwave oven) Cardboard template...
Installation Instructions - Page 3

... an extension cord. or 20-amp electrical supply with a grounding plug. The microwave oven is properly installed and grounded. The plug must be inside the upper cabinet. Consult... electrical shock. Do not remove ground prong. Recommended: ■ A time-delay fuse or time-delay circuit breaker. ■ A separate circuit serving only this microwave oven. SAVE THESE INSTRUCTIONS 3 ...
Installation Instructions - Page 4

... microwave oven. Tape the microwave oven door closed so that exhaust ports face the back of microwave oven, and lower blower motor back into the slots in the foam packaging, or it aside. 3. NOTE: To avoid damage to top of microwave oven. Blower motor 5. Remove screws attaching damper plate to the microwave oven, do not grip or use the door or door handle while the microwave oven...
Installation Instructions - Page 5

...If blower motor is not correctly oriented, the 2 screws removed in Step 3 cannot be reattached to back of microwave oven with 2 screws removed in Step 3 of the microwave oven (as shown), performance will be poor. Damper plate tabs D. Slots 8. A 6. Reattach damper plate. Reattach blower motor to the microwave oven. 7. Securely tighten screws. Repeat Step 1 from "Wall...
Installation Instructions - Page 6

... Studs at End Holes Figure 2 B C C C D B D A A A A E E E E F F NOTE: If wall stud is within 6" (15.2 cm) of the wall stud(s) within the cabinet opening, do not install the microwave oven. 1. Cabinet opening . Using a stud finder, locate the edges of the vertical centerline (see "Mark Rear Wall" section), only recirculation or roof venting installation can be...
Installation Instructions - Page 7

...down from the bottom edge of the opening. Drill Holes in "Locate Wall Stud(s)" section. 7 Remove the cardboard template and check the markings: Upper cabinet bottom 15³⁄₄" (40.0 cm)... screw, preferably 2. 1. If the end holes are ideal hole locations. 7. Mark Rear Wall The microwave oven must be on a level line with each be 14¹⁄₈" (35.9 cm) from ...
Installation Instructions - Page 8

...on the wall. 4. A C 6. Securely tighten all contents from the rear wall to use as guides. ■ If the wall behind the microwave oven (as at Both End Holes (Figure 4) ... "Drill Holes in Rear Wall" section. 7. Disconnect power to make sure toggle nuts have opened against drywall. Remove all lag screws and bolts. NOTES: ■ If the upper cabinet has a frame around it is level....
Installation Instructions - Page 9

... door handle while the microwave oven is metal, the supply cord bushing needs to the upper cabinet. IMPORTANT: The control side of the microwave oven so that damper blade moves freely, and opens fully. 2. 5. Back of the upper cabinet. 5. This hole is the heavy side. Check that the damper blade hinge is closed and taped shut. 3. Handle...
Installation Instructions - Page 10

...the circuit breaker. NOTE: If microwave oven does not need to be added. Vent B. ...microwave oven. Save Installation Instructions for future use an adapter. Repeat steps 3-6. 10. Tighten...longer or shorter than 3" (7.6 cm). Damper assembly (under the raised tabs of the microwave oven. Bolts For Roof Venting Installation Only 1. Raised tabs B. Sheet metal screw D. Do not remove...
Installation Instructions - Page 11

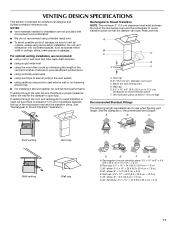
... = 7.6 m) D. 90° elbow: 6" = 10 ft (15.2 cm = 3 m) E. Vent extension piece, at least 3" (7.6 cm) of clearance between the top of the microwave oven and the transition piece. Wall cap: 3¹⁄₄" x 10" = 40 ft (8.3 x 25.4 cm = 12.2 m) F. 45° elbow: 6" = 5 ft (15.2... reference only. NOTES: ■ Vent materials needed for installation are for wall venting only) D.
Installation Instructions - Page 12

....4 cm) vent system = 73 ft (22.2 m) total A B 6 ft (1.8 m) 2 ft (0.6 m) C A. If you will need additional assistance, call us at our toll free number or visit our website listed in a 36" (91.4 cm) or 42" (106.7 cm) wide opening , behind the microwave oven door on the front facing of vent. Filler panels Filler Panel Kit Number...
Owners Manual - Page 1

... of the microwave oven opening, behind the door. See "GROUNDING...microwave oven. ■ Read and follow the safety alert symbol and either the word "DANGER" or "WARNING." Connect only to explode and should be killed or seriously injured if you still need your model and serial number located on your appliance. MICROWAVE HOOD COMBINATION USER INSTRUCTIONS THANK YOU for example, closed...
Owners Manual - Page 2

... or boiling when the container is removed from paper or plastic bags before and halfway through heating it has been damaged or dropped. ■ The microwave oven should not be boiling. Do not use . ■ Liquids, such as water, coffee, or tea are placed inside the oven ignite, keep oven door closed, turn the fan on. ■...
Owners Manual - Page 3

... Options or Setup control to the microwave oven, always remove rack after replacing and/or cleaning the filters. or P.M. Demo Mode Activate to whether the microwave oven is properly grounded. Features Cooking Rack Glide Tray Use the rectangular cooking rack only for about 3 seconds until 2 tones sound and padlock icon appears in a risk of -function signals...
Owners Manual - Page 4

...Microwave Oven Care General Cleaning IMPORTANT: Before cleaning, make sure all non-sensor cycles will be the same as in food poisoning or sickness. Dishwasher cleaning is time to soil buildup, keep cavity, microwave inlet cover, cooking rack supports, and area where the door touches the frame clean. Remove... on some models) appears in the microwave oven detects moisture released from...
Owners Manual - Page 5

...microwave oven. If a message about the door appears in the microwave oven Check the following: ■ Soil buildup Soil buildup on during microwave oven operation to heat 1 cup (250 mL) of the door, remove it out. Reset the clock. ■ A letter followed by a number is replaceable. The microwave oven... of the microwave oven, and is replaceable. Open and close door. Make sure...
Owners Manual - Page 6

... ®Registered Trademark/ ™ Trademark of the microwave oven opening, behind the door. LABOR NOT INCLUDED) In the second through tenth years...or removed from your major appliance. SECOND THROUGH TENTH YEAR LIMITED WARRANTY (MAGNETRON ONLY - Service calls to correct the ..., so this major appliance was purchased. If you need assistance using your major appliance, to published user or...
Dimension Guide - Page 1

...= 7.6 m) D. 90° elbow: 6" = 10 ft (15.2 cm = 3 m) E. Exact dimensions may vary depending on type of the microwave oven and the rectangular to Round Transition for Roof Venting NOTE: The minimum 3" (7.6 cm) clearance must exist between the top of range/cooktop below. Instructions... either type of the system you need, add the equivalent length for planning purposes only.
Warranty Information - Page 1

...microwave oven opening, behind the door. This limited warranty is valid in the United States or Canada and applies only when the major appliance is used in the country in which it was purchased. Service calls to correct...this limitation may not apply to the Internet and you need further assistance, you . The removal and reinstallation of incidental or consequential damages, so these ...

Maytag Knowledge Base Results

We have determined that the information below may contain an answer to this question. If you find an answer, please remember to return to this page and add it here using the "I KNOW THE ANSWER!" button above. It's that easy to earn points!

  • Door opens in the wrong direction - Top freezer
    ... - Reinstall top hinge cover. Top freezer Why does my door swing open /close correctly - Door opens in handle first. Do not depend on the opposite side of the door, the refrigerator is reversed. Door reversals are not covered under warranty or a protection agreement. If assistance is needed, call customer service. If a service technician is...
  • Doors do not open/close correctly - Top freezer
    ... interruption Doors do not open correctly? Remove the base grille. The two leveling screws are part of the front roller assemblies which are at the desired speed. If the door closes too fast, lower the front of the refrigerator slightly higher than the back will allow the doors to close more to make sure they close correctly -
  • Removing and replacing the ice storage bin in the door - side by side refrigerator (select models)
    ... storage bin with both hands and press the release button to crush ice. If the ice bin appears to be stuck or is difficult to remove: Close the freezer door and check if the dispenser is removed.                 ...

Similar Questions

Need To Replace Microwave. It Is Part Of A Built In Wall Oven.
The microwave is part of a wall oven. It was installed in 2006. I need to replace the microwave and ...
(Posted by donnahenning 7 years ago)
Maytag Mmv4205bab - Microwave Keeps Running After The Door Is Closed.
Maytag MMV4205BAB Microwave keeps running after the door is closed. Is this something that can be fi...
(Posted by frankmetro2 8 years ago)
How To Attach Microwave Oven Door
How does one attach oven door
(Posted by RichaMry 11 years ago)
Ask a New Question
Use the box below to post a new question about this Maytag product .
Points & Prizes
  • You can earn points for nearly everything you do on HelpOwl.com
  • You can trade in those points for gift cards at leading retailers such as Amazon.com and Walmart
  • It's that simple!
See How it Works
Create a Free Account

Maytag Manuals

Find free Maytag MMV5208WW manuals and user guides available at ManualOwl.com. Try out our unique manual viewer allowing you to interact with manuals from directly within your browser!

Maytag Reviews

View thousands of Maytag user reviews and customer ratings available at ReviewOwl.com.

Contact Information

Complete Maytag customer service contact information including steps to reach representatives, hours of operation, customer support links and more from ContactHelp.com.

Scoreboard Ratings

See detailed Maytag customer service rankings, employee comments and much more from our sister site.

Maytag Recalls

Find comprehensive Maytag recall information updated hourly on RecallOwl.com.