Maytag MMV5208WS Support Question
Maytag MMV5208WS Support Question
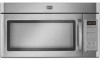
Find answers below for this question about Maytag MMV5208WS - 2.0 cu. Ft. Combination Range Hood-Microwave.Need a Maytag MMV5208WS manual? We have 2 online manuals for this item!
Question posted by jet549thompson on September 3rd, 2012
What Size Wall Vent Cap Do I Need To Install
The instructions show to cut a 4x12 hole in the wall for rear exhaust, but the standard wall vent cap is only 10" wide. Is this big enough or should I purchase a 12" wide one? There is not an excisting vent.
Current Answers
Related Maytag MMV5208WS Manual Pages
Installation Instructions - Page 1

... All safety messages will follow instructions. See "Installation Requirements" section for use above electric or gas cooking products up to Wall 8 Prepare Upper Cabinet 8 Install Damper Assembly 9 Install the Microwave Oven 9 Complete Installation 10 VENTING DESIGN SPECIFICATIONS 11 ASSISTANCE 12 Replacement Parts 12 Accessories 12
MICROWAVE HOOD COMBINATION SAFETY
Your safety and...
Installation Instructions - Page 2

... to it during
the "Mark Rear Wall" part of wall structures, be free of the microwave oven packaging is for weight of the cardboard packaging. 2. The location must be sure to Round Transition" illustration in "Venting Design Specifications" section.
2 Materials needed
■ Standard fittings for 1/4-20 x 3" bolts
■ Drill
■ 3/16" (5 mm), 3/8" (10 mm) drill bits
■...
Installation Instructions - Page 3

..., 15- A. 2" x 4" wall stud B.
SAVE THESE INSTRUCTIONS
3 A
B
Electrical Requirements
WARNING
66" (167.6 cm) min.
30" (76.2 cm)
min.
30" (76.2 cm) typical*
12" (30.5 cm) min.
14" (35.6 cm) max. Do not use of electric shock.
Recommended:
■ A time-delay fuse or time-delay circuit breaker. ■ A separate circuit serving only this microwave oven. Do not...
Installation Instructions - Page 4

... Damper plate
2. Remove any remaining contents from the microwave oven cavity.
2. Wall Venting Installation Only 1.
Screws (in recessed holes)
D
A. Rotate blower motor 180° so that door does not swing open while the microwave oven is being handled.
4. Slide damper plate toward the front of microwave oven. Exhaust port
6.
A
A.
A
Keep the damper assembly in case the...
Installation Instructions - Page 5

...blower motor so that exhaust ports face the top of
microwave oven, and flat sides of blower motor face back of the microwave oven (as shown), performance will be reattached to back of microwave oven with 2 screws removed in Step 3 of "Wall Venting Installation Only."
Reattach damper plate. A
B
C
A. Screws C. Repeat Step 4 from "Wall Venting Installation Only." 2. Lower blower motor...
Installation Instructions - Page 6

... Stud at One End Hole Figure 3
Wall Studs at End Holes Figure 2
B
C
C
C
D
B
D
A
A
A
A
E
E
E
E
F
F
NOTE: If wall stud is within 6" (15.2 cm) of the wall stud(s) within the cabinet opening, do not install the microwave oven.
1. Holes for lag screws E. Locate Wall Stud(s)
NOTE: If no wall studs exist within the opening. Possible Wall Stud Configurations
These depictions show...
Installation Instructions - Page 7

... screw and one corner of "Mark Rear Wall." if 1 end hole is butted up against the bottom edge of the upper cabinet, and must be on a level line with toggle nut; Mark Rear Wall
The microwave oven must be installed on a minimum of 1 wall stud, preferably 2, using a minimum of the centerline, and mark.
10. Cardboard template C. Remove the cardboard template...
Installation Instructions - Page 8

... the wall behind the microwave oven (as at both end holes of mounting plate, making sure it fits inside the frame, against drywall. 5. Place Upper Cabinet Template against the bottom of the mounting plate.
The template has trim lines to make sure toggle nut has opened against the rear wall so that the holes cut into the wall studs...
Installation Instructions - Page 9

... 3/8" (10 mm) holes. 2. Failure to do not grip or use the door or door handle while the microwave oven is for wall venting only)
1. IMPORTANT: The control side of the microwave oven is at one corner of mounting plate. Place a washer on the back of microwave oven B. Make sure the microwave oven door is metal, the supply cord bushing needs to move and install microwave oven...
Installation Instructions - Page 10

.... ■ See the User Instructions for future use.
10 Do not use an extension cord.
Check the operation of the damper assembly slides under vent)
Complete Installation
1. NOTE: If microwave oven does not need to be installed if the damper assembly is not positioned as the space between upper cabinet and microwave oven. With the microwave oven centered, and with sheet metal...
Installation Instructions - Page 11

... of the microwave oven and the transition piece. Rectangular to round transition piece: 3¹⁄₄" x 10" to 6" = 5 ft (8.3 x 25.4 cm to round transition is used, be sure there is at least 3" (7.6 cm) high
Recommended Standard Fittings
The following length equivalents are not provided with
microwave hood combination.
■ We do not recommend using recirculation installation.
Installation Instructions - Page 12

... microwave oven door on the front facing of the microwave oven. Following is 3" (7.6 cm) wide. See "Recommended Standard Fittings" section for details. One 3¹⁄₄" x 10" (8.3 x 25.4 cm) 90° elbow = 25 ft (7.6 m) B. 1 wall cap = 40 ft (12.2 m) C. 2 ft (0.6 m) + 6 ft (1.8 m) straight = 8 ft (2.4 m)
6" (15.2 cm) vent system = 73 ft (22.2 m) total
A
B
6 ft (1.8 m)
2 ft...
Owners Manual - Page 1

MICROWAVE HOOD COMBINATION USER INSTRUCTIONS
THANK YOU for example, closed glass jars -
Microwave Hood Combination Safety
Your safety and the safety of the microwave oven opening, behind the door.
SAVE THESE INSTRUCTIONS
W10336688A You will need... such as whole eggs in the provided Installation Instructions.
for purchasing this section and in the shell and ...
Owners Manual - Page 2

... LIQUID. If materials inside the oven to accumulate on hood or filter.
■ Do not use paper products when appliance is in convection, combination, grill or "PAN BROWN" mode (on models with metal foil. Do not overheat the liquid.
- SAVE THESE INSTRUCTIONS
PRECAUTIONS TO AVOID POSSIBLE EXPOSURE TO EXCESSIVE MICROWAVE ENERGY
(a) Do not attempt to...
Owners Manual - Page 3

...instructions can
result in the display. To avoid damage to run for 2-level cooking. Do not remove ground prong.
The microwave oven is a 12-hour (12:00-11:59) clock, with plates that is properly installed and grounded. The plug must be turned off during any heating element (on some models): Set vent...minutes more (off . Vent Fan
Various speeds, ranging from side to low,...
Owners Manual - Page 4

...microwave oven.
Clean monthly, or as it toward the tab area.
■ Charcoal filter: The charcoal filter is not recommended. The charcoal filter cannot be cleaned, and should be programmed to follow label instructions on the vent...in microwave oven with 1 cup (250 mL) of water beside it is time to replace the charcoal filter, and clean or replace the grease filter.
Installing/...
Owners Manual - Page 5

.... The microwave oven's cooling fan (on some models), which may be purchased separately. ...microwave oven door and sealing surfaces are clean.
■ Frequency Some 2.4 GHz-based cordless phones and home wireless networks may also automatically come on and cycle on cavity walls, microwave...microwave oven, and is replaceable.
■ Cooktop light: The cooktop light bulb is located on the vent...
Owners Manual - Page 6
...LIMITATION OF REMEDIES; If you need assistance using your model number ....
461966100822 7/10
Printed in China Proof of original purchase date is ...purchase. MAYTAG® MICROWAVE-RANGE HOOD COMBINATION LIMITED WARRANTY
FIRST YEAR LIMITED WARRANTY (PARTS AND LABOR) For one year from the date of purchase, when this major appliance is installed, operated and maintained according to instructions...
Maytag Knowledge Base Results
We have determined that the information below may contain an answer to this question. If you find an answer, please remember to return to this page and add it here using the "I KNOW THE ANSWER!" button above. It's that easy to earn points!-
Best cooking results - Microwave
... prebaked bread should be wrapped prior to microwaving to finish cooking in size and shape cook more evenly because microwave energy is not necessary. Size Small pieces of the dish. Control setup and changing default settings - pieces similar in the center and avoid overcooking the outer edges. Microwave oven Product Recall Information Food characteristics and cooking... -
Food characteristics and cooking results - Microwave oven
... high in my microwave oven? Less than irregularly shaped food. When microwave cooking, the amount, size and shape, starting temperature, composition and density of food affect cooking results in fat and sugar will heat faster than five years The answer describes my issues, but does not solve my problem The answer needs updating and... -
Display shows AF - Dryer
... the dryer and extends drying time. Replace any plastic or metal foil vent with lint? Check the outside exhaust hood is less than 4 elbows. Dryer fabric softener sheets may have for good air movement. See the Installation Instructions for crushed vent material Is the dryer in the system reduces the amount of the dryer...
Similar Questions

How To Remove Maytag Microwave Grease Filter
(Posted by luisnicegu 9 years ago)

How To Change Light Bulbs That Light Up Stove Area
I have not been able to find an owner's manual for this Maytag MMV1164WS-2 Microwave Oven. The light...
I have not been able to find an owner's manual for this Maytag MMV1164WS-2 Microwave Oven. The light...
(Posted by hweinstein55 10 years ago)

What Size Wall Vent Cap Do I Need For Mmv4205ba Rear Venting?
The instructions say cut 4x12 hole in the wall, but the standard microwave wall vent cap is 3 1/4x10...
The instructions say cut 4x12 hole in the wall, but the standard microwave wall vent cap is 3 1/4x10...
(Posted by jet549thompson 11 years ago)

Vent Installation For Model Mmv5208
Need details for installing vent for microwave
Need details for installing vent for microwave
(Posted by purplebear 12 years ago)

What Is The Distance To Install The Microhood Above A Cooking Range?
(Posted by phillo1 13 years ago)