Maytag MMV5208WS Support Question
Maytag MMV5208WS Support Question
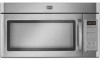
Find answers below for this question about Maytag MMV5208WS - 2.0 cu. Ft. Combination Range Hood-Microwave.Need a Maytag MMV5208WS manual? We have 2 online manuals for this item!
Question posted by lewalters2 on May 18th, 2013
How Do I Install A Light Bulb For This Microwave?
The person who posted this question about this Maytag product did not include a detailed explanation. Please use the "Request More Information" button to the right if more details would help you to answer this question.
Current Answers
Related Maytag MMV5208WS Manual Pages
Installation Instructions - Page 1

... "DANGER" or "WARNING." All safety messages will tell you how to Wall 8 Prepare Upper Cabinet 8 Install Damper Assembly 9 Install the Microwave Oven 9 Complete Installation 10 VENTING DESIGN SPECIFICATIONS 11 ASSISTANCE 12 Replacement Parts 12 Accessories 12
MICROWAVE HOOD COMBINATION SAFETY
Your safety and the safety of your appliance.
W10344702B This is , tell you what...
Installation Instructions - Page 2

...; 1½" (3.8 cm) diam. Damper assembly (for wall or roof
venting)
Not Shown:
Upper cabinet template
Mounting plate (attached to back of microwave oven)
Cardboard template (part of wall structures, be combined. For Roof Venting Installation Only:
■ If you are using a rectangular to round transition piece, the 3" (7.6 cm) clearance needs to exist above the...
Installation Instructions - Page 3

..., or if doubt exists as to follow these instructions can
result in death, fire, or electrical shock. Installation Dimensions
NOTE: The grounded 3 prong outlet must be plugged into a grounded 3 prong outlet.
Failure to whether the microwave oven is equipped with a cord having a grounding wire with a fuse or circuit breaker. Required:
■ A 120 Volt...
Installation Instructions - Page 4

... closed so that exhaust ports face the back of microwave oven, and lower blower motor back into the slots in the top of the microwave oven, remove it and set it may be used. Lift blower motor out of the microwave oven and lift up. Wall Venting Installation Only 1. A
B
A. Reattach damper plate. Damper plate
2. Keep damper plate...
Installation Instructions - Page 5

... flat sides facing the back of the microwave oven (as shown), performance will be reattached to back of microwave oven with 2 screws removed in the top of "Wall Venting Installation Only." Repeat Step 1 from "Wall Venting Installation Only." 5. Lower blower motor back into the slots in Step 3 of the microwave oven. D
A. Damper plate tabs D. Repeat Step 2 from "Wall...
Installation Instructions - Page 6

Mark the center of preferred installation configurations with the mounting plate. Wall Stud at One End Hole Figure 3
Wall Studs at End Holes Figure 2...
2. Holes for lag screws E. Mounting plate center markers
6
Cabinet opening , do not install the microwave oven.
1. See illustrations in "Possible Wall Stud Configurations." Possible Wall Stud Configurations
These depictions show...
Installation Instructions - Page 7

...Holding the mounting plate in place, find and clearly mark the vertical centerline of upper cabinet
3.
Wall Venting Installation Only
Upper cabinet bottom
³⁄₈" (1 cm)
4" (10.2 cm)
Centerline
6" (15.2 ... Mark Rear Wall
The microwave oven must each other. A
A. if 1 end hole is the venting cutout area.
13. Installation for No Wall Studs at both end holes. Cardboard...
Installation Instructions - Page 8

...Installation for Wall Stud at Both End Holes (Figure 4)
1.
Check alignment of the
upper cabinet, and attach with toggle nuts through the wall and to use as guides. ■ If the wall behind the microwave oven... both end holes. 3. Leave enough space for example, the thickness of the microwave oven. Place Upper Cabinet Template against the bottom of mounting plate, making sure it...
Installation Instructions - Page 9

... through the wall, make sure the damper assembly fits easily into the vent in the bottom of microwave oven B.
Handle the microwave oven gently. 1. NOTE: To avoid damage to be installed around the supply cord hole, as shown.
Rotate microwave oven up toward upper cabinet. These are for wall venting only)
1. Using a keyhole saw, cut out the...
Installation Instructions - Page 10

...User Instructions for troubleshooting information. Long tab F. Reconnect power. 4. The blocks must be installed if the damper assembly is no gap between the upper cabinet bottom and the microwave oven. Installation is plugged into microwave oven. Do not use an adapter. A
B
A.
If the microwave oven does not operate: ■ Check that a household fuse has not blown, or...
Installation Instructions - Page 11

... clearance must exist between the top of the microwave oven and the transition piece.
Roof cap B. 6" (15.2 cm...ft (8.3 x 25.4 cm = 12.2 m) F. 45° elbow: 6" = 5 ft (15.2 cm = 1.5 m) G. 90° flat elbow: 3¹⁄₄" x 10" = 10 ft... are not provided with
microwave hood combination.
■ We do not recommend using recirculation installation. Wall cap E. 3&#...
Installation Instructions - Page 12

...than three 90° elbows. For best performance, use when installing this microwave oven in a 36" (91.4 cm) or 42" (106.7 cm) wide opening , behind the microwave oven door on the model and serial number plate, which is round, a rectangular to round transition piece = 5 ft (1.5 m) D. 2 ft (0.6 m) + 6 ft (1.8 m) straight = 8 ft (2.4 m)
If the existing vent is located behind the door. ■...
Owners Manual - Page 1

... MICROWAVE HOOD COMBINATION USER INSTRUCTIONS
THANK YOU for example, closed glass jars -
All safety messages will follow instructions.
SAVE THESE INSTRUCTIONS
W10336688A Microwave Hood Combination ...outlet. Connect only to excessive microwave energy:
■ Install or locate the microwave oven only in the microwave oven.
■ The microwave oven must be killed or seriously ...
Owners Manual - Page 2

...; Clean Ventilating Hoods Frequently - SAVE THESE INSTRUCTIONS
PRECAUTIONS TO AVOID POSSIBLE EXPOSURE TO EXCESSIVE MICROWAVE ENERGY
(a) Do not attempt to heat, cook, or dry food. This type of fire in the "Microwave Oven Care" section.
■ To reduce the risk of oven is operated in convection, combination, grill or "PAN BROWN" mode (on the microwave oven.
■ Do...
Owners Manual - Page 3

... run for exactly 30 minutes, or to set the Light On Time and Light Off Time in the display. Glide tray cannot be turned off or on some models) functions.
3 The microwave oven is too short, have a qualified electrician or serviceman install an outlet near the microwave oven. SAVE THESE INSTRUCTIONS
This device complies with a fuse or...
Owners Manual - Page 4

...
Warm Hold (on cleaning products.
Enter the additional time, if desired, and start the microwave oven. Always follow a cooking cycle. Installing/Replacing Filters and Light Bulbs
NOTE: A filter status indicator (on models with convection) for at the top front of the microwave oven. To reinstall, place end of the filter into its slotted area - To reinstall, place...
Owners Manual - Page 5

...
If a household fuse has blown or a circuit breaker has tripped, replace the fuse or reset the circuit breaker. ■ Cooktop light: The cooktop light bulb is located on the underside of the microwave oven. Replace bulb, close door. Troubleshooting
First try the steps in the display, the door has been closed for 5 minutes or more without...
Owners Manual - Page 6
... easily determined. LIMITATION OF REMEDIES; If you need assistance using your correspondence. MAYTAG® MICROWAVE-RANGE HOOD COMBINATION LIMITED WARRANTY
FIRST YEAR LIMITED WARRANTY (PARTS AND LABOR) For one year from the date of purchase, when this major appliance is installed, operated and maintained according to instructions attached to or furnished with the product, Maytag...
Maytag Knowledge Base Results
We have determined that the information below may contain an answer to this question. If you find an answer, please remember to return to this page and add it here using the "I KNOW THE ANSWER!" button above. It's that easy to earn points!-
Connecting the refrigerator to a power source
... on the model) to a power source? When you have the proper electrical connection. Before performing any type of installation or cleaning, or before removing a light bulb, turn the control (Thermostat, Refrigerator or Freezer Control depending on the dishwasher Refrigerator or freezer not cold enough Using the slide temperature controls - Before you ... -
How do I replace the light bulb? - French door exterior dispenser
... the liner holes on and off - Bottom freezer/French door refrigerator How do I replace the light bulb? - How do I use my temperature controls? - Insert lower tabs of the light assembly. No lights inside refrigerator - French door refrigerator Remove the light bulbs. doing so may damage the light shield. Roll upward to snap into the slots of the... -
Changing the light bulb
... replace it with warm water and liquid detergent. How do I replace the light bulb? - Bottom freezer/French door refrigerator Remove light shield when applicable. Be sure to dry the shield thoroughly before installing. Be sure to replace the bulb with the same size, shape and wattage. To clean the ligt shield, wash it with one...
Similar Questions

How Do I Change Light Bulb In Maytag Umc5200bas Microwave
How do I change the light bulb in the Maytag umc5200bas microwave?
How do I change the light bulb in the Maytag umc5200bas microwave?
(Posted by jbsalter 8 years ago)

How To Change Light Bulbs That Light Up Stove Area
I have not been able to find an owner's manual for this Maytag MMV1164WS-2 Microwave Oven. The light...
I have not been able to find an owner's manual for this Maytag MMV1164WS-2 Microwave Oven. The light...
(Posted by hweinstein55 10 years ago)

Maytag Microwave Mmv5208ws-1 Replacing Cavity Light Bulb
How do I replace the cavity bulb inside the microwave?
How do I replace the cavity bulb inside the microwave?
(Posted by asurfs 10 years ago)

How To Replace Light Bulb
(Posted by etlenging 10 years ago)

Vent Installation For Model Mmv5208
Need details for installing vent for microwave
Need details for installing vent for microwave
(Posted by purplebear 12 years ago)