
Maytag MEW9630DS Support Question
Maytag MEW9630DS Support Question
Find answers below for this question about Maytag MEW9630DS.Need a Maytag MEW9630DS manual? We have 4 online manuals for this item!
Question posted by rphuskin on November 23rd, 2014
Where Can I Find The Serial Number?
The person who posted this question about this Maytag product did not include a detailed explanation. Please use the "Request More Information" button to the right if more details would help you to answer this question.
Current Answers
Answer #1: Posted by bengirlxD on November 23rd, 2014 10:57 AM
bengirlxD

Member since:
November 5th, 2012 Points: 6,395,085

Member since:
November 5th, 2012 Points: 6,395,085
Follow the instructions here to locate the serial number:
http://www.ehow.com/how_6139232_locate-number-maytag-gas-oven.html
Feel free to resubmit the question if you didn't find it useful.

Related Maytag MEW9630DS Manual Pages
Installation Guide - Page 1
...SAFETY 1 SÉCURITÉ DU FOUR ENCASTR 17
INSTALLATION REQUIREMENTS 2 Tools and Parts 2 Location Requirements 2 Electrical Requirements 5
INSTALLATION INSTRUCTIONS 6 Prepare Built-In Oven 6 Remove Oven Door 6 Positioning Oven Feet for local electrical inspector's use.
All safety messages will follow the safety alert symbol and either the word "DANGER" or "WARNING." IMPORTANT...
Installation Guide - Page 2

... to your cabinets, check with bottom of cabinet cutout.
■ Floor must be able to support a single oven weight of 129 lbs (59 kg) for 27" (68.6 cm) models or 154 lbs (70 kg)....2 cm) models. bottom vent trim ■ Four #8-18 x ³⁄₈" screws - single ovens (2), double ovens (4)* ■ Foam strip - NOTE: For undercounter installation, it is installed in the adjacent right or ...
Installation Guide - Page 3
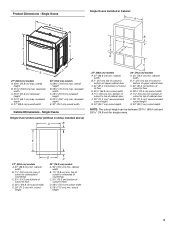
....2 cm)* recommended cutout height
G. 24" (60.7 cm) cutout depth
NOTE: The cutout height can be between 26 68.4 cm) and 29 74.8 cm) for single ovens. top of cutout to floor
D. 28¹⁄₂" (72.4 cm) cutout width
E. 28" (71.2 cm) min. overall height
B. 25 64.6 cm) max. recessed depth...
Installation Guide - Page 4
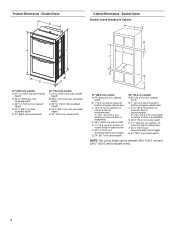
... cutout height can be between 48⁷⁄₈" (124.1 cm) and 52 132.6 cm) for double ovens.
4
overall height
B. 28½" (72.4 cm) max. recessed depth
E. 27" (68.6 cm)... D. 28¹⁄₂" (72.4 cm) cutout width
E. 1¹⁄₂" (3.8 cm) min. Double Ovens B
Cabinet Dimensions - overall height
B. 25 64.6 cm) max. recessed width
C. 48 124.0 cm) recessed height...
Installation Guide - Page 5

..., and all local codes and ordinances.
1.
Check with a qualified electrical installer if you will be connected to the following table.
Model/serial number plate A. Model/serial number plate
■ Models rated from the oven should be connected to the ends of the line.
■ Do not cut the conduit.
Models rated at 4.8 kW and below...
Installation Guide - Page 6
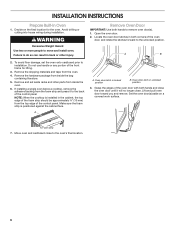
... you and remove.
Decide on a covered work surface. Do not use handle or any portion of the control panel. Remove Oven Door
IMPORTANT: Use both hands to move and install oven. INSTALLATION INSTRUCTIONS
Prepare Built-In Oven
1. A
A. Remove the shipping materials and tape from the top edge of the front frame for the...
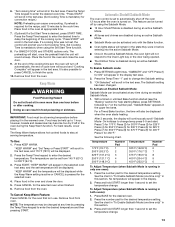
Installation Guide - Page 7
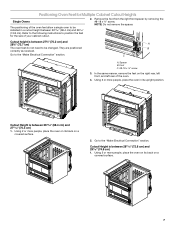
...27⁵⁄₈" (70.2 cm) and 28⁵⁄₈" (72.7 cm) The oven feet do not need to be changed.
Remove the foot from the right front spacer by removing ... the following instructions to position the feet for Multiple Cabinet Cutout Heights
Single Ovens
The positioning of the oven feet allow a single oven to be installed in its upright position. Go to the "Make Electrical ...
Installation Guide - Page 8
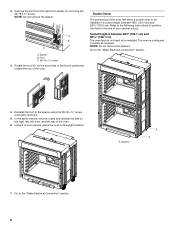
...) and 52 132.6 cm). In the same manner, remove, rotate and reinstall the feet on the right rear, left front, and left rear of the oven. A. Spacers
A A
7.
Remove the foot from the right front spacer by removing the #8-18 x ³⁄₈" screw. Rotate the foot 90° so the short...
Installation Guide - Page 9
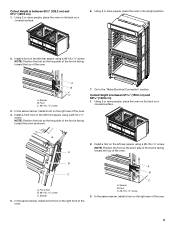
...spacer using a #8-18 x ³⁄₈" screw. Install a foot on the right rear of the oven.
9 A
B
C
A. In the same manner, install a foot on the left front spacer using ...screw C.
Foot C. #8-18 x ³⁄₈" screw
3. Install a foot on the right rear of the oven. 4. Spacer B. Go to the "Make Electrical Connection" section. In the same manner, install a front foot on...
Installation Guide - Page 10
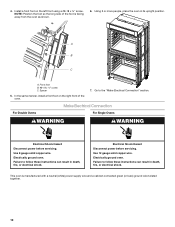
...) power supply wire and a cabinet-connected green (or bare) ground wire twisted together.
10 NOTE: Position the foot so the long side of the oven.
7. Electrically ground oven. Failure to the "Make Electrical Connection" section. Electrical Shock Hazard Disconnect power before servicing. Use 12 gauge solid copper wire. Using 2 or more people...
Installation Guide - Page 11
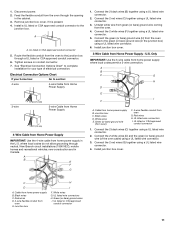
...wires (F) together using a UL listed wire connector.
2. Only
IMPORTANT: Use the 3-wire cable from
oven E. UL listed or CSA approved conduit connector
1. Connect the 2 red wires (G) together using a UL...wire connector.
3. Junction box C. Connect the green (or bare) ground wire (H) from the oven.
4. UL listed wire connectors
I . UL listed wire connectors H. Tighten screws on conduit ...
Use & Care Guide - Page 4
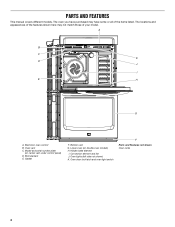
... some or all of your model. Broil element E. Lower oven (on center vent under control panel) D. Oven door lock latch and oven light switch
F
Parts and Features not shown Oven racks
4 Model and serial number plate
(on double oven models) H. Hidden bake element
I
E
H
G
A. Oven vent C. Gasket
F. A
B
C K
D J
I . Bottom vent G. Oven lights (left side not shown) K. The...
Use & Care Guide - Page 7
...the "1" number keypad to change the 12-hour auto off Demo Mode: 1. "OFF Selected" will appear in the display text area. 2.
Oven Temperature Control
The oven provides accurate ...(-12°C)
...moderately less
-30°F (-18°C)
...much less
To Adjust Oven Temperature Calibration: For Single Ovens:
1. Press START to Star-K Jewish Sabbath requirements. "Enter Offset: Press 1 to ...
Use & Care Guide - Page 8
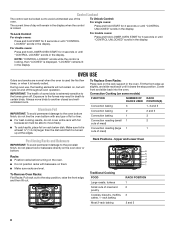
.... To Remove Oven Racks: Flat Racks: Pull rack out to the stop position. Upper and Lower Oven
6 5 4 3 2 1
Traditional Cooking FOOD
Large roasts, turkeys
Small cuts of some models)
FUNCTION
NUMBER OF RACK RACKS...control is locking, then "LOCKED" is extremely sensitive to the fumes given off throughout oven operation.
"LOCKED" remains lit in the display. Always move freely.
■ To...
Use & Care Guide - Page 13
... Bake), press SETTINGS followed by using the Set Start Time function.
8. Press the number pad for convection recipe.) NOTE: Preheating can be turned off the oven 12 hours after cooking. "Set cooking time" will appear in the oven and close the oven door.
9. With a timed or untimed Bake function started (see the "Baking" section...
Use & Care Guide - Page 16
... avoid the cost of the crust and/or reduce baking temperature.
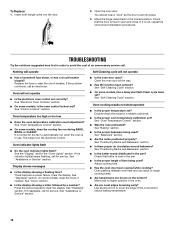
16 Oven peeking releases oven heat and can result in use. Move the hinge levers back to ...oven door been opened while cooking? Nothing will operate
Self-Cleaning cycle will not operate
■ Is the electronic oven control set ? Open the oven door. See "Clock" section.
■ Is the display showing a letter followed by a number...
Use & Care Guide - Page 17
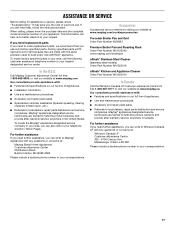
... in your area, call .
affresh® Kitchen and Appliance Cleaner Order Part Number W10355010
In Canada
Call the Whirlpool Canada LP Customer eXperience Centre toll free 1-800...please know the purchase date and the complete model and serial number of a service call the following customer assistance telephone number or your telephone directory Yellow Pages. Accessories
Accessories can ...
Use & Care Guide - Page 18

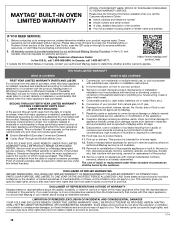
MAYTAG® BUILT-IN OVEN LIMITED WARRANTY
ATTACH YOUR RECEIPT HERE. Before contacting us to arrange service,... or replacement under this major appliance, you call the Customer eXperience Center:
■ Name, address and telephone number ■ Model number and serial number ■ A clear, detailed description of the problem ■ Proof of original consumer purchase. Food loss due...
Dimension Guide - Page 1
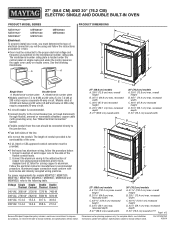
... length of conduit provided is recommended. recessed depth
E. 27" (68.6 cm) overall width
30" (76.2 cm) models
A. 28 72.8 cm) max.
q Oven must be connected to the junction box.
Model/serial number plate A. Models rated at 4.8 kW and below at 240 volts (3.6 kW and below : 1. q Connect directly to the ends of the flexible...
Warranty Information - Page 1
MAYTAG® BUILT-IN OVEN LIMITED WARRANTY
ATTACH YOUR RECEIPT HERE. Some questions can be provided by a...or parts for the following information available when you call the Customer eXperience Center:
■ Name, address and telephone number ■ Model number and serial number ■ A clear, detailed description of the problem ■ Proof of this major appliance and that vary from ...
Maytag Knowledge Base Results
We have determined that the information below may contain an answer to this question. If you find an answer, please remember to return to this page and add it here using the "I KNOW THE ANSWER!" button above. It's that easy to earn points!-
Recall Information
... stainless steel front panels. The affected dishwashers were manufactured with plastic tubs and certain serial numbers. Consumer Contact: For additional information, contact Maytag at 1-800-544-5513 anytime, ... new dishwasher models MDB7759, MDB7609 or MDBH979; Free Standing range, Double Oven And Oven Microwave Combination 2004 -United States Over The Range Microwave Hood Combination 2001 ... -
My dishwasher will not start
...installed backward will also cause incomplete door closure. This suggestion pertains to models where the serial number starts with lock icon) for you reach the start option activated? To cancel the... plug-in front of the preferred cycle. The timer knob should turn off. The serial label is opened while running a cycle. The lights for obstructions (spoons or utensils), ... -
My dishwasher will not start
... graphic will illuminate when the controls are locked . Press and hold the Heated Dry option (button with a F. The serial label is located on ? The indicator light next to models where the serial number starts with icon) for cycles selected will not start ? If these tips did not work or your dishwasher...
Similar Questions

How Do I Find Out My Models Year Built, And The Original Price?
I want to find out how much the original owners spent in this double oven, and also the year it was ...
I want to find out how much the original owners spent in this double oven, and also the year it was ...
(Posted by ellesrx 7 years ago)


'i Used The Cleaning Function On My Convection Oven And Even Thou The Cook Top
"I used the cleaning function on My convection oven and even thou the cook top works the oven has st...
"I used the cleaning function on My convection oven and even thou the cook top works the oven has st...
(Posted by mr3d2000 9 years ago)
When Was This Model Manufactured
(Posted by mamapeanut3 9 years ago)

Model And Serial Number
Where do I look on this unit for the Model and Serial Number.
Where do I look on this unit for the Model and Serial Number.
(Posted by DANDJAPPLIANCE 9 years ago)