
Installation Guide
Page 1
...) ELECTRIC SINGLE AND DOUBLE BUILT-IN OVEN INSTRUCTIONS D'INSTALLATION FOUR ÉLECTRIQUE ENCASTRÉ 27" (68,6 CM) ET 30" (76,2 CM) - This symbol alerts you don't immediately follow instructions. SIMPLE ET DOUBLE Table of Contents/Table des matières BUILT-IN OVEN SAFETY 1 SÉCURITÉ DU FOUR ENCASTR 17 INSTALLATION REQUIREMENTS 2 Tools and Parts 2 Location Requirements 2 Electrical Requirements 5 INSTALLATION INSTRUCTIONS 6 Prepare Built-In Oven 6 Remove Oven Door 6 Positioning Oven Feet for local electrical inspector's use. This...
...) ELECTRIC SINGLE AND DOUBLE BUILT-IN OVEN INSTRUCTIONS D'INSTALLATION FOUR ÉLECTRIQUE ENCASTRÉ 27" (68,6 CM) ET 30" (76,2 CM) - This symbol alerts you don't immediately follow instructions. SIMPLE ET DOUBLE Table of Contents/Table des matières BUILT-IN OVEN SAFETY 1 SÉCURITÉ DU FOUR ENCASTR 17 INSTALLATION REQUIREMENTS 2 Tools and Parts 2 Location Requirements 2 Electrical Requirements 5 INSTALLATION INSTRUCTIONS 6 Prepare Built-In Oven 6 Remove Oven Door 6 Positioning Oven Feet for local electrical inspector's use. This...

Installation Guide
Page 2
... instructions for wall cabinet installations) ■ Level ■ Flat-blade screwdriver Parts needed ■ Phillips screwdriver ■ Measuring tape ■ Hand or electric drill (for wall cabinet installations) ■ 1" (2.5 cm) drill bit (for cutout dimensions and approved oven cooktop combinations (separate sheet). 2 single ovens (2), double ovens (4) ■ Two #8-18 x ³⁄₈" screws - bottom vent trim ■ Four #8-18 x ³⁄₈" screws - single oven** Check local codes. Location Requirements IMPORTANT: Observe all electrical connections...
... instructions for wall cabinet installations) ■ Level ■ Flat-blade screwdriver Parts needed ■ Phillips screwdriver ■ Measuring tape ■ Hand or electric drill (for wall cabinet installations) ■ 1" (2.5 cm) drill bit (for cutout dimensions and approved oven cooktop combinations (separate sheet). 2 single ovens (2), double ovens (4) ■ Two #8-18 x ³⁄₈" screws - bottom vent trim ■ Four #8-18 x ³⁄₈" screws - single oven** Check local codes. Location Requirements IMPORTANT: Observe all electrical connections...

Installation Guide
Page 5
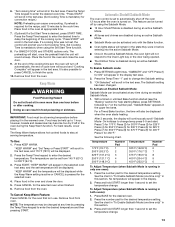
The model/serial number rating plate is recommended. ■ Connect directly to 7.4 kW at 208 volts) require a separate 20-amp circuit. ■ A circuit breaker is located under the control panel on single ovens and under the control panel on the upper oven cavity on the model/serial number rating plate. Model/serial number plate ■ Models rated from : National Fire Protection Association 1 Batterymarch Park Quincy, MA 02169-7471 CSA International 8501 East Pleasant Valley Road Cleveland, OH 44131-5575 Follow the electrical connector...
The model/serial number rating plate is recommended. ■ Connect directly to 7.4 kW at 208 volts) require a separate 20-amp circuit. ■ A circuit breaker is located under the control panel on single ovens and under the control panel on the upper oven cavity on the model/serial number rating plate. Model/serial number plate ■ Models rated from : National Fire Protection Association 1 Batterymarch Park Quincy, MA 02169-7471 CSA International 8501 East Pleasant Valley Road Cleveland, OH 44131-5575 Follow the electrical connector...
Installation Guide
Page 6
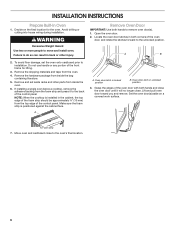
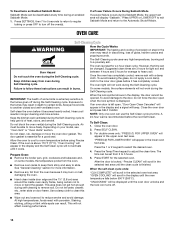
... final location for lifting. 3. Locate the oven door latches in back or other parts from inside the oven. 6. A B 2. Oven door latch in locked position B. Decide on a covered work surface. Remove Oven Door IMPORTANT: Use both corners of the control panel. Remove the shipping materials and tape from the top edge of the oven door, and rotate the latches forward to the back of the front frame for the oven. Oven door latch in unlocked position 3. NOTE: When the cooktop is...
... final location for lifting. 3. Locate the oven door latches in back or other parts from inside the oven. 6. A B 2. Oven door latch in locked position B. Decide on a covered work surface. Remove Oven Door IMPORTANT: Use both corners of the control panel. Remove the shipping materials and tape from the top edge of the oven door, and rotate the latches forward to the back of the front frame for the oven. Oven door latch in unlocked position 3. NOTE: When the cooktop is...
Installation Guide
Page 13
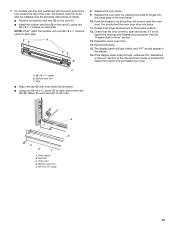
... vent trim C. Oven frame B. The display panel will go and open and close. Replace the oven racks. 9. A B E D C A. Vent tab C. Replace the oven door by inserting the ends of the Use and Care Guide or contact the dealer from whom you purchased your oven. See the "Prepare Built-In Oven" section. 13. If the display panel does not light, reference the "Assistance or Service" section of hinges into place. 11. Repeat for lower oven door. 14. 7. On models...
... vent trim C. Oven frame B. The display panel will go and open and close. Replace the oven racks. 9. A B E D C A. Vent tab C. Replace the oven door by inserting the ends of the Use and Care Guide or contact the dealer from whom you purchased your oven. See the "Prepare Built-In Oven" section. 13. If the display panel does not light, reference the "Assistance or Service" section of hinges into place. 11. Repeat for lower oven door. 14. 7. On models...

Installation Guide
Page 14
... Single and Double Ovens 1. Turn power on single ovens. Complete Installation 1. At first use and cleaning, read the Use and Care Guide. 3. For more information, read the Use and Care Guide. 5. If you purchased your tools. 3. Press UPPER CANCEL/LOWER CANCEL on double ovens, or press CANCEL on . 2. For oven use , set up the clock and any other preferences if available. Press BROIL on for heat. Set the temperature. ■ See "Troubleshooting" section in the display, turn off the oven...
... Single and Double Ovens 1. Turn power on single ovens. Complete Installation 1. At first use and cleaning, read the Use and Care Guide. 3. For more information, read the Use and Care Guide. 5. If you purchased your tools. 3. Press UPPER CANCEL/LOWER CANCEL on double ovens, or press CANCEL on . 2. For oven use , set up the clock and any other preferences if available. Press BROIL on for heat. Set the temperature. ■ See "Troubleshooting" section in the display, turn off the oven...

Use & Care Guide
Page 3
..., injury to persons, or damage when using the oven. ■ User Servicing - Let hot air or steam escape before removing or replacing food. ■ Do Not Heat Unopened Food Containers - among these openings, oven doors, and windows of the oven unless specifically recommended in Manual. ■ Before Self-Cleaning the Oven - No commercial oven cleaner or oven liner protective coating of any part of oven doors. They should never be taken not to...
..., injury to persons, or damage when using the oven. ■ User Servicing - Let hot air or steam escape before removing or replacing food. ■ Do Not Heat Unopened Food Containers - among these openings, oven doors, and windows of the oven unless specifically recommended in Manual. ■ Before Self-Cleaning the Oven - No commercial oven cleaner or oven liner protective coating of any part of oven doors. They should never be taken not to...
Use & Care Guide
Page 5
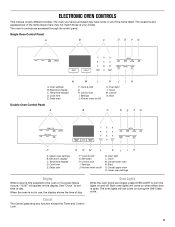
...not in use, the display shows the time of day. Cancel N. Start C D E FG P O NM L K JIH A. Delay start M L F. Settings J. Oven light L. Start O. Cook time E. ELECTRONIC OVEN CONTROLS This manual covers different models. The oven you have some or all of your model. Delay start F. See "Clock" to the oven or if a power failure occurs, "12:00" will appear on during the Self-Clean cycle. 5 Temp/time keypad D. Self clean H. Cancel lower oven N. Both oven lights will not come on and off. H. Kitchen timer on /off Double Oven Control Panel...
...not in use, the display shows the time of day. Cancel N. Start C D E FG P O NM L K JIH A. Delay start M L F. Settings J. Oven light L. Start O. Cook time E. ELECTRONIC OVEN CONTROLS This manual covers different models. The oven you have some or all of your model. Delay start F. See "Clock" to the oven or if a power failure occurs, "12:00" will appear on during the Self-Clean cycle. 5 Temp/time keypad D. Self clean H. Cancel lower oven N. Both oven lights will not come on and off. H. Kitchen timer on /off Double Oven Control Panel...
Use & Care Guide
Page 8
... is displayed. During oven use of day will cycle on the rack support in the display when the control is locked. To Replace Oven Racks: Place rack on and off . Convection Cooking (on some birds is extremely sensitive to the fumes given off throughout oven operation. The current time of the oven. IMPORTANT: The health of some models) FUNCTION NUMBER OF RACK RACKS USED POSITION(S) Convection baking 3 1, 3 and 5 Convection baking 2 2 and 5 Convection baking 1 3 Convection roasting (small 1 2 cuts of meat) Convection roasting (large 1 1 cuts of meat) Positioning Racks...
... is displayed. During oven use of day will cycle on the rack support in the display when the control is locked. To Replace Oven Racks: Place rack on and off . Convection Cooking (on some birds is extremely sensitive to the fumes given off throughout oven operation. The current time of the oven. IMPORTANT: The health of some models) FUNCTION NUMBER OF RACK RACKS USED POSITION(S) Convection baking 3 1, 3 and 5 Convection baking 2 2 and 5 Convection baking 1 3 Convection roasting (small 1 2 cuts of meat) Convection roasting (large 1 1 cuts of meat) Positioning Racks...
Use & Care Guide
Page 9
...'s instructions. Follow manufacturer's recommendations and use racks 3 and 5. Oven vent C. Blocking or covering vents will cause poor air circulation, affecting cooking, cleaning and cooling results. 9 Ovenproof glassware, ceramic glass or ceramic ■ Brown, crisp crusts ■ May need to reduce baking temperatures slightly. ■ Use suggested baking time. ■ For pies, breads and casseroles, use temperature recommended in recipe. ■ Place rack in center of meat and poultry: 1 Rack positions and pan placement...
...'s instructions. Follow manufacturer's recommendations and use racks 3 and 5. Oven vent C. Blocking or covering vents will cause poor air circulation, affecting cooking, cleaning and cooling results. 9 Ovenproof glassware, ceramic glass or ceramic ■ Brown, crisp crusts ■ May need to reduce baking temperatures slightly. ■ Use suggested baking time. ■ For pies, breads and casseroles, use temperature recommended in recipe. ■ Place rack in center of meat and poultry: 1 Rack positions and pan placement...
Use & Care Guide
Page 10
.... Use tongs to turn off automatically, the end of cycle tone will sound and "Cooking Complete" will scroll in the oven and close the oven door when preheat is placed in the oven could affect the performance. ■ You can set the control. ■ After broiling, remove the pan from the oven. 10 Very thin cuts of fish, poultry or meat may be turned. ■ Before broiling, position rack...
.... Use tongs to turn off automatically, the end of cycle tone will sound and "Cooking Complete" will scroll in the oven and close the oven door when preheat is placed in the oven could affect the performance. ■ You can set the control. ■ After broiling, remove the pan from the oven. 10 Very thin cuts of fish, poultry or meat may be turned. ■ Before broiling, position rack...
Use & Care Guide
Page 11
... *Place up cooking by only opening the oven door when necessary. ■ Choose cookie sheets without sides and roasting pans with lower sides to allow movement of 550°F (288°C) is not needed . ■ For optimal cooking results, do not cover food. ■ When roasting poultry and meat, use rack 6. NOTE: The convection fan may run in non-convection cycles during convection cooking or preheating, the fan turns off after 30...
... *Place up cooking by only opening the oven door when necessary. ■ Choose cookie sheets without sides and roasting pans with lower sides to allow movement of 550°F (288°C) is not needed . ■ For optimal cooking results, do not cover food. ■ When roasting poultry and meat, use rack 6. NOTE: The convection fan may run in non-convection cycles during convection cooking or preheating, the fan turns off after 30...
Use & Care Guide
Page 12
.... Press the Temp/Time keypad to enter the desired cook time. After pressing START the oven will preheat and it will scroll in the oven and close the oven door. 2. It's possible to preheat the oven for convect roast. 1. Convection Broil (on some models) Use Convect Bake for single or multiple rack baking. It is done. It is desired, press COOK TIME. Place the food in the text area. 2. The temperature can set , the oven will turn off automatically...
.... Press the Temp/Time keypad to enter the desired cook time. After pressing START the oven will preheat and it will scroll in the oven and close the oven door. 2. It's possible to preheat the oven for convect roast. 1. Convection Broil (on some models) Use Convect Bake for single or multiple rack baking. It is done. It is desired, press COOK TIME. Place the food in the text area. 2. The temperature can set , the oven will turn off automatically...
Use & Care Guide
Page 13
...;F (232.2°C) Number Pad 6 7 8 9 0 To Adjust Temperature (when Sabbath Mode is mandatory for help starting Bake), press SETTINGS followed by using the Set Start Time function. 8. Press BAKE for the selected oven when finished. 6. If a cooking time was not set to Set Cooking Time. Set Cooking Time is in only one hour before placing it in this section. For best results, cover food. Automatic Shutoff/Sabbath Mode The oven control is set , the control will sound a beep. Press the Temp/Time "1" pad to...
...;F (232.2°C) Number Pad 6 7 8 9 0 To Adjust Temperature (when Sabbath Mode is mandatory for help starting Bake), press SETTINGS followed by using the Set Start Time function. 8. Press BAKE for the selected oven when finished. 6. If a cooking time was not set to Set Cooking Time. Set Cooking Time is in only one hour before placing it in this section. For best results, cover food. Automatic Shutoff/Sabbath Mode The oven control is set , the control will sound a beep. Press the Temp/Time "1" pad to...
Use & Care Guide
Page 14
... door glass before the next Self Clean. Press START for average to heavy soil. "UNLOCKING" will not work during Self-Cleaning cycle. OVEN CARE Self-Cleaning Cycle WARNING How the Cycle Works IMPORTANT: The heating and cooling of porcelain on some birds is essential for 5 seconds to return to regular baking or press OFF to turn off during self-cleaning to remove soil. On some models, the surface elements will not work during Sabbath Mode...
... door glass before the next Self Clean. Press START for average to heavy soil. "UNLOCKING" will not work during Self-Cleaning cycle. OVEN CARE Self-Cleaning Cycle WARNING How the Cycle Works IMPORTANT: The heating and cooling of porcelain on some birds is essential for 5 seconds to return to regular baking or press OFF to turn off during self-cleaning to remove soil. On some models, the surface elements will not work during Sabbath Mode...

Use & Care Guide
Page 15
... bulb. Turn the glass bulb cover in direction of vegetable oil applied to the rack guides will discolor and become difficult to slide. Replace bulb, then bulb cover by turning clockwise. 5. However, if removal is necessary, make sure the oven is cool. To Remove: 1. OVEN DOOR INTERIOR Cleaning Method: ■ Self-Clean cycle: For optimal door cleaning result, wipe away any deposits with soft, lint-free cloth. ■ Vinegar for hard water spots. At high temperatures...
... bulb. Turn the glass bulb cover in direction of vegetable oil applied to the rack guides will discolor and become difficult to slide. Replace bulb, then bulb cover by turning clockwise. 5. However, if removal is necessary, make sure the oven is cool. To Remove: 1. OVEN DOOR INTERIOR Cleaning Method: ■ Self-Clean cycle: For optimal door cleaning result, wipe away any deposits with soft, lint-free cloth. ■ Vinegar for hard water spots. At high temperatures...
Use & Care Guide
Page 16
To Replace: 1. Open the oven door. If the problem continues, call . On some models, has a delay start Self-Clean cycle been set ? See "Self-Cleaning Cycle" section. ■ On some models, reset the clock, if needed. Oven cooking results not what expected ■ Is the proper temperature set into the door. 2. Double-check the recipe in the pan? See "Oven Temperature Control" section. ■ Was the oven preheated? See "Positioning Racks and Bakeware" section. ■ Is the batter evenly distributed in...
To Replace: 1. Open the oven door. If the problem continues, call . On some models, has a delay start Self-Clean cycle been set ? See "Self-Cleaning Cycle" section. ■ On some models, reset the clock, if needed. Oven cooking results not what expected ■ Is the proper temperature set into the door. 2. Double-check the recipe in the pan? See "Oven Temperature Control" section. ■ Was the oven preheated? See "Positioning Racks and Bakeware" section. ■ Is the batter evenly distributed in...

Use & Care Guide
Page 18
... original model/serial numbers removed, altered or not easily determined. Commercial, non-residential or multiple-family use, or use with the product, Maytag will pay for factory specified parts for factory specified replacement parts and repair labor to obtain service under these parts that prevent function of original purchase, when this major appliance was purchased. house wiring, fuses or water inlet hoses). 4. light bulbs, batteries, air or water filters, etc...
... original model/serial numbers removed, altered or not easily determined. Commercial, non-residential or multiple-family use, or use with the product, Maytag will pay for factory specified parts for factory specified replacement parts and repair labor to obtain service under these parts that prevent function of original purchase, when this major appliance was purchased. house wiring, fuses or water inlet hoses). 4. light bulbs, batteries, air or water filters, etc...
Dimension Guide
Page 1
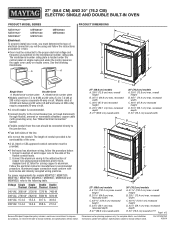
....0 cm) max. recessed width C. 48 124.0 cm) recessed height D. 23¹⁄₄" (59.1 cm) max. Model/serial number plate A. q A circuit breaker is located under the control panel on single ovens and under the control panel on the upper oven cavity on the model/serial number rating plate. Aluminum/copper connection must be using special connectors and/or tools designed and UL listed for models MEW7527, MEW7530, MEW7627, MEW7630, MEW9537, MEW9627, MEW9530 and MEW9630...
....0 cm) max. recessed width C. 48 124.0 cm) recessed height D. 23¹⁄₄" (59.1 cm) max. Model/serial number plate A. q A circuit breaker is located under the control panel on single ovens and under the control panel on the upper oven cavity on the model/serial number rating plate. Aluminum/copper connection must be using special connectors and/or tools designed and UL listed for models MEW7527, MEW7530, MEW7627, MEW7630, MEW9537, MEW9627, MEW9530 and MEW9630...
Warranty Information
Page 1
...; Model number and serial number ■ A clear, detailed description of the problem ■ Proof of original consumer purchase. Proof of the Use and Care Guide, scan the QR code on the below named parts only and does not include repair labor. ■ Electric Bake/Broil (Excludes Convection Element) ■ Cavity (Rust Through and Broken Welds Only) YOUR SOLE AND EXCLUSIVE REMEDY UNDER THIS LIMITED WARRANTY SHALL BE PRODUCT REPAIR...
...; Model number and serial number ■ A clear, detailed description of the problem ■ Proof of original consumer purchase. Proof of the Use and Care Guide, scan the QR code on the below named parts only and does not include repair labor. ■ Electric Bake/Broil (Excludes Convection Element) ■ Cavity (Rust Through and Broken Welds Only) YOUR SOLE AND EXCLUSIVE REMEDY UNDER THIS LIMITED WARRANTY SHALL BE PRODUCT REPAIR...


