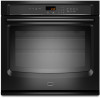
Maytag MEW7527AB Support Question
Maytag MEW7527AB Support Question
Find answers below for this question about Maytag MEW7527AB.Need a Maytag MEW7527AB manual? We have 4 online manuals for this item!
Question posted by Shopple1 on September 25th, 2013
Has There Been Any Recalls On The Mew7527ab?
I had this oven installed and have had problem after problem with it heating correctly and accurately. It has had a service tech here 4 times and the problem is still ongoing.
Current Answers
Related Maytag MEW7527AB Manual Pages
Warranty Information - Page 1
...correct non-cosmetic defects in materials or workmanship in this part that prevent function of the oven and that existed when this major appliance was purchased. Consumable parts are unable to resolve the
problem after checking "Troubleshooting," additional help can be found by checking the "Assistance or Service.../or installation instructions.
4. Service calls to correct the installation of ...
Energy Guide - Page 1
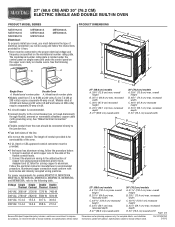
... overall width Page 1 of 2
Dimensions are for serviceability of conduit provided is for planning purposes only.
The length of the oven. Connect the aluminum wiring to the following illustrations. ...models
A. 51 130.0 cm) max. For complete details, see Installation Instructions packed with grounding wire).
q Oven must be using special connectors and/or tools designed and UL listed...
Energy Guide - Page 2
..." (60.7 cm) cutout depth
30" (76.2 cm) models
A. 30" (76.2 cm) min. top of cutout to change materials and specifications without notice. cutout height
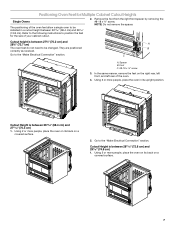
Double Ovens Installed in Cabinet A
E
D
C
A. 27" (68.6 cm) min. D. 25¹⁄₂" (64.8 cm) cutout width
E. 1¹⁄₂" (3.8 cm) min. cabinet width on 30" (76.2 cm...
Installation Guide - Page 1
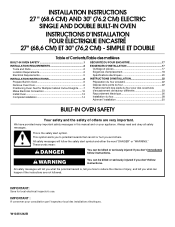
... du four 22 Positionnement des pieds du four pour des ouvertures d'encastrement de hauteur différente 23 Raccordement électrique 26 Installation du four 28 Achever l'installation 30
BUILT-IN OVEN SAFETY
Your safety and the safety of others .
These words mean:
DANGER
You can be killed or seriously injured if you...
Installation Guide - Page 2

... KEBS179B, KEBS109B, KEBS277B, KEBS279B, KEBS207B, KEBS209B, KEBU109B and KEBU209B. **Foam strip not included with cooktop installed above):
Ovens approved for 30" (76.2 cm) models.
INSTALLATION REQUIREMENTS
Tools and Parts
Gather the required tools and parts before starting installation. Read and follow the instructions provided with the maximum allowable wood cabinet temperatures of the...
Installation Guide - Page 3
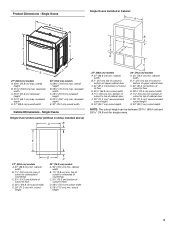
....2 cm) models
A. 28¾" (72.8 cm) max. recessed width
C. 26³⁄₄" (67.9 cm) recessed height
D. 23¹⁄₄" (59.1 cm) max. Single Ovens B
Single Ovens Installed in Cabinet A
B
D
C
F
A
G
E
D E
27" (68.6 cm) models
A. 28¾" (72.8 cm) max. cabinet width
B. 1" (2.5 cm) top of cutout to bottom of upper cabinet door
C. 32...
Installation Guide - Page 4
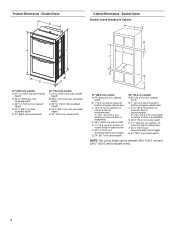
... (3.8 cm) min. bottom of cutout to top of cutout to floor is acceptable. Double Ovens B
Cabinet Dimensions -
recessed width
C. 48 124.0 cm) recessed height
D. 23¹⁄... 30" (76.2 cm) overall width
G E
C
27" (68.6 cm) models
A. 27" (68.6 cm) min. Double Ovens Double Ovens Installed in Cabinet
A
A
C
B
D F
E
D
27" (68.6 cm) models
A. 51 130.0 cm) max. D. 28¹...
Installation Guide - Page 5

...14.9 A
15.0 A
29.8 A
29.9 A
For power requirements for serviceability of the flexible conduit leads.
2. Voltage 240 VAC
Single Thermal
3690 W
Single Convect
3720 W
...Standards C22.1-94, Canadian Electrical Code, Part 1 and C22.2 No. Electrical Connection
To properly install your oven, you are in conformance with grounding wire). See "Make Electrical Connection" section.
■...
Installation Guide - Page 6
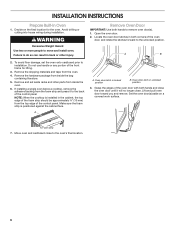
... to the back of the control panel. Move oven and cardboard close .
Remove Oven Door
IMPORTANT: Use both hands and close the oven door until it to installation. Oven door latch in unlocked position
3. Oven door latch in locked position
B. Grasp the edges of the control panel. If installing a single oven below a cooktop, remove the adhesive backing from...
Installation Guide - Page 7
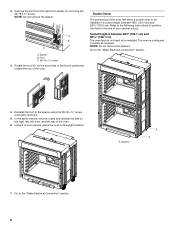
... to be installed in its back on its upright position.
Go to the "Make Electrical Connection" section. A B
C
A. Foot C. #8-18 x ³⁄₈" screw
3.
Positioning Oven Feet for the size of the oven.
4. Remove the foot from the right front spacer by removing the #8-18 x ³⁄₈" screw.
They are positioned correctly as received...
Installation Guide - Page 8
... feet on the right rear, left front, and left rear of the oven feet allow a double oven to position the feet for the size of the oven. Refer to the following instructions to be installed. NOTE: Do not remove the spacer. The oven is between 48⁷⁄₈" (124.1 cm) and 52 132.6 cm...
Installation Guide - Page 9
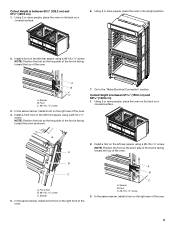
....0 cm) and 52 132.6 cm) 1. Spacer
5. A
B
C
A. B
C
A. Foot C. #8-18 x ³⁄₈" screw
3.
Install a foot on the right rear of the foot is facing
A
toward the oven as shown.
7.
Install a front foot on a
covered surface.
2.
Using 2 or more people, place the oven on its back on the left front spacer using a #8-18 x ³⁄₈...
Installation Guide - Page 10
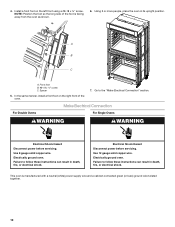
Electrical Shock Hazard Disconnect power before servicing.
Spacer
5. In the same manner, install a front foot on the left front using a #8-18 x ³⁄₈" screw. Use 8 gauge solid copper wire.
This oven is facing away from the oven as shown.
6. Install a front foot on the right front of the foot is manufactured with a neutral (white) power...
Installation Guide - Page 11
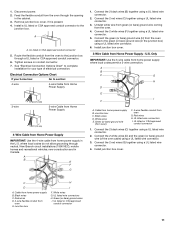
... using a UL listed wire connector.
5. Connect the 2 white wires (F) together using a UL listed wire connector.
3. Install junction box cover.
3-Wire Cable from
oven E. Junction box C. Green (or bare) ground wire
(from oven)
F. 4-wire flexible conduit from the oven through a UL listed or CSA approved conduit connector.
6. UL listed wire connectors
I . Connect the 2 black wires...
Installation Guide - Page 12
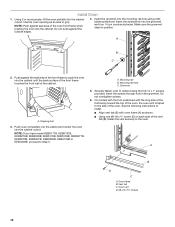
... of the foot facing toward the top of the oven front frame when pushing the oven into the mounting rail hole using the # 8-14 x 1" screws provided. Oven vent
D. #8-18 x ³⁄₈" screws
12 Install Oven
1. Do not overtighten screws.
6. On models with the foot positioned with oven frame (A) as an area to the side of...
Installation Guide - Page 13
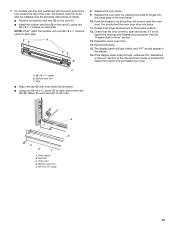
...oven. Rotate both hinge latches back to the oven. 7. A
B
8. You should appear in the display.
16. If the display panel does not light, reference the "Assistance or Service... removal and installation procedures. Repeat for lower oven door.
14. Oven frame B. Replace the oven racks.
9. See the "Prepare Built-In Oven" section.
13. On models with the foot positioned with oven frame (A) as...
Use & Care Guide - Page 3
... properly installed and grounded by a qualified technician.
■ Never Use the Oven for a good seal.
We have had sufficient time to cool. All safety messages will tell you what can kill or hurt you how to reduce the chance of fire, electrical shock,
injury to persons, or damage when using the oven.
■ User Servicing...
Use & Care Guide - Page 5
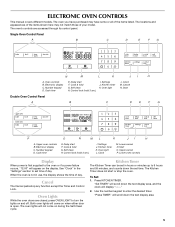
... will not come on during the Self-Clean cycle. To Set: 1.
Number keypad D. Cook & hold G. Cook time
E. Start O. Cancel
The Cancel pads stop the oven. ELECTRONIC OVEN CONTROLS
This manual covers different models. Oven controls B. Start
Double Oven Control Panel
A
B
C
D
E
F
G
P
O
N
ML
K
JI
H
A. The Kitchen Timer does not start or stop any function except the...
Use & Care Guide - Page 15
... set correctly? See "Positioning Racks and Bakeware" section.
■ Is there proper air circulation around bakeware? 3. See "Oven Temperature Control" section.
■ Was the oven preheated? Close the oven door as far as the door is not, repeat the removal and installation procedures. Lift the oven door while holding both hanger arms into place.
3. If the problem...
Use & Care Guide - Page 17

... resolve the
problem after checking "Troubleshooting," additional help can be easily determined. If you need for service or repair of purchase.
6. LIMITATION OF REMEDIES; MAYTAG® BUILT-IN ELECTRIC OVEN WARRANTY
FIRST YEAR LIMITED WARRANTY (PARTS AND LABOR)
For one year from the date of purchase, when this major appliance is installed, operated and...
Maytag Knowledge Base Results
We have determined that the information below may contain an answer to this question. If you find an answer, please remember to return to this page and add it here using the "I KNOW THE ANSWER!" button above. It's that easy to earn points!-
Proposition 65 Warnings
... in order for Whirlpool Corporation to provide the warning when a listed chemical is below accepted and regulated concentrations. Product Recall Information Display shows an error code - Therefore, Whirlpool has elected to comply with all listed chemicals provide exposure limit... the Use and Care Manual is present. All Whirlpool products are below . Oven -
Rainbow colors in my oven door glass.
... a rainbow colored appearance. See picture. This is due to the inner oven door glass being coated with a heat barrier to reflect oven heat back into the oven which reduces heat loss and the outside oven door temperature. Oven My gas oven won't operate Product Recall Information Cleaning and caring stainless steel surfaces Sabbath Mode - Rainbow colors in my... -
Product Rebate Information
Any ongoing Maytag product rebates can be found on our Maytag site Product Recall Information Proposition 65 Warnings My gas oven won't operate Online Product Registration here. Product Rebate Information Is Maytag offering any rebates?
Similar Questions

May Tag 30 Inch Oven
Is this more like a microwave oven that blow the heat, or different electric heat. I like to see ins...
Is this more like a microwave oven that blow the heat, or different electric heat. I like to see ins...
(Posted by adoon1 7 years ago)

Upper Oven Flashing Bake
When I go to preheat the upper oven, it flashes BAKE. It I put something in to bake, it burns it to ...
When I go to preheat the upper oven, it flashes BAKE. It I put something in to bake, it burns it to ...
(Posted by mjohnson23455 8 years ago)

Oven Will Not Work
The oven is dead. We checked the brakers and the power is good. There is no display. Is there a fuse...
The oven is dead. We checked the brakers and the power is good. There is no display. Is there a fuse...
(Posted by Anonymous-148129 9 years ago)

Maytag Smooth Top Double Oven Model Mer6875bas18 Stopped Heating
Maytag smooth top double oven model MER6875BAS18 stopped heating. It has worked fine until today. No...
Maytag smooth top double oven model MER6875BAS18 stopped heating. It has worked fine until today. No...
(Posted by wilberdb 10 years ago)

Upper Oven Will Not Heat Up.
Heating element looks fine. Bottom oven works. Problem may have begun after self clean, but worked a...
Heating element looks fine. Bottom oven works. Problem may have begun after self clean, but worked a...
(Posted by Danagerard 12 years ago)