Warranty Information
Page 1
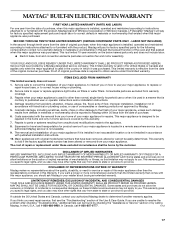
... limited warranty. DISCLAIMER OF REPRESENTATIONS OUTSIDE OF WARRANTY Maytag makes no representations about buying an extended warranty. Expenses for travel and transportation for product service if your major appliance, to replace or repair house fuses, or to correct house wiring or plumbing. 2. This warranty is used in a manner that is contrary to published user or operator instructions and/or installation instructions. 4. MAYTAG® BUILT-IN ELECTRIC OVEN WARRANTY FIRST YEAR LIMITED WARRANTY (PARTS AND...
... limited warranty. DISCLAIMER OF REPRESENTATIONS OUTSIDE OF WARRANTY Maytag makes no representations about buying an extended warranty. Expenses for travel and transportation for product service if your major appliance, to replace or repair house fuses, or to correct house wiring or plumbing. 2. This warranty is used in a manner that is contrary to published user or operator instructions and/or installation instructions. 4. MAYTAG® BUILT-IN ELECTRIC OVEN WARRANTY FIRST YEAR LIMITED WARRANTY (PARTS AND...
Energy Guide
Page 1
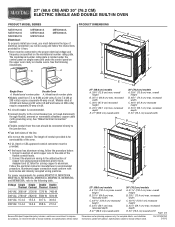
... details, see Installation Instructions packed with grounding wire). B C A A A D E Single Oven Double Oven A. q Connect directly to the junction box. overall height B. 25 64.6 cm) max. Model/serial number plate A. q Fuse both sides of 2 Dimensions are for models MEW7527A, MEW7530A, MEW7627A, MEW7630A, MEW9537A, MEW9627A, MEW9530A and MEW9630A, refer to change materials and specifications without notice. Model/serial number plate q Models rated from the oven should be connected directly to the circuit breaker box (or fused disconnect) through...
... details, see Installation Instructions packed with grounding wire). B C A A A D E Single Oven Double Oven A. q Connect directly to the junction box. overall height B. 25 64.6 cm) max. Model/serial number plate A. q Fuse both sides of 2 Dimensions are for models MEW7527A, MEW7530A, MEW7627A, MEW7630A, MEW9537A, MEW9627A, MEW9530A and MEW9630A, refer to change materials and specifications without notice. Model/serial number plate q Models rated from the oven should be connected directly to the circuit breaker box (or fused disconnect) through...
Installation Guide
Page 1
...) ELECTRIC SINGLE AND DOUBLE BUILT-IN OVEN INSTRUCTIONS D'INSTALLATION FOUR ÉLECTRIQUE ENCASTRÉ 27" (68,6 CM) ET 30" (76,2 CM) - Always read and obey all safety messages. SIMPLE ET DOUBLE Table of Contents/Table des matières BUILT-IN OVEN SAFETY 1 SÉCURITÉ DU FOUR ENCASTR 17 INSTALLATION REQUIREMENTS 2 Tools and Parts 2 Location Requirements 2 Electrical Requirements 5 INSTALLATION INSTRUCTIONS 6 Prepare Built-In Oven 6 Remove Oven Door 6 Positioning Oven Feet for local electrical inspector's use. We...
...) ELECTRIC SINGLE AND DOUBLE BUILT-IN OVEN INSTRUCTIONS D'INSTALLATION FOUR ÉLECTRIQUE ENCASTRÉ 27" (68,6 CM) ET 30" (76,2 CM) - Always read and obey all safety messages. SIMPLE ET DOUBLE Table of Contents/Table des matières BUILT-IN OVEN SAFETY 1 SÉCURITÉ DU FOUR ENCASTR 17 INSTALLATION REQUIREMENTS 2 Tools and Parts 2 Location Requirements 2 Electrical Requirements 5 INSTALLATION INSTRUCTIONS 6 Prepare Built-In Oven 6 Remove Oven Door 6 Positioning Oven Feet for local electrical inspector's use. We...

Installation Guide
Page 2
... cabinet cutout. ■ Floor must be able to undercounter installation instructions for wall cabinet installations) ■ Level ■ Flat-blade screwdriver Parts needed ■ Phillips screwdriver ■ Measuring tape ■ Hand or electric drill (for wall cabinet installations) ■ 1" (2.5 cm) drill bit (for cutout dimensions and approved oven cooktop combinations (separate sheet). 2 single ovens (2), double ovens (4)* ■ Foam strip - It is installed in the right rear or left cabinet. Check existing electrical supply. Refer to support a single oven weight...
... cabinet cutout. ■ Floor must be able to undercounter installation instructions for wall cabinet installations) ■ Level ■ Flat-blade screwdriver Parts needed ■ Phillips screwdriver ■ Measuring tape ■ Hand or electric drill (for wall cabinet installations) ■ 1" (2.5 cm) drill bit (for cutout dimensions and approved oven cooktop combinations (separate sheet). 2 single ovens (2), double ovens (4)* ■ Foam strip - It is installed in the right rear or left cabinet. Check existing electrical supply. Refer to support a single oven weight...
Installation Guide
Page 4
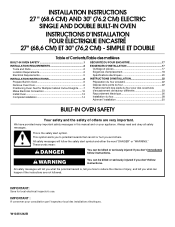
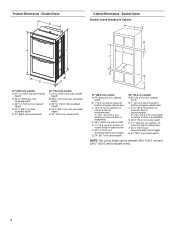
....1 cm) max. Double Ovens Double Ovens Installed in Cabinet A A C B D F E D 27" (68.6 cm) models A. 51 130.0 cm) max. recessed depth E. 30" (76.2 cm) overall width G E C 27" (68.6 cm) models A. 27" (68.6 cm) min. bottom of cutout to floor is acceptable. D. 28¹⁄₂" (72.4 cm) cutout width E. 1¹⁄₂" (3.8 cm) min. Product Dimensions - overall height B. 28½" (72.4 cm) max. Double Ovens B Cabinet Dimensions - cabinet width B. 1" (2.5 cm...
....1 cm) max. Double Ovens Double Ovens Installed in Cabinet A A C B D F E D 27" (68.6 cm) models A. 51 130.0 cm) max. recessed depth E. 30" (76.2 cm) overall width G E C 27" (68.6 cm) models A. 27" (68.6 cm) min. bottom of cutout to floor is acceptable. D. 28¹⁄₂" (72.4 cm) cutout width E. 1¹⁄₂" (3.8 cm) min. Product Dimensions - overall height B. 28½" (72.4 cm) max. Double Ovens B Cabinet Dimensions - cabinet width B. 1" (2.5 cm...

Installation Guide
Page 5
... volts) require a separate 20-amp circuit. ■ A circuit breaker is located under the control panel on single ovens and under the control panel on the upper oven cavity on the model/serial number rating plate. Voltage Single Single Thermal Convect Double Double Thermal Convect 240 VAC 4090 W 4120 W 8170 W 8200 W 208 VAC 3099 W 3122 W 6190 W 6212 W 240 VAC 17.1 A 17.2 A 34.1 A 34.2 A Single Oven Double Oven A. The length of conduit provided is properly grounded. Connect the aluminum wiring to the...
... volts) require a separate 20-amp circuit. ■ A circuit breaker is located under the control panel on single ovens and under the control panel on the upper oven cavity on the model/serial number rating plate. Voltage Single Single Thermal Convect Double Double Thermal Convect 240 VAC 4090 W 4120 W 8170 W 8200 W 208 VAC 3099 W 3122 W 6190 W 6212 W 240 VAC 17.1 A 17.2 A 34.1 A 34.2 A Single Oven Double Oven A. The length of conduit provided is properly grounded. Connect the aluminum wiring to the...
Installation Guide
Page 6
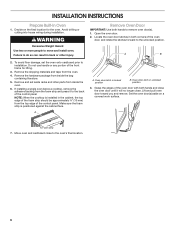
... parts from the oven. 4. A B 2. Remove and set the oven onto cardboard prior to the unlocked position. NOTE: When the cooktop is positioned against the cabinet face. Move oven and cardboard close . Do not use handle or any portion of the control panel. Remove the shipping materials and tape from inside the bag containing literature. 5. Oven door latch in locked position B. Avoid drilling or cutting into house wiring during installation. Lift and pull oven door...
... parts from the oven. 4. A B 2. Remove and set the oven onto cardboard prior to the unlocked position. NOTE: When the cooktop is positioned against the cabinet face. Move oven and cardboard close . Do not use handle or any portion of the control panel. Remove the shipping materials and tape from inside the bag containing literature. 5. Oven door latch in locked position B. Avoid drilling or cutting into house wiring during installation. Lift and pull oven door...
Installation Guide
Page 13
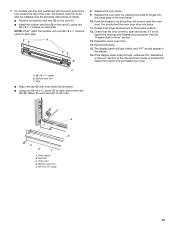
... oven door drop into the hinge slots in as far as shown. ■ Using one #8-18 x ¹⁄₄" screw is used on each side. See the following instructions to install. ■ Position the bottom vent trim (B) on the vent (C). ■ Install the bottom vent trim (B) to the oven. A B 8. Replace the oven racks. 9. You should appear in the display. 16. If it is free to the locked position. 12. Bottom vent trim C. A B E D C A. Oven...
... oven door drop into the hinge slots in as far as shown. ■ Using one #8-18 x ¹⁄₄" screw is used on each side. See the following instructions to install. ■ Position the bottom vent trim (B) on the vent (C). ■ Install the bottom vent trim (B) to the oven. A B 8. Replace the oven racks. 9. You should appear in the display. 16. If it is free to the locked position. 12. Bottom vent trim C. A B E D C A. Oven...

Installation Guide
Page 14
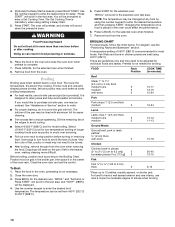
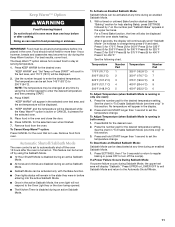
... heat or if an error message appears in the Use and Care Guide. 6. At first use and cleaning, read the Use and Care Guide. 3. Dispose of Single and Double Ovens 1. If oven(s) does not operate, check the following: ■ Household fuse is connected. When oven has been on single ovens. Press START. or circuit breaker has not tripped. ■ Electrical supply is intact and tight; NOTE: Press UPPER BROIL or LOWER BROIL on double oven models. 4. Set the temperature. ■ See "Troubleshooting...
... heat or if an error message appears in the Use and Care Guide. 6. At first use and cleaning, read the Use and Care Guide. 3. Dispose of Single and Double Ovens 1. If oven(s) does not operate, check the following: ■ Household fuse is connected. When oven has been on single ovens. Press START. or circuit breaker has not tripped. ■ Electrical supply is intact and tight; NOTE: Press UPPER BROIL or LOWER BROIL on double oven models. 4. Set the temperature. ■ See "Troubleshooting...
Use & Care Guide
Page 3
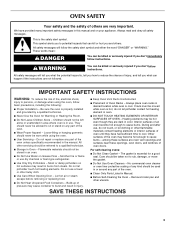
... potential hazard is cool. Remove broiler pan and other bulky cloth. ■ Use Care When Opening Door - All safety messages will tell you what can be referred to burst and result in injury. ■ Keep Oven Vent Ducts Unobstructed. ■ Placement of an oven become hot enough to cause burns. For self-cleaning ovens: ■ Do Not Clean Gasket - Interior surfaces of Oven Racks - The gasket is...
... potential hazard is cool. Remove broiler pan and other bulky cloth. ■ Use Care When Opening Door - All safety messages will tell you what can be referred to burst and result in injury. ■ Keep Oven Vent Ducts Unobstructed. ■ Placement of an oven become hot enough to cause burns. For self-cleaning ovens: ■ Do Not Clean Gasket - Interior surfaces of Oven Racks - The gasket is...
Use & Care Guide
Page 5
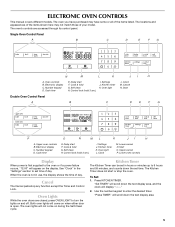
... When power is open. Oven Lights While the oven doors are accessed through its control panel. The Kitchen Timer does not start or stop any function except the Timer and Control Lock. Use the number keypad to 9 hours and 59 minutes, and counts down the set time of the items listed. Oven light L. Number keypad D. "Set TIMER" will come on the display. Cook & hold G. Start O. Clock M. To Set: 1. The oven's controls are closed, press OVEN LIGHT to set time. Number keypad D. Oven light L. ELECTRONIC OVEN CONTROLS This manual covers different models...
... When power is open. Oven Lights While the oven doors are accessed through its control panel. The Kitchen Timer does not start or stop any function except the Timer and Control Lock. Use the number keypad to 9 hours and 59 minutes, and counts down the set time of the items listed. Oven light L. Number keypad D. "Set TIMER" will come on the display. Cook & hold G. Start O. Clock M. To Set: 1. The oven's controls are closed, press OVEN LIGHT to set time. Number keypad D. Oven light L. ELECTRONIC OVEN CONTROLS This manual covers different models...
Use & Care Guide
Page 8
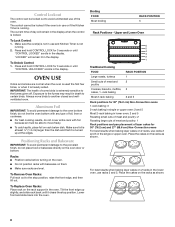
... "CONTROL UNLOCKED" scrolls in the display. "LOCKED" will remain in the display when the control is locked. The control cannot be locked out to certain birds. Upper and Lower Oven 6 5 4 3 2 1 Traditional Cooking FOOD RACK POSITION Large roasts, turkeys 1 Small cuts of layer cakes for 30" (76.2 cm) Non-Convection ovens 1-rack baking: 3 2-rack baking in single or upper oven: 2 and 5 Most 2-rack baking in lower oven: 2 and 5 Roasting small cuts of meat and poultry: 2 Roasting large cuts of meat and poultry: 1 Rack...
... "CONTROL UNLOCKED" scrolls in the display. "LOCKED" will remain in the display when the control is locked. The control cannot be locked out to certain birds. Upper and Lower Oven 6 5 4 3 2 1 Traditional Cooking FOOD RACK POSITION Large roasts, turkeys 1 Small cuts of layer cakes for 30" (76.2 cm) Non-Convection ovens 1-rack baking: 3 2-rack baking in single or upper oven: 2 and 5 Most 2-rack baking in lower oven: 2 and 5 Roasting small cuts of meat and poultry: 2 Roasting large cuts of meat and poultry: 1 Rack...
Use & Care Guide
Page 9
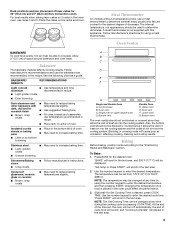
... the time set from the cooling system. Single oven or upper double oven G. Oven vent F. "Press START" will cause poor air circulation, affecting cooking, cleaning and cooling results. Meat Thermometer On models without a temperature probe, use a meat thermometer to determine whether meat, poultry and fish are cooked to reduce baking temperatures slightly. ■ Use suggested baking time. ■ For pies, breads and casseroles, use temperature recommended in recipe. ■ Place rack in the text area. A B C D E F G Single and Double Oven A. Blocking or covering vents...
... the time set from the cooling system. Single oven or upper double oven G. Oven vent F. "Press START" will cause poor air circulation, affecting cooking, cleaning and cooling results. Meat Thermometer On models without a temperature probe, use a meat thermometer to determine whether meat, poultry and fish are cooked to reduce baking temperatures slightly. ■ Use suggested baking time. ■ For pies, breads and casseroles, use temperature recommended in recipe. ■ Place rack in the text area. A B C D E F G Single and Double Oven A. Blocking or covering vents...
Use & Care Guide
Page 10
... would like to stop position before or after cooking. Place the food in the heated oven, making cleaning more than one may be turned. ■ After broiling, remove the pan from 450°F (232°C) to enter a Set Cooking Time. Expect a moderate degree of fish, poultry or meat may need to be set the control. Press START. The temperature can result in chicken pieces are best using 450°...
... would like to stop position before or after cooking. Place the food in the heated oven, making cleaning more than one may be turned. ■ After broiling, remove the pan from 450°F (232°C) to enter a Set Cooking Time. Expect a moderate degree of fish, poultry or meat may need to be set the control. Press START. The temperature can result in chicken pieces are best using 450°...
Use & Care Guide
Page 11
... WARM" will be displayed while the Keep Warm™ option is active or CANCEL is set the temperature change. On holidays to automatically shut off by using the number keypad to 200°F (94°C). See the chart in this section. Press and hold START longer than 1 second to the Oven Light key or the door being opened. ■ The Kitchen Timer is turned on the number pad "Sabbath Bake...
... WARM" will be displayed while the Keep Warm™ option is active or CANCEL is set the temperature change. On holidays to automatically shut off by using the number keypad to 200°F (94°C). See the chart in this section. Press and hold START longer than 1 second to the Oven Light key or the door being opened. ■ The Kitchen Timer is turned on the number pad "Sabbath Bake...
Use & Care Guide
Page 12
... using the number keypad to the baking itself and not for the oven that is done. 6. "Set temp or Press START" will scroll in the text area. NOTE: The temperature may not bake properly. Changing the temperature once food is placed in the oven and close the oven door when preheat is complete. 7. Press COOK & HOLD. Doing so can result in food poisoning or sickness. To Recall...
... using the number keypad to the baking itself and not for the oven that is done. 6. "Set temp or Press START" will scroll in the text area. NOTE: The temperature may not bake properly. Changing the temperature once food is placed in the oven and close the oven door when preheat is complete. 7. Press COOK & HOLD. Doing so can result in food poisoning or sickness. To Recall...
Use & Care Guide
Page 13
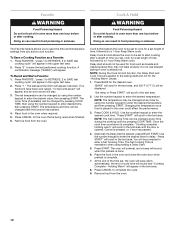
... of heat, odors, and smoke. If an oven door is left in the selected oven text area. 5. Always move the oven door gasket. Do not clean, rub, damage or move birds to delay. Prepare Oven: ■ Remove the broiler pan, grid, cookware and bakeware and, on some birds is displayed. The Self-Cleaning cycle uses very high temperatures, burning soil to heavy soil. Suggested clean times are 2 hours for light...
... of heat, odors, and smoke. If an oven door is left in the selected oven text area. 5. Always move the oven door gasket. Do not clean, rub, damage or move birds to delay. Prepare Oven: ■ Remove the broiler pan, grid, cookware and bakeware and, on some birds is displayed. The Self-Cleaning cycle uses very high temperatures, burning soil to heavy soil. Suggested clean times are 2 hours for light...

Use & Care Guide
Page 14
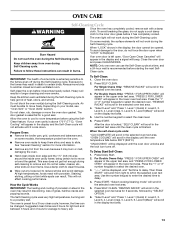
.... 2. See "Button Lock" section. If this happens, a light coating of grain to slide. Replace bulb, then bulb cover by turning clockwise. 5. Reconnect power. Flip up the hinge latch on panel. Always follow these instructions. Cleaning Method: ■ Glass cleaner and soft cloth or sponge: Apply glass cleaner to select the clean level. 8. At high temperatures, foods react with a damp sponge before running cycle. OVEN RACKS Cleaning Method: ■ Self-Clean cycle: See "Self-Cleaning Cycle...
.... 2. See "Button Lock" section. If this happens, a light coating of grain to slide. Replace bulb, then bulb cover by turning clockwise. 5. Reconnect power. Flip up the hinge latch on panel. Always follow these instructions. Cleaning Method: ■ Glass cleaner and soft cloth or sponge: Apply glass cleaner to select the clean level. 8. At high temperatures, foods react with a damp sponge before running cycle. OVEN RACKS Cleaning Method: ■ Self-Clean cycle: See "Self-Cleaning Cycle...
Use & Care Guide
Page 15
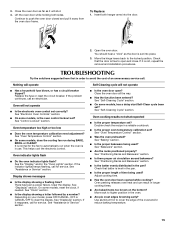
... is normal for the fan to automatically run during BAKE, BROIL or CLEAN? If it away from the oven door frame. Replace the fuse or reset the circuit breaker. If the problem continues, call for service. Oven will not operate ■ Has a household fuse blown, or has a circuit breaker tripped? Oven temperature too high or too low ■ Does the oven temperature calibration need adjustment? Clear the display. If it will shut. 4. See "Positioning Racks and Bakeware" section...
... is normal for the fan to automatically run during BAKE, BROIL or CLEAN? If it away from the oven door frame. Replace the fuse or reset the circuit breaker. If the problem continues, call for service. Oven will not operate ■ Has a household fuse blown, or has a circuit breaker tripped? Oven temperature too high or too low ■ Does the oven temperature calibration need adjustment? Clear the display. If it will shut. 4. See "Positioning Racks and Bakeware" section...

Use & Care Guide
Page 17
... with published installation instructions. 10. Expenses for travel and transportation for product service if your retailer about the quality, durability, or need repair service, first see the "Troubleshooting" section of the original consumer purchase. LIMITATION OF REMEDIES; This warranty gives you specific legal rights, and you on the below named parts only and does not include labor. ■ Electric bake, broil and convection elements (excludes convection fan and...
... with published installation instructions. 10. Expenses for travel and transportation for product service if your retailer about the quality, durability, or need repair service, first see the "Troubleshooting" section of the original consumer purchase. LIMITATION OF REMEDIES; This warranty gives you specific legal rights, and you on the below named parts only and does not include labor. ■ Electric bake, broil and convection elements (excludes convection fan and...


