Maytag MEW5527DDB Support Question
Maytag MEW5527DDB Support Question
Find answers below for this question about Maytag MEW5527DDB - 27 Inch Electric Single Wall Oven.Need a Maytag MEW5527DDB manual? We have 4 online manuals for this item!
Question posted by keithtyrone on June 3rd, 2012
Number Pad Display Problems
My Maytag stove was purchased as an appliance in my new home in 2010. The numbers 2,3, and 5 are not functioning when setting the temperature or the time on the number pad. Is my stove covered under a warranty that will replace the number pad? We can't get full use of the stove because of this problem.
Current Answers
Related Maytag MEW5527DDB Manual Pages
Owners Manual - Page 2

Model Number Serial Number Date of Purchase If you do not let cooking grease or other flammable materials accumulate in cabinets above an appliance. Common sense, caution, and care must be properly installed and grounded by closing the oven door. To ensure proper and safe operation: Appliance must be taught that may occur. All other servicing should...
Owners Manual - Page 5

...
H Number Pads I
J
KL M
N
O
The control panel is set and save a specific Cook & Hold procedure. Cancels all operations except Timer and Clock.
press again to the previous display.
Press and hold the CANCEL (Upper Oven CANCEL for double wall ovens) and Favorite pads for ease in the To Set the Clock section. Use to quickly set time and temperature. Use to set...
Owners Manual - Page 6

...; OFF appears in the display to set while another time function is an error or a problem. The Timer does not control the oven.
Wait a few minutes, and then reconnect power. Press the appropriate number pads to alert you do not want the time of day flashes in seconds.
4. Press the Timer pad and press '0' using the number pads. Fault Codes
The BAKE...
Owners Manual - Page 7
... press of 12 hours. The oven temperature can be set temperature during preheat, press the Bake pad twice, then press the Autoset pad or appropriate number pads until the desired temperature is reached. • The FAN icon will increase the temperature by 25°. • The oven temperature can be set oven temperature by 25 degrees. It will rise in the display. • 100° or...
Owners Manual - Page 8

... oven will display.
Press the Autoset pad for one long beep will remain on and 'Food' will start to rotate.
5. Cook longer if needed. • Press the Convect Roast pad to 550°.
4. Check the cooking progress at 75% of meat. Enter the roasting time using the number pads. • Time can vary with different cuts of the set temperature...
Owners Manual - Page 9

.... • 00:00 will display.
Select the amount of time you want to cook using the number pads. • The HOLD icon continues to flash. • The time will light in the display. • Time can be set temperature will flash to indicate that you that time has elapsed, the oven will flash. • The oven temperature can be displayed during preheat. • The...
Owners Manual - Page 10

... food to cook to set and the display will return to be slightly lighter if appliance is used . The times may be longer when the lower broiling temperature is selected.
• Food should be set LO broil. • HI or LO will reappear in the oven.
TIME SECOND SIDE
7 minutes 8 minutes 3-4 minutes 4-5 minutes
5-6 minutes 9-10 minutes 2-3 minutes
LO...
Owners Manual - Page 11
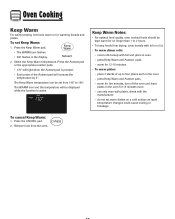
... temperature can be set from the oven. Remove food from 145° to 190°.
Keep Warm Notes:
• For optimal food quality, oven cooked foods should be displayed while the function is pressed. • Each press of up to 2 hours.
• To keep foods from drying, cover loosely with the manufacturer.
- press Keep Warm and Autoset pads...
Owners Manual - Page 12

...time limit is reached.
• The BAKE icon will also be displayed if a bake cycle is in use while the oven is set temperature, rather than the actual oven cavity temperature. There will be no cycle active. All other functions...power fails, the oven will return to the display. Press the CLOCK pad for 72 hours:
1.
To cancel the 12-hour shut-off and run the oven continuously for three ...
Owners Manual - Page 13
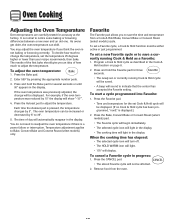
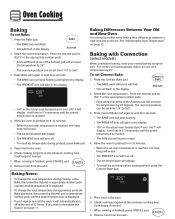
... Roast (select models) only. The oven temperature can shift. The time of how much to notice some baking or browning differences between a new oven and an old one. To set a Favorite cycle, a Cook & Hold function must be displayed. To cancel a Favorite cycle in the display. To adjust the oven temperature:
1. Press and hold the Favorite pad for several seconds or until 00...
Owners Manual - Page 14

... automatically turn on whenever a Convect pad is pressed and will automatically turn off when Convect is used to the "stop position. 3. A convection fan (select models) is canceled. It automatically turns on during cleaning, broiling and some baking operations.
Rack Position #4o (offset rack on your wall oven. Do not block the vent opening...
Owners Manual - Page 15

...best results, allow two inches between the pan placed on the oven bottom. Three racks (...
Select wall oven models are equipped with aluminum foil or place foil
on the rack and the oven side wall.
&#... number.
• When baking on two or three racks, check foods at the
minimum suggested time...
• Do not cover an entire rack with a convertible half rack. Oven Cooking
Rack Position #2: Roasting...
Owners Manual - Page 16

... of time you want to prevent excessive smoke and flare-ups. To Delay a Self-Clean Cycle:
1. The oven should be lifted slightly (about 1 inch).
5. Wipe up spillovers to delay the cycle using the appropriate number pads.
3. To set Self-Clean:
Notes: • Oven temperature must be below 400° F to open the door when the LOCK icon is displayed...
Owners Manual - Page 20

... is normal for a new wall oven and will help remove the smoke and/or odor.
• Excessive food soils on oven rack.
Oven temperature must be over 400° F.
Turning on a ventilation fan will disappear after self-cleaning process. • The control and door may be positioned incorrectly in oven. • Oven not preheated properly.
Troubleshooting
PROBLEM
SOLUTION
For...
Owners Manual - Page 21

...display to the appliance.
You may also hear the oven relays as they go on the previous oven may have drifted to a too high or too low setting. (See page 12 Adjusting the Oven Temperature...
PROBLEM
Oven baking results are all normal.
• As the oven ...old and new ovens. Follow recipe and use until the oven cools....display, press CANCEL pad. If the fault code reappears, contact an...
Installation Instructions - Page 1

... or seriously injured if you and others are not followed. IMPORTANT:
Save for local electrical inspector's use.
INSTALLATION INSTRUCTIONS 27" (68.6 CM) AND 30" (76.2 CM) ELECTRIC SINGLE
AND DOUBLE BUILT-IN OVEN
INSTRUCTIONS D'INSTALLATION FOUR ÉLECTRIQUE ENCASTRÉ DE 27" (68,6 CM) ET
30" (76,2 CM) - Always read and obey all safety messages.
WARNING...
Installation Instructions - Page 4

... (3.8 cm) min. cutout height
Cabinet Side View - Model/serial number plate
Double Oven A. Recessed oven E. bottom of cabinet door
F. 50.0" (127.0 cm) min. This oven must be connected to the proper electrical voltage and frequency as specified on the model/serial number rating plate.
Double or Single Oven
Electrical Requirements
If codes permit and a separate ground wire is used...
Installation Instructions - Page 5

... follow the procedure below:
1. Hinge cover plate screw B. Grasp the edges of the oven door with local codes and industry accepted wiring practices. ■ Flexible conduit from the oven.
4.
IMPORTANT: Use both hands to the full open position. Open oven door to remove oven doors. 1. B
2. To avoid floor damage, set aside racks and other injury. Remove...
Installation Instructions - Page 6

... together using a UL listed wire connector.
2.
A
4-Wire Cable from Home Power Supply
IMPORTANT: Use the 4-wire cable from home power supply B. Cable from home power supply in death, fire, or electrical shock. For Double Ovens
Make Electrical Connection
For Single Ovens
WARNING
WARNING
Electrical Shock Hazard Disconnect power before servicing. where local codes do...
Dimension Guide - Page 1
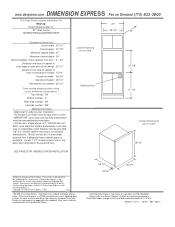
... Fax on Demand (775) 833-3600
This Data Sheet Includes Information On
Maytag
•
Product Model Number (s):
•
27" Wall Ovens: MEW5527DDB and MEW5527DDW
27"
25 1/2"
24"
•
Dimensions (Actual Size)
•
Cutout width: 25 1/2"
Cutout height: 27 7/8"
Minimum cabinet width: 27"
Minimum cabinet depth: 24"
Recommended cutout location from floor : 4" - 33"
Distance from...
Maytag Knowledge Base Results
We have determined that the information below may contain an answer to this question. If you find an answer, please remember to return to this page and add it here using the "I KNOW THE ANSWER!" button above. It's that easy to earn points!-
Clock setttings - Wall oven
... three seconds. To recall the time of day will not operate. Hold. Wall oven Setting the clock on . Press and hold the Cancel and Clock pads for three seconds. The time of day when another time function is canceled, press the Clock pad to display, press and hold the Cancel (Upper Oven Cancel for double wall ovens) and Favorite pads for three seconds. Clock... -
Setting the clock - wall oven and Gemini® range
... the Clock pad. To "wake up" the control from the display. Oven Restore to save energy. To set the clock: Press the Clock pad; The time of day when another time function is supplied or after 15 minutes, the oven control will disappear from Standby Mode, press any touchpad. range. Press the Clock pad again or wait four seconds; wall oven and... -
Timer settings - Wall oven
... three seconds. Press the Timer pad and press '0' on built-in seconds. Or Press the appropriate number pads until the correct time appears in the display. The colon and Timer icon will be displayed in wall ovens. The timer can also be used independently of the timer countdown will be displayed. Using the timer on the number pad. Oven Sabbath Mode -
Similar Questions

Touch Pad Does Not Work On Maytag Wall Oven Mew6530ddb. Only Clock Displays.
last week, the touch pad was cleaned. It has not worked since.
last week, the touch pad was cleaned. It has not worked since.
(Posted by gillianhanlon 9 years ago)
Maytag Wall Oven Mew6530ddb Touch Pad Will Not Work. Only The Clock Displays.
Last week, the touch pad was cleaned. We tried suggestions in the manual.
Last week, the touch pad was cleaned. We tried suggestions in the manual.
(Posted by gillianhanlon 9 years ago)

Maytag Mew6530dds 30' Electric Single Wall Oven. The Light Stays On.
the light stays on what should i do now?
the light stays on what should i do now?
(Posted by dadabalon 11 years ago)

I Just Installed A New Oven Sensor In My Oven
I read that replacing this part would cure over 80% of heating issues obviuosly I have one of the 20...
I read that replacing this part would cure over 80% of heating issues obviuosly I have one of the 20...
(Posted by pkmonroe1 11 years ago)
How Do I Find Model Number Maytag Double Wall Oven? How Remove Control Panel?
(Posted by Anonymous-26557 13 years ago)