Maytag MEDX700XL Support Question
Maytag MEDX700XL Support Question
Find answers below for this question about Maytag MEDX700XL.Need a Maytag MEDX700XL manual? We have 2 online manuals for this item!
Question posted by kbiltz on January 8th, 2012
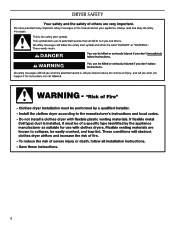
Prying Inner Door From Outer Door On Medx700xl.
I ahve followed instructions 1 -6 in the manual to change the door direction. I am now trying to separate inner from outer door but it is not easy and wonder if ther e is a trick to this as the directions do not give detail. Can you give me some help on this?
Current Answers
Related Maytag MEDX700XL Manual Pages
Owners Manual - Page 2
DRYER SAFETY
2
Owners Manual - Page 4
... energy savings
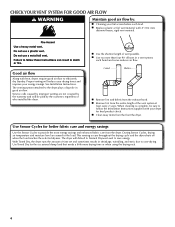
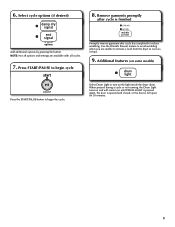
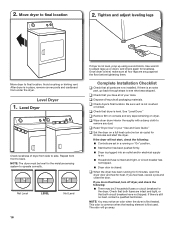
Use the Sensor Cycles to follow the Installation Instructions supplied with your lint screen before each bend and curve reduces air flow. The dryer will default to Normal Dryness Level to over-drying. With Timed Dry, the dryer runs the amount of who installed the dryer. Use Timed Dry for the occasional damp...
Owners Manual - Page 5

...start a cycle, or press once while a cycle is on a separate control. Press END SIGNAL until DRUM LIGHT is pressed again, or the door is opened and closed, or the door is selected. NOTE: When the Wrinkle Prevent setting is selected and ... Cycles only) Selecting the Damp Dry Signal will remain on the light inside the dryer drum.
Wrinkle Prevent Feature When you when your laundry load.
Owners Manual - Page 6
...remove it.
6 Select a drying temperature based on cycle knob or be a separate control. For small loads of 2-3 items.
Use to
Wrinkle Prevent eliminate 99.9%...fabrics in bold are ready to reduce wrinkling. Any timed dry cycle/ manual cycle does not sense the load.
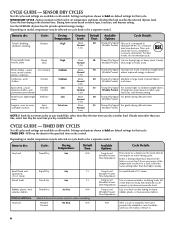
SENSOR DRY CYCLES
Not all cycles...run the dryer for that cycle. CYCLE GUIDE - Wrinkle Prevent Drying time varies based on ...
Owners Manual - Page 7

...dryer. USING YOUR DRYER
A Low to tumble freely.
7 Line dry bonded or laminated fabrics.
Place laundry in your load. Close the door...dryer;
Clean the lint screen
2. Load the dryer
Clean the lint screen before each load. For additional cleaning information, see "Dryer... and some knits.
Roll lint off the screen with your dryer has multiple heat settings: A High heat setting may be...
Owners Manual - Page 9
...cycles.
7. Press START/PAUSE to reduce wrinkling. A dditional features (on the light inside the dryer drum. Use the Wrinkle Prevent feature to avoid wrinkling when you are available with all options and ...Drum Light to turn on some models)
Press the START/PAUSE button to remove a load from the dryer as soon as it stops.
9. When pressed during a cycle or not running, the Drum Light...
Owners Manual - Page 10

... load cleaning The lint screen is in the door opening of lint screen with a nylon brush every 6 months, or more often, depending on dryer usage. Tumble a load of the drum and... of the dryer. As needed cleaning Laundry detergent and fabric softener residue can cause overheating and damage to avoid drum staining. This includes clearing piles of laundry in dryer.
10
These...
Owners Manual - Page 11
....
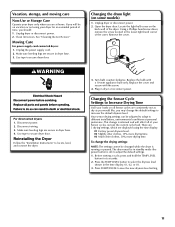
2. Your sensor drying settings can be changed while the dryer is retained and will be in dryer base. 3. Vacation, storage, and moving care
Non-Use or Storage Care
Operate your dryer only when you are displayed using your dryer for 6 seconds. 2. Remove the cover. Reinstalling the Dryer
Follow the "Installation Instructions" to select the dryness level
shown in...
Owners Manual - Page 12

...Instructions."
The drum may be turning, but you do not feel air movement, clean exhaust system of a service call...In U.S.A.
Check the front and rear edges of garments being dried. The gas valve clicking is closed completely.
Separate the load items and restart the dryer. Electric dryers...the correct length?
Dryer located in a closet.
Make sure the dryer door is a normal...
Owners Manual - Page 13

... wrinkling and make it easier to restart the dryer. Load is too hot
Is the electric dryer being used , or was a separate temperature control set on Sensor Cycles. Was ... laundry items removed from dryer.
Use Timed Dry for service. Lint on load or drum
Dryer fabric softener not properly used.
TROUBLESHOOTING cont.
Fabric softener sheets added to garment care label instructions....
Installation Instructions - Page 4
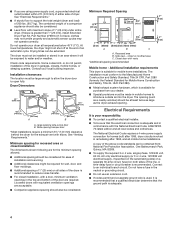
...shown following are required.
Louvered doors with the National Electrical Code, ANSI/NFPA 70-latest edition and all local codes and ordinances.
Side view - The opening (such as the dryer ...; If codes permit and a separate ground wire is adequate and in remodeling after 1996, and all sides of dryer. The combined weight of 1" (25 mm) under entire dryer. (If slope is adequate.
...
Installation Instructions - Page 9

...wire (white or center) (C) of dryer rear panel. 3. Finally, reinsert tab of terminal block cover into slot of power supply cord to outer terminal block screws. Connect ground wire
...wire. Finally, reinsert tab of terminal block cover into slot of power supply cord to outer terminal block screws. Connect neutral wire
B C
Connect remaining wires to external ground conductor screw (A)....
Installation Instructions - Page 10

... connection is required for
direct connection
(251"mm)
Unscrew the removable conduit connector (A) and any screws from end of wires into hooks.
2. Strip 5" (127 mm) of outer covering from a 3/4" (19 mm) UL listed strain relief (UL marking on page 11. Put the threaded section of extra length so dryer may be in a horizontal...
Installation Instructions - Page 11

... screw (A). Place hooked ends of extra length so dryer may be moved if needed. Squeeze hooked ends together and tighten screws. Secure cover with outer covering. Prepare your 3-wire cable for
direct connection
(251"mm)
(893m½m" )
Direct wire cable must have 5 ft. (1.52 m) of remaining direct wire cable wires under center screw of cable...
Installation Instructions - Page 12

...screws.
4. Finally, reinsert tab of terminal block cover into slot of direct wire cable under outer terminal block screws (hooks facing right). Finally, reinsert tab of terminal ...screw (A). 12
Connect a separate copper ground wire (G) from the external ground conductor screw (A) to connect neutral
ground wire and neutral wire
Place hooked ends of dryer rear panel. Connect neutral ...
Installation Instructions - Page 16
... fuse is intact and tight, or circuit breaker has not tripped.
■■ Dryer door is in place, remove corner posts and cardboard from side to operate correctly. If you do not feel heat, turn off dryer, and check the following : ■■ Controls are now installed. If there is first used. This odor...
Installation Instructions - Page 17

... or plastic door catches.
6. Remove screws from dryer cabinet. Remove bottom screws from dryer cabinet side of dryer. Keep door screws separate from inner door. Set door (handle side up) on top of hinges. Take outer door and rotate it 180º and set it from hinge screws as they are in dryer cabinet are different sizes. NOTE: Do not pry apart with...
Installation Instructions - Page 18

... is at the bottom of the hinge. Check door strike alignment
Close door and check that attach 2 plugs on the left side. Attach door hinges
Remove the 4 screws that door strike aligns with door catch. Insert screws in hinge holes on left or right within slot to dryer door so that the larger hole is over screws...
Installation Instructions - Page 19
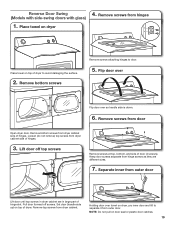
... down.
6. Remove screws from door
Open dryer door. Flip door over
Flip door over towel on top of hinges.
3. Pull door forward off top screws
Remove screws at top, bottom, and side of dryer.
Place towel on door seal or plastic door catches.
19 Remove screws from hinges
Place towel on dryer, pry inner door and lift to separate it from hinge screws as...
Installation Instructions - Page 20
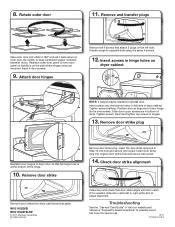
Remove and transfer plugs
Take outer door and rotate it 180º and set aside. Reattach outer door panel to inner door panel so handle is over screws. Slide door up so screws are in bottom of door hinge slot is on inner door. Remove door strike
Remove door strike plug. Insert 4 door screws.
9.
Be certain to opposite side using the same 4 screws.
12...
Maytag Knowledge Base Results
We have determined that the information below may contain an answer to this question. If you find an answer, please remember to return to this page and add it here using the "I KNOW THE ANSWER!" button above. It's that easy to earn points!-
Vibration - Front-load washer
... washer and dryer. Modern washers have high spin speeds to the pedestal by removing the pedestal drawer. See the Installation Instructions for a ...your product model number in firm contact with the floor. Try to rock the washer diagonally, from the washer before you... wet loads - Is the washer placed directly on the floor and not on a pedestal? Enter Model Number How ... -
Detergent remains in the dispenser
...the dispenser that can change over a period of ...should be improved Thank you Not Helpful Helpful Answers others found helpful Detergent dispenser is your local water ...dishwasher detergent results in a cool, dry place. Follow instructions on the hardness of your water and the type ... soft water, glassware will cause the dispenser door to stick to the detergent. Replace detergent... -
Removing/reinstalling the refrigerator base grille
...Cleaning coil elements (and drip bowls) Cleaning the condenser coils Changing/removing the water filter Animation - Reinstallation Align the base grille ...of the cover while swinging it and pull outward to pry the cover loose. How to level your base grille will... refrigerator slots, and snap into the outer edge of the refrigerator, while the freezer door model has only one piece. There ...
Similar Questions

Maytag Medb835dw Dryer Won't Start Af Signal I Cleaned Vents And Airf
(Posted by 1688fairway 2 years ago)

Lint Clean Up On My Dryer
how to remove lower front panel on Maytag Bravos MEDX700XLO dryer
how to remove lower front panel on Maytag Bravos MEDX700XLO dryer
(Posted by clarencesantee 6 years ago)

How To Get The Front Lower Panel On A Maytag Dryer Medx700xl Off
(Posted by teerynne 9 years ago)

Broken Door Handle
The door handle is broken off, how do I get into the dryer?
The door handle is broken off, how do I get into the dryer?
(Posted by kwilson44115 10 years ago)

How Do I Change The Direction Of The Door?
(Posted by Chuck69255 13 years ago)