Maytag MEDX700XL Support Question
Maytag MEDX700XL Support Question
Find answers below for this question about Maytag MEDX700XL.Need a Maytag MEDX700XL manual? We have 2 online manuals for this item!
Question posted by clarencesantee on November 10th, 2017
Lint Clean Up On My Dryer
how to remove lower front panel on Maytag Bravos MEDX700XLO dryer
Current Answers
Answer #1: Posted by Odin on November 10th, 2017 11:39 AM
Odin

Member since:
April 10th, 2010 Points: 41,236,670

Member since:
April 10th, 2010 Points: 41,236,670
Hope this is useful. Please don't forget to click the Accept This Answer button if you do accept it. My aim is to provide reliable helpful answers, not just a lot of them. See https://www.helpowl.com/profile/Odin.
Related Maytag MEDX700XL Manual Pages
Owners Manual - Page 4
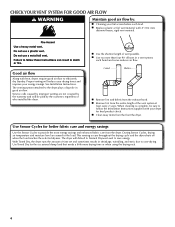
... heat, dryers require good air flow to save energy.
Use Sensor Cycles for final product check. Proper venting will default to Normal Dryness Level to efficiently dry laundry.
n Use no more drying time or when using the drying rack.
4 The dryer will reduce your drying times and improve your energy savings. n Remove lint from the dryer.
Owners Manual - Page 5

...the lower setting rather than the higher setting. NOTE: The Air Dry Temp Level Feature is not available on your laundry load... models with two choices,
90 minutes for the Sensor Cycles only. CONTROL PANEL & FEATURES
1
2
3
6
5
4
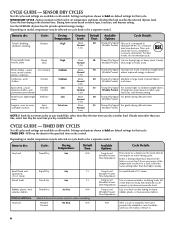
Not all models. Dryness Level...Timed Cycles only) Will run the dryer for the specified time on until the clothes are removed, or the Wrinkle Prevent setting ...
Owners Manual - Page 6
...all cycles and settings are unsure of the temperature to remove it.
6 to provide optimal energy savings.
Settings and options shown in the dryer too long. Items to dry:
Any load
Cycle:
Timed...to
Wrinkle Prevent eliminate 99.9% of 2-3 items.
Use to a damp level for a load, select the lower setting rather than you like , select More Dry the next time you dry a similar load. Gives the...
Owners Manual - Page 7

..., permanent press fabrics, and some knits. Clean the lint screen
2. For additional cleaning information, see "Dryer Care." Close the door.
Setting the Drying Temperature
Select a drying temperature based on the fabrics in the dryer. Temperature Tips If your dryer has multiple heat settings: A High heat setting may be able to remove lint. Use a no heat (air dry) setting...
Owners Manual - Page 8
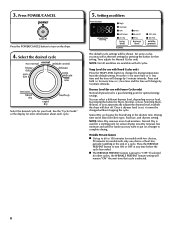
...ended. 3. Press POWER/CANCEL
5.
Less Dry removes less moisture and used for a starting point for loads you may want to put on the dryer.
4. Setting modifiers
Press the POWER/CANCEL ... dryness level is a good starting point for More, Normal, or Less. NOTE: More Dry removes more information about each cycle. You can select a different dryness level, depending on fabric type...
Owners Manual - Page 9
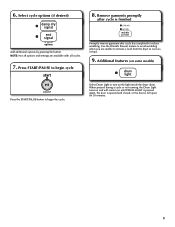
R emove garments promptly
after cycle has completed to remove a load from the dryer as soon as it stops.
9. Use the Wrinkle Prevent feature to avoid wrinkling.... NOTE: Not all cycles.
7. Press START/PAUSE to begin the cycle. Select Drum Light to begin cycle
Promptly remove garments after cycle is left open for 30 minutes.
9 When pressed during a cycle or not running, the Drum Light...
Owners Manual - Page 10

.... Do not rinse or wash screen to your load is removed. 2. These stains are not harmful to remove lint. Dry these items inside out to a residue buildup. Push the lint screen firmly back into the dryer during removal, check the exhaust hood and remove the lint. As needed cleaning Laundry detergent and fabric softener residue can cause longer drying times...
Owners Manual - Page 11
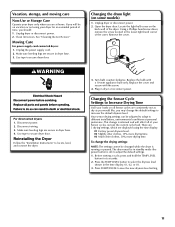
... can be in the lower right-hand corner of the dryer. Unplug the power supply cord. 2. Unplug dryer or disconnect power.
2. Use tape to secure dryer door. To change the...and connect the dryer.
3. Disconnect power. 2.
See "Cleaning the Lint Screen."
Make sure leveling legs are at home. Remove the cover. There are 3 drying settings, which are secure in dryer base. 3....
Owners Manual - Page 12

...See "Installation Instructions." Separate the load items and restart the dryer. For gas dryers, is a normal operating sound.
Lint screen should be turning, but you may vibrate if not properly... Clean out pockets before each load. Exhaust vent diameter the correct size.
Dryer will increase drying times. http://www.maytag.com/help - In Canada www.maytag.ca
If you hear the dryer drum...
Owners Manual - Page 13

... Asked Questions) to garment care label instructions. Alternating between F# and E#, the dryer control has detected a problem that can stain your dryer is best for the first time? If loads are wrinkled
Load not removed from loads consisting of a service call...In U.S.A.
Were laundry items removed from dryer.
TROUBLESHOOTING cont.
Lint on high? Call for very small loads.
Installation Instructions - Page 5
... or nonmetallic sheathed copper cable (with ground wire), covered with clothes dryers. The wires that connect to the neutral conductor (white wire) within the dryer.
If connecting by direct wire: Power supply cable must match power supply (4-wire or 3-wire) and be removed from the neutral conductor.
■■ A 4-wire power supply connection...
Installation Instructions - Page 8
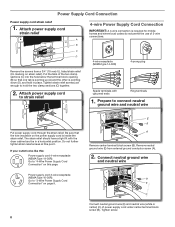
...center) (C) of 3-wire connections.
4-wire receptacle (NEMA type 14-30R)
4-prong plug
Remove the screws from external ground conductor screw (A).
2. Be sure that one tab is pointing up...relief
Spade terminals with the dryer cabinet and be in place. Remove neutral ground wire (E) from a 3/4" (19 mm) UL listed strain relief (UL marking on page 9.
8
E
B
A
Remove center terminal block screw ...
Installation Instructions - Page 9

... codes permit connecting cabinet-ground conductor to external ground conductor screw (A). Finally, reinsert tab of terminal block cover into slot of dryer rear panel. Tighten screw.
4. Connect remaining wires
Remove center terminal block screw (B).
2.
Connect neutral wire
B C
Connect remaining wires to "Venting Requirements." Connect ground wire
1. Secure cover with hold...
Installation Instructions - Page 10

... a 3/4" (19 mm) UL listed strain relief (UL marking on page 11. E B
A Remove center terminal block screw (B).
Prepare your wiring looks like this:
4-wire direct connection: Go to "4-Wire...Wire Direct Connection" on strain relief). Shape ends of extra length so dryer may be in a horizontal position. Remove neutral ground wire (E) from end of the strain relief (C) through ...
Installation Instructions - Page 11

... wire (E) and place hooked end (hook facing right) of neutral wire (white or center wire) (C) of terminal block (B). Squeeze hooked ends together and tighten screw.
4. Remove center screw
B
AF Connect ground wire (green or bare) (F) of dryer rear panel. Tighten screw.
5. Finally, reinsert tab of terminal block cover into hooks.
2.
Installation Instructions - Page 12

... wire) (C) of remaining wires under center terminal block screw (B). Finally, reinsert tab of terminal block cover into slot of dryer rear panel. Optional 3-wire Connection
IMPORTANT: You must verify with hold -down screw. Remove neutral ground wire (E) from external ground conductor screw (A). 12
Connect a separate copper ground wire (G) from the external ground conductor...
Installation Instructions - Page 13

... airflow and poor performance.
■■ Do not install in final dryer location.
■■ Remove excess to seal all governing codes and ordinances.
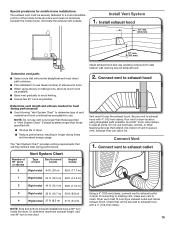
Review "Vent System Chart... The total length should not exceed 73/4 ft. (2.4 m). NOTE: If using an existing vent system, clean lint from ground or any gas vent, chimney, wall, ceiling, attic, crawlspace, or a concealed space of a...
Installation Instructions - Page 15
...of vent to secure vent, because they can catch lint.
Vent System Chart
Number of 90° turns ... hood combinations acceptable to use vent runs longer than those specified in dryer. Secure vent to exhaust hood with a 4" (102 mm) clamp...System Chart." The "Vent System Chart" provides venting requirements that vent is clean. Use clamps to avoid kinking. ■■ Use as few 90°...
Installation Instructions - Page 16
... supply is on.
■■ Household fuse is intact and tight, or circuit breaker has not tripped.
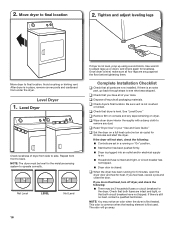
■■ Dryer door is first heated. Check that both fuses are set in place, remove corner posts and cardboard from side to see what was skipped. NOTE: You may be level for 5 minutes, open...
Installation Instructions - Page 17

... inner door. NOTE: Do not pry apart with putty knife or screwdriver. Reattach outer door panel to avoid damaging the surface.
2. Remove screws from dryer cabinet. Remove bottom screws from dryer cabinet side of door (5 screws).
Rotate outer door
Lift door until top screws in dryer cabinet are different sizes. Pull door forward off top screws...
Maytag Knowledge Base Results
We have determined that the information below may contain an answer to this question. If you find an answer, please remember to return to this page and add it here using the "I KNOW THE ANSWER!" button above. It's that easy to earn points!-
Lint is on the load - Dryer
... load overdried? Dryer My dryer makes sounds or vibrations Lint is lint on the load - The lint may be the surface fuzz (pilling) on cleaning the lint screen. Smaller loads allow adequate removal of lint from the clothing. Is the lint screen clogged with residue? Clean the Lint Screen Is the lint screen clogged with lint? Thoroughly dry the lint screen with a clean towel; Were... -
Lint is on the load - Front-load washer
...can expect some lint on your load size. What happens if I don't clean my HE washer? video Was the laundry sorted? Sort lint-producing fabrics (towels, chenille) from the laundry load. Also... movement and tumbling of laundry. Lint is on the load - New clothes tend to trap lint. Sort loads before starting a new load of a dryer removes lint from lint takers (corduroys, synthetics,... -
Lint is on the load - Top-load washer
... be high enough to allow the load to reduce lint. Top-load washer Lint is overloaded. Lint is not cleaning laundry - Sort loads before starting a new load of the washer before laundering. lights with lights and darks with less wash time and/or lower wash speeds to move freely. The water level should be trapped in...
Similar Questions

How To Get The Front Lower Panel On A Maytag Dryer Medx700xl Off
(Posted by teerynne 9 years ago)

Maytag Centennial Dryer How To Clean Dryer Cabinet
(Posted by joelmomo 10 years ago)

How To Remove Front Panel Of Dryer?
How do you remove the front panel of a Maytag gas dryer model # MGDB200QV?
How do you remove the front panel of a Maytag gas dryer model # MGDB200QV?
(Posted by vitojeffords 12 years ago)

Prying Inner Door From Outer Door On Medx700xl.
I ahve followed instructions 1 -6 in the manual to change the door direction. I am now trying to sep...
I ahve followed instructions 1 -6 in the manual to change the door direction. I am now trying to sep...
(Posted by kbiltz 12 years ago)