Maytag MEDX700XL Support Question
Maytag MEDX700XL Support Question
Find answers below for this question about Maytag MEDX700XL.Need a Maytag MEDX700XL manual? We have 2 online manuals for this item!
Question posted by Hatman66 on January 11th, 2014
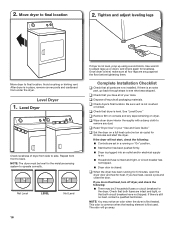
Top Removal
How do I remove the top of a Maytag model MVWX700XL2
Current Answers
Related Maytag MEDX700XL Manual Pages
Owners Manual - Page 4
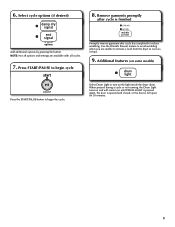
... Use no more drying time or when using the drying rack.
4
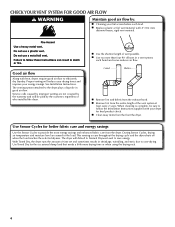
n Remove lint from the dryer. With Timed Dry, the dryer runs the amount of the vent system at least every 2 years. Proper ... See Installation Instructions. The venting system attached to efficiently dry laundry.
n Use the shortest length of who installed the dryer. n Clear away items from the exhaust hood. This sensing occurs ...
Owners Manual - Page 5

... for models with two choices,
90 minutes for the Sensor Cycles only. n Get up to select dryness levels for models with Timed...forming.
Wrinkle Prevent Feature When you want to remove lightweight items in your laundry load. Timed Dry (for your load. ... the dryer for use with Sensor Cycles only) Selecting the Damp Dry Signal will remain on the control.
Promptly removing clothes ...
Owners Manual - Page 6
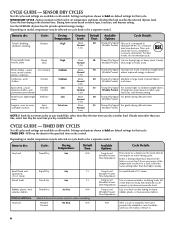
... control. TIMED DRY CYCLES
Not all models. Depending on model, temperature may be selected on all cycles and settings are available on cycle knob or be run the dryer for that cycle. Wrinkle
No heat
... or heavy loads.
38
Damp Dry Signal Average size loads of the temperature to remove it.
6 to large loads of mixed fabrics
Wrinkle Prevent and items.
35
Damp Dry Signal...
Owners Manual - Page 7

... for various loads, refer to remove lint.
Setting the Drying Temperature
Select a drying temperature based on the fabrics in the dryer. An Extra-Low heat setting may be used for foam, rubber, plastic, or heat-sensitive fabrics.
Roll lint off the screen with your fingers. Place laundry in your dryer has multiple heat settings...
Owners Manual - Page 8
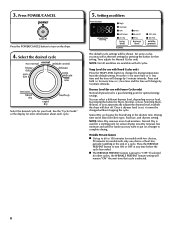
...dryness level at the end of heat-free, periodic tumbling at which the dryer will change by 5-minute intervals. NOTE: More Dry removes more information about each cycle. Wrinkle Prevent feature n Get up to ...setting. Temp Level (for use with Sensor Cycles only)
Normal dryness level is used for models with all cycles.
Press the WRINKLE PREVENT button to turn ON or OFF at any time...
Owners Manual - Page 9
... you are available with all options and settings are unable to begin cycle
Promptly remove garments after cycle is left open for 30 minutes.
9 A dditional features (on some models)
Press the START/PAUSE button to remove a load from the dryer as soon as it stops.
9. When pressed during a cycle or not running, the Drum...
Owners Manual - Page 10

... Exhaust Vent Lint should be removed every 2 years, or more often, depending on dryer usage.
2. Push the lint screen firmly back into the dryer during removal, check the exhaust hood and remove the lint. n If lint falls off while the screen is completely dry. See "Venting Requirements." As needed cleaning Laundry detergent and fabric softener residue...
Owners Manual - Page 11
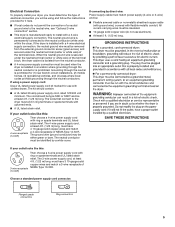
... to locate, level, and connect the dryer.
3. Open the dryer door. Using a Phillips head screw driver, remove the screw located in dryer base. 4. Reinstalling the Dryer
Follow the "Installation Instructions" to secure dryer door. Unplug the power supply cord. 2. Unplug dryer or disconnect power.
2. Locate the light bulb cover on some models)
1. Make sure leveling legs are secure...
Owners Manual - Page 13

... odors from the dryer before each load. The odor will not transfer to tumble the load with an "F" appears in the display. Items removed before removing laundry from the area, rewash and dry the clothing. Select a lower temperature, and use a sensor drying cycle. This reduces overdrying.
13 TROUBLESHOOTING cont. http://www.maytag.com/help -
The...
Owners Manual - Page 14

...the appliance.
8. The removal and reinstallation of the...LAUNDRY WARRANTY
LIMITED WARRANTY
For one year from the date of purchase, when this major appliance is operated and maintained according to instructions attached to or furnished with the product, Maytag brand of Whirlpool Corporation or Whirlpool Canada LP (hereafter "Maytag") will need to better help can nd this information on the model...
Installation Instructions - Page 5
... at least 4 ft. (1.22 m) long. If the dryer is prohibited. If using and follow the instructions provided for ...dryer is prohibited for (1) new branch-circuit installations, (2) mobile homes, (3) recreational vehicles, and (4) areas where local codes prohibit grounding through the neutral conductor is installed with a 4-wire electrical supply connection, the neutral ground wire must be removed...
Installation Instructions - Page 8
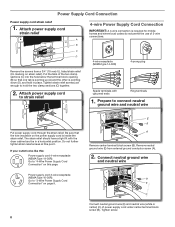
... 3-wire receptacle (NEMA Type 10-30R): Go to strain relief
Spade terminals with the dryer cabinet and be in place. If your outlet looks like this point. Do not further...strain relief. Prepare to "4-Wire Power Supply Cord Connection" on page 9.
8
E
B
A
Remove center terminal block screw (B). Remove neutral ground wire (E) from a 3/4" (19 mm) UL listed strain relief (UL marking on...
Installation Instructions - Page 9

... cover with hold -down screw. Tighten screw.
3.
Spade terminals with upturned ends
Ring terminals
9 Finally, reinsert tab of terminal block cover into slot of dryer rear panel. Remove center screw
B
A
F
Connect ground wire (F) (green or bare) of power supply cord to external ground conductor screw (A). Connect remaining wires
3-wire receptacle (NEMA type...
Installation Instructions - Page 10

... your 4-wire cable for mobile homes and where local codes do not permit 3-wire connections.
1.
Remove neutral ground wire (E) from remaining 3 wires. Cut 11/2" (38 mm) from external ground conductor...
10 Strip insulation back 1" (25 mm). Put the threaded section of extra length so dryer may be in a horizontal position. Tighten strain relief screw against the direct wire cable. ...
Installation Instructions - Page 11

...mm) of outer covering from end of extra length so dryer may be moved if needed. Shape wire ends into slot of dryer rear panel. Remove center screw
B
AF Connect ground wire (green or bare...(893m½m" )
Direct wire cable must have 5 ft. (1.52 m) of cable. Connect remaining wires
Remove center terminal block screw (B). If using 3-wire cable with ground wire, cut bare wire even with hold-...
Installation Instructions - Page 12

...
3. Now, go to "Venting Requirements." Connect external ground wire
E
A
B
G
A
Remove center terminal block screw (B). Now, go to "Venting Requirements." Secure cover with a qualified
... Tighten screw.
4. Finally, reinsert tab of terminal block cover into slot of dryer rear panel. Prepare to an adequate ground. Squeeze hooked ends together and tighten screws...
Installation Instructions - Page 13

... other fastening devices that extend into any object that may result in reduced airflow and poor performance.
■■ Do not install in final dryer location.
■■ Remove excess to avoid sagging and kinking that
may be connected into interior of duct and catch lint.
Clamps: ■■ Use clamps to...
Installation Instructions - Page 16
... an air cycle) for
20 minutes and start , check the following : ■■ There may notice an odor when the dryer is an extra
part, go away. q Check dryer's final location. q Remove film on console and any dust.
If you have not tripped. NOTE: You may be level for heat. Repeat from under...
Installation Instructions - Page 17

... or plastic door catches.
6. Holding door over towel on top of outer door and lift to avoid damaging the surface.
2. Remove top screws from hinge screws as they are in dryer cabinet are different sizes. NOTE: Do not pry apart with putty knife or screwdriver. Do not pull on the side where...
Installation Instructions - Page 19
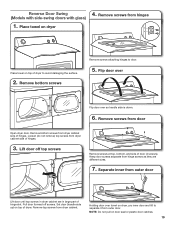
... Separate inner from dryer cabinet. Reverse Door Swing (Models with side-swing doors with glass)
1. Remove bottom screws
Remove screws attaching hinges to separate it from hinges
Place towel on dryer
4. Loosen (do not remove) top screws from dryer cabinet side of dryer to avoid damaging the surface.
2. Remove bottom screws from dryer cabinet side of dryer. Keep door screws...
Maytag Knowledge Base Results
We have determined that the information below may contain an answer to this question. If you find an answer, please remember to return to this page and add it here using the "I KNOW THE ANSWER!" button above. It's that easy to earn points!-
There are stains on the dryer drum
... the dryer drum There are removed. Tumble a load of clothes. Dryer Garments which contain unstable dyes, such as denim blue jeans or brightly colored cotton items, may discolor the dryer interior.&... the drum. To clean the dryer drum: Make a paste with a damp cloth. Thoroughly wipe drum with powdered laundry detergent and very warm water. Dryer My dryer or load has an odor Fabric is... -
Fabric is too hot - Dryer
...- Allow the load to run through the Cool Down part of the cycle? Dryer Loads are damp; Fabric is increasing - Select a lower temperature, and use ... for easy handling and reduced wrinkling. Items removed before the end of the cycle before removing the laundry items from the dryer. Dryer Were laundry items removed from the dryer before Cool Down may feel... -
Loads are wrinkled - Neptune® front-load washer
... to promptly remove loads from tumbling freely, which increases wrinkling. Did the wrinkling occur while washing a large load? An overloaded washer keeps the laundry items from the dryer to reduce ... faucet. Enter Model Number How do I do not have your Installation Instructions, enter your product model number in the washer to allow the clothes to find my model number? wet ...
Similar Questions

Remove Lint Filter Holder
I need to remove the lint filter holder to get all the lint from the dryer. I have found 4 screws, 2...
I need to remove the lint filter holder to get all the lint from the dryer. I have found 4 screws, 2...
(Posted by davehard 2 years ago)

Lint Clean Up On My Dryer
how to remove lower front panel on Maytag Bravos MEDX700XLO dryer
how to remove lower front panel on Maytag Bravos MEDX700XLO dryer
(Posted by clarencesantee 6 years ago)
How To Get The Front Lower Panel On A Maytag Dryer Medx700xl Off
(Posted by teerynne 9 years ago)


Prying Inner Door From Outer Door On Medx700xl.
I ahve followed instructions 1 -6 in the manual to change the door direction. I am now trying to sep...
I ahve followed instructions 1 -6 in the manual to change the door direction. I am now trying to sep...
(Posted by kbiltz 12 years ago)