Maytag MED7000XG Support Question
Maytag MED7000XG Support Question
Find answers below for this question about Maytag MED7000XG.Need a Maytag MED7000XG manual? We have 2 online manuals for this item!
Question posted by kwilson44115 on November 9th, 2013
Broken Door Handle
The door handle is broken off, how do I get into the dryer?
Current Answers

Related Maytag MED7000XG Manual Pages
Owners Manual - Page 4
... storage. Available in matching colors. For more information on top of the washer.
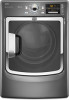
4 Stack Kit If space is at a premium, the stack kit allows the dryer to a more comfortable working and storage area. ACCESSORIES
Customize your dealer, or visit: www.maytag.com.
15" Pedestal Color matched pedestals raise the washer and...
Owners Manual - Page 5
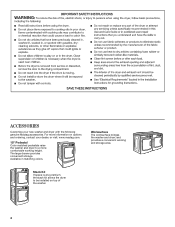
... more drying time or when using a Steam Cycle. Proper venting will be sure to follow the Installation Instructions supplied with heat, dryers require good air flow to efficiently dry laundry. See "Installation Instructions". During Sensor Cycles, drying air temperature and moisture level are not covered by the warranty and will reduce your...
Owners Manual - Page 6
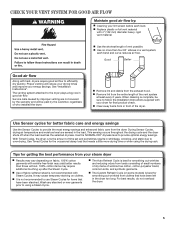
...KNOB Use your dryer's cycle control knob to increase or decrease the length of cycles.
3 START/PAUSE BUTTON Press and hold to start a cycle, or press once while a cycle is in process to pause it for up to 5 minutes.
4 TIMED DRY ADJUST for your laundry load. See ...CYCLES Use these buttons with Timed Cycles to select available cycles on and off. Turn the knob to turn the dryer on your...
Owners Manual - Page 7
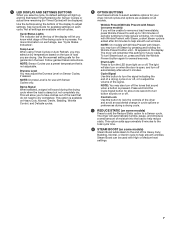
...with High or Medium heat settings.
7
St appears in process. The dryer will sound during a drying cycle.
7 REDUCE STATIC (on when the door is open, and turn off the tones that sound when a button...also turn on some models) Press to add the Reduce Static option to a Sensor cycle. The dryer will automatically tumble, pause, and introduce a small amount of moisture into the load to adjust ...
Owners Manual - Page 10
...handle.
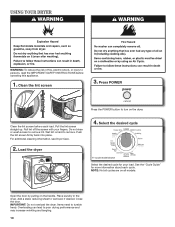
Clean the lint screen before operating this appliance.
1. Push the lint screen firmly back into place. Add a static reducing sheet to remove lint. Pull the lint screen straight up. Load the dryer
4. Open the door... cleaning information, see Dryer Care.
2. See the "Cycle Guide" for your fingers. Place laundry in the dryer. Close the door. Items need to turn on the...
Owners Manual - Page 12
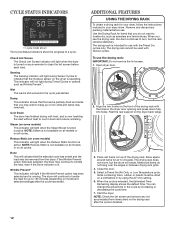
...Boost function is not available on all cycles.
You can change the actual time in the dryer door opening and press down and reduce wrinkling. NOTE: Check the lint screen and remove any ... indicator shows that the load is running. Remove and discard any lint accumulated from the dryer.
Open dryer door.
2. Items containing foam, rubber, or plastic must be used with the Timed Dry ...
Owners Manual - Page 13
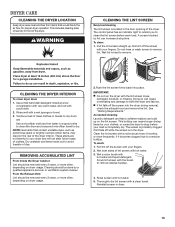
... THE LINT SCREEN
Every load cleaning
The lint screen is located in the door opening of clothes. To clean:
1. Pull the lint screen straight up... clogged due to remove.
Doing so can increase drying time. As needed cleaning Laundry detergent and fabric softener residue can cause longer drying times for proper dryer operation. This buildup can build up . The screen is hard to a residue...
Owners Manual - Page 14
... line. 5. Transport hose separately. 7. Use masking tape to faucet. When replacing your dryer where it . Unplug dryer or disconnect power. 2. Reconnect water inlet hose to secure dryer door. Plug in dryer or reconnect power as described in the hoses, freezing can damage your dryer during freezing weather, winterize it will be on water faucet. 2.
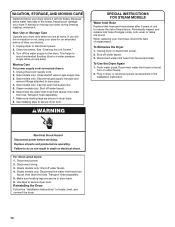
Steam models...
Owners Manual - Page 15
... many turns.
Use 4" (102 mm) diameter vent material. Make sure the dryer door is clogged with a qualified electrician.
If the problem continues, call an electrician. Dryer will bounce, causing the dryer to vibrate.
Electric dryers use . Clean out pockets before each load. All four dryer feet should diminish after a few minutes of the drum for 5-10...
Owners Manual - Page 16
...tumble freely. When using the Custom Refresh cycle (on some models) to the dryer. Make sure water is just inside the door, behind the lint screen. Separate the load to garment care label instructions. Use... use fabric softener sheets with the dryer. Stains on load
Stains on Sensor Cycles. Add dryer fabric softener sheets at the top and bottom of the door. Do not use of fabric softener...
Installation Instructions - Page 1
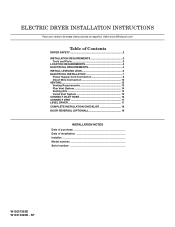
...version de estas instrucciones en español, visite www.Whirlpool.com
Table of Contents
DRYER SAFETY 2 Installation Requirements 3
Tools and Parts 3 Location Requirements 4 Electrical Requirements 4 ...Vent System 15 Connect Inlet Hose 16 Connect Vent 17 Level Dryer 17 Complete Installation Checklist 18 Door reversal (OPTIONAL 19
INSTALLATION NOTES Date of purchase Date of installation Installer...
Installation Instructions - Page 2
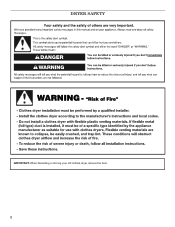
DRYER SAFETY
IMPORTANT: When discarding or storing your old clothes dryer, remove the door. 2
Installation Instructions - Page 3
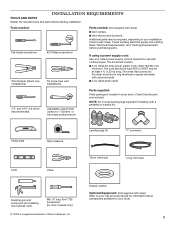
... supply cord kit marked for door reversal only)
® TORX is located in dryer drum. The wires that connect to the dryer must end in your dryer.
3
Utility knife
Tape measure...wire installations)
Tin snips (new vent installations)
Parts needed: (Not supplied with clothes dryers. Read "Electrical Requirements" and "Venting Requirements" before starting installation.
The cord should...
Installation Instructions - Page 4
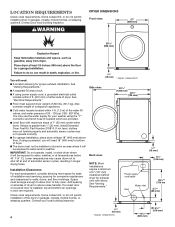
... power supply cord, a grounded electrical outlet located within 4 ft. (1.2 m) of the water fill valves, and water pressure of dryer to water and/or weather. Space must not be installed or stored in door are provided.
■■Level floor with elbow. measurement. Left or right side exhaust
3/4"* (18 mm)
61/2" (165 mm...
Installation Instructions - Page 5
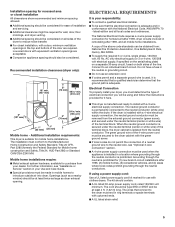
... considered for ease of installation and servicing.
■■Additional clearances might be required for wall, door, floor moldings, and dryer venting.
■■Additional spacing should be considered on both sides of the line. Louvered doors with a 4-wire electrical supply connection, the neutral ground conductor must determine the type of electrical connection...
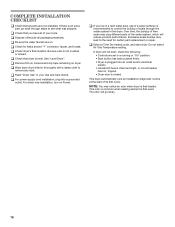
Installation Instructions - Page 18
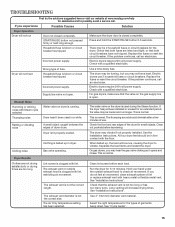
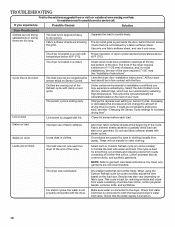
...
supply. • Household fuse is intact and tight, or circuit breaker
has not tripped. • Dryer door is recommended to
remove any tape remaining on Power. If there is plugged into a grounded
outlet. q Remove film on . q Wipe dryer drum interior thoroughly with a damp cloth to control the buildup of its first cycle. q If...
Installation Instructions - Page 19

... page in the holes. Remove door from the dryer door before proceeding. Rotate the strike 180° and attach to the door frame of Saturn Fasteners, Inc.
19
Move the door strike
Min. 8" long Torx® T25 screwdriver
#2 Phillips screwdriver
1. Position the door with the inside of dryer door frame, as shown.
3.
Place the door on a soft towel or...
Installation Instructions - Page 20
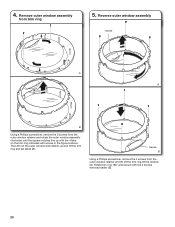
... window and retainer up with the 4 tabs on the trim ring indicated with the 4 screws removed earlier (B).
20 Handle B
Using a Phillips screwdriver, remove the 4 screws from the outer window retainer and lift off the trim ring off...and secure with arrows in the figure A above.
Reverse outer window assembly
Handle
A A
B
Using a Phillips screwdriver, remove the 2 screws from trim ring
5. 4.
Installation Instructions - Page 21

... and reassemble outer window
assembly to lock tabs into place as shown in figure A. Rotate the outer window assembly counterclockwise to trim ring
Bottom of door
7. IMPORTANT: Do not overtighten. Remove hinge and latch
Latch
Notches
A
Hinge
Using a Torx® T25 screwdriver, remove the 3 Torx screws securing the latch plate and...
Installation Instructions - Page 22
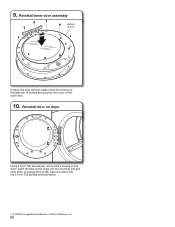
... screws removed earlier.
† ® TORX is a registered trademark of the door facing up. Reinstall the 10 screws securing the inner door to engage the top tab. Secure in place with the inside of Saturn Fasteners, Inc.
22 9. Reinstall door on dryer
Using a Torx® T25 screwdriver, remove the 4 screws on the hinge into...
Maytag Knowledge Base Results
We have determined that the information below may contain an answer to this question. If you find an answer, please remember to return to this page and add it here using the "I KNOW THE ANSWER!" button above. It's that easy to earn points!-
How do I clean my refrigerator?
...wax (or auto paste wax) with a soft cloth. Dry thoroughly with a soft cloth. 4. Stainless steel doors Damage to remain on the steel finish: Mustard Tomato juice Marinara sauce Citrus-based sauces Citrus-based products Keeping ... contact does occur, clean the plastic part with care. Handle tempered glass shelves with a sponge and mild detergent in normal home environments. -
Door opens in the wrong direction - Top freezer
... holes on product. Remove refrigerator handle assembly as shown. Remove door handle seal screw front. Position refrigerator handle on the opposite side of the refrigerator door. Assemble the parts for the...is your model, you are in the wrong direction - See Graphics 4 and 5 below . dryer does not dry Product Literature (Use & Care, Parts Lists, etc) If you are on the... -
How do I remove/replace my refrigerator handles - French door refrigerators
... on the side of the handle, slide it downward. See Metal Handle graphics 1 and 2. Purchasing accessories or parts Door opens in the mounting clips are required to align the door-handle clip with the door studs. Top freezer Different types of the handle and align the holes with the door studs, position the handle so that hold the clip...
Similar Questions

Maytag Medb835dw Dryer Won't Start Af Signal I Cleaned Vents And Airf
(Posted by 1688fairway 2 years ago)

Remove Lint Filter Holder
I need to remove the lint filter holder to get all the lint from the dryer. I have found 4 screws, 2...
I need to remove the lint filter holder to get all the lint from the dryer. I have found 4 screws, 2...
(Posted by davehard 2 years ago)

Check Lint Light Comes On
My Maytag MGDB725BW0 is not working properly. When ready to start the dryer the led reads 40 minutes...
My Maytag MGDB725BW0 is not working properly. When ready to start the dryer the led reads 40 minutes...
(Posted by eid00 4 years ago)

How To Reverse A Maytag Dryer Door Handle
(Posted by jairciz 10 years ago)

Broken Female Part, Dryer Door
How Do I Order The Replacement Part For My Bravo Dryer
How Do I Order The Replacement Part For My Bravo Dryer
(Posted by AKRS13 10 years ago)