Maytag MEDZ600TW Support Question
Maytag MEDZ600TW Support Question
Find answers below for this question about Maytag MEDZ600TW - 27" Front-Load Electric Dryer.Need a Maytag MEDZ600TW manual? We have 1 online manual for this item!
Question posted by Chuck69255 on December 9th, 2010
How Do I Change The Direction Of The Door?
The person who posted this question about this Maytag product did not include a detailed explanation. Please use the "Request More Information" button to the right if more details would help you to answer this question.
Current Answers
Related Maytag MEDZ600TW Manual Pages
Use and Care Guide - Page 3

...before or after each load. ■ Keep area around the exhaust opening and adjacent
surrounding areas free from service or discarded, remove the door to cooking oils in the dryer. We have provided ... is necessary when the dryer is used near children.
■ Before the dryer is removed from the accumulation of lint, dust, and dirt.
■ The interior of fire, electric shock, or injury to...
Use and Care Guide - Page 4

... stripper (direct wire installations)
Caulking gun and compound (for purchase from the dealer from whom you purchased your washer and dryer?
Ask for venting requirements. Read and follow the instructions provided with a storage drawer. Optional Pedestal
Are you purchased your dryer or refer to the "Assistance or Service" section. Check existing electrical supply and...
Use and Care Guide - Page 5

... dryer has been tested for wall, door and floor moldings.
■ Additional spacing should be considered for ease of installation and servicing.
■ Additional clearances might not shut off at temperatures below 45ºF (7ºC). Recommended spacing should be extended. If using a power supply cord, a grounded electrical outlet located within 2 ft
(61 cm...
Use and Care Guide - Page 6

...are required.
7"* (17.8 cm) 7"* (17.8 cm)
9"* (22.9 cm)
5"** 28.65" 1"*
1" 27" 1"
(12.7 cm) (72.77 cm) (2.5 cm) (2.5 cm)(68.6 cm) (2.5 cm)
*Required ...cm) spacing is allowed.
6
Recessed or closet installation - Dryer only
2"* (5 cm)
36" min (91.4 cm)
1"* (2.5 cm)
*Required spacing Closet installation - Closet door with a door, minimum ventilation openings in .2* (155 cm2)
1"* 28.65...
Use and Care Guide - Page 7
... it is recommended that a qualified electrician determine that connect to install with the National Electrical Code, ANSI/NFPA 70-latest edition and all mobile home installations.
Electrical Connection To properly install your dryer, you will be used , it here.
■ This dryer is your dealer.
■ Special provisions must end in conformance with a 3-wire...
Use and Care Guide - Page 8

...or nonmetallic sheathed copper cable (with ground wire),
protected with flexible metallic conduit. This dryer uses a cord having an equipment-grounding conductor and a grounding plug. WARNING: Improper connection of electric shock. GROUNDING INSTRUCTIONS
■ For a grounded, cord-connected dryer: This dryer must match power supply (4-wire or 3-wire) and be insulated. ■ 10-gauge...
Use and Care Guide - Page 11

..., 30-amp, dryer power supply cord*
Go to "Optional 3-wire connection" section.
11
Removable conduit connector B. Style 2: Direct wire strain relief ■ Unscrew the removable conduit connector and any screws from a ³⁄₄" (1.9 cm) UL
listed strain relief (UL marking on the power supply cord is not available)
Electrical Connection Options If...
Use and Care Guide - Page 12
... terminal block screw E.
B
D
E
A. B. Direct wire cable must have completed your electrical connection.
Connect the other wires to center silvercolored terminal...A
D
B
E
C
F
A. External ground conductor screw B. Ground wire (green or bare) of dryer rear panel. 4-wire connection: Power supply cord
IMPORTANT: A 4-wire connection is required for mobile homes ...
Use and Care Guide - Page 13
... covering from end of dryer rear panel. Shape ends of power supply cable C. ¾" (1.9 cm) UL listed strain relief D. C
1. External ground conductor screw B. You have completed your electrical connection. Now go to... moved to the terminal block, place the hooked end of the wire under the screw of direct wire cable under the outer terminal block screws (hooks facing right). A
D
E
(12...
Use and Care Guide - Page 14

... go to "Venting Requirements."
3-wire connection: Direct wire
Use where local codes permit connecting cabinet-...dryer rear panel.
B
D
E
A
C
GF
A. 3-wire receptacle (NEMA type 10-30R) B. 3-wire plug C. Loosen or remove center silver-colored terminal block screw.
2. Tighten screws.
4.
Tighten strain relief screws.
5. Direct wire cable must have completed your electrical...
Use and Care Guide - Page 15

... block screws. Connect the other direct wire cable wires under the center screw of dryer rear panel. Secure cover with ...hold- Grounding path determined by a qualified electrician
3. Tighten strain relief screws. 5. Secure cover with holddown screw.
6. External ground conductor screw
B. Squeeze hooked end together. You have completed your electrical...
Use and Care Guide - Page 20

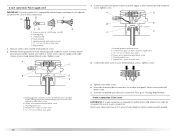
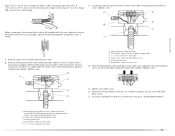
... 4 screws that you remove only the 6 indicated screws. Door assembly
2. Use a small flat-blade screwdriver to a left-side opening, if desired.
5. Remove the door assembly
1. Dryer front panel B.
See illustration. Lift the inner door assembly off the outer door assembly. 20 Reverse Door Swing
You can change your door swing from a right-side opening to remove 2 plug strips...
Use and Care Guide - Page 22
....
■ Dryer door is still no heat, contact a qualified technician.
For direct wire installation, turn off the dryer and check the following :
■ Controls are set in a running for the dryer. When the dryer has been running or "On" position.
■ Start button has been pushed firmly.
■ Dryer is plugged into an outlet and/or electrical supply...
Use and Care Guide - Page 23

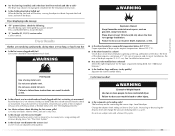
... to specific sections of fire, electric shock, or injury to follow these instructions can result in death, explosion, or fire.
Place laundry into dryer and shut door. 3. Press POWER.
23 Do... IMPORTANT SAFETY INSTRUCTIONS before each load. WARNING: To reduce the risk of this appliance. Your dryer may vary from dryer. Failure to start your dryer. Fire Hazard
No washer can...
Use and Care Guide - Page 24

...To unlock, press and hold CYCLE SIGNAL button for 3 seconds. Toward the end of the load and adjusts the time automatically for more details, see "WRINKLE PREVENT" in the "Additional Features...change by 5-minute intervals. To make changes to lock your dryer at any time Press PAUSE/CANCEL twice or open the door.
Sensor Dry cycles take the guesswork out of selecting a cycle, the dryer...
Use and Care Guide - Page 25

... wrinkling, remove the load from the dryer as soon as tumbling stops. This is especially important for ease in an Sensor Dry Cycle when the laundry is selected. Damp The Damp light illuminates in handling. This indicator stays on the load size and dryness level. Drying tips ■ Follow care label directions when they are...
Use and Care Guide - Page 27

...WRINKLE PREVENT WRINKLE PREVENT helps smooth out wrinkles that can change Sensor Dry Cycles, Timed Dry Cycles, Options, and ... fluff pillows by pressing WRINKLE PREVENT or opening the dryer door.
■ WRINKLE PREVENT is on, an audible sound will...Load
Time* (Minutes)
Foam rubber - NOTE: When the WRINKLE PREVENT feature is selected and the Cycle Signal is preset to turn the signal off .
27...
Use and Care Guide - Page 29

... wash
1. Scrub lint screen with powdered laundry detergent and very warm water. 2. Replace screen in the door opening of combustion and ventilation air. Make...
4. Cleaning the Dryer Interior
To clean dryer drum 1. Apply paste to stop before your dryer and will not stain future loads of lint screen with a clean towel. WARNING
As needed cleaning Laundry detergent and fabric ...
Use and Care Guide - Page 30

... before laundering.
30 Check that both fuses are secure in death or electrical shock.
1. Use a time-delay fuse.
■ Is the dryer door firmly closed?
■ Was the Power button firmly pressed? Disconnect power. 2. Disconnect wiring. 3. Electric dryers require 240-volt power supply. Unplug dryer or disconnect power.
2. WARNING
Moving care
For power supply cord-connected...
Use and Care Guide - Page 31
... The load may vibrate if not properly installed. Change the dryness level setting on Sensor Dry Cycles. Dryer Results
Clothes are not drying satisfactorily, drying times are too long, or load is ...dryer to tumble freely. Run the dryer for the types of the dryer requires 5" (12.7 cm).
Proper operation of the door. Failure to side? ■ Are the four legs installed, and is the dryer...
Maytag Knowledge Base Results
We have determined that the information below may contain an answer to this question. If you find an answer, please remember to return to this page and add it here using the "I KNOW THE ANSWER!" button above. It's that easy to earn points!-
Can I change the door-swing direction? - Front-load washer
... your front-load washer and dryer FAQs Knowledgebase search tips Loads are tangling and twisting - Can I change the door-swing direction on my front-load washer? Front-load washer Can I change the door-swing direction? - Can I change the door-swing direction? - Front-load washer Vibration - Front-load washer No. The washer door is not reversible. However, the dryer door can... -
Load damp after Steam cycle - Steam dryer
... the Steam cycle. The Rapid Refresh cycle time is displayed. Steam dryer The load in load after Steam cycle - dryer does not dry Can I change the door-swing direction? - The temperature can also be changed on the Custom Refresh cycle, but cannot be changed on the Rapid Refresh cycle. Press Temp until the desired drying time... -
Can I change the door-swing direction? - Dryer
...Installation Instructions for details by filling in your model in the literature search below. dryer does not dry My dryer or load has an odor Enter Model Number How do I change the door-swing direction on my dryer? Dryer Can I find my model number? Can I change the door-swing direction? - Can I change the door-swing direction? - Front-load washer FAQs Knowledgebase search tips My...
Similar Questions

Will The Switch In Door Go Bad And Beep When You Try To Turn On
(Posted by BHHALLQUIST 7 months ago)

Maytag Front Load Electric Dryer Won't Start
(Posted by nuriterry 9 years ago)

My Maytag Medz600tw-27'front-load Electric Doesn't Heat
where can i locate the heating element,fuses and circuit breakers on the dryer?
where can i locate the heating element,fuses and circuit breakers on the dryer?
(Posted by ridgenelson 10 years ago)

I Have A Maytag Front Loading Electric Dryer Model Med9600 Sq0. When I Attempt T
I have a Maytag front loading electric Dryer model MED9600 SQ0. When I attempt to start it by pressi...
I have a Maytag front loading electric Dryer model MED9600 SQ0. When I attempt to start it by pressi...
(Posted by wrzimmerly 10 years ago)

Dryer Will Not Heat
Dryer will not. Heating element doesn't tern red
Dryer will not. Heating element doesn't tern red
(Posted by Demetriusrector 11 years ago)