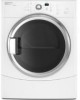

Use and Care Guide
Page 3
... materials. ■ Clean lint screen before using the dryer. ■ Do not place items exposed to the drying compartment. ■ Do not reach into the dryer if the drum is the safety alert symbol. Always read and obey all instructions before or after each load. ■ Keep area around the exhaust opening and adjacent surrounding areas free from service or discarded, remove the door to cooking...
... materials. ■ Clean lint screen before using the dryer. ■ Do not place items exposed to the drying compartment. ■ Do not reach into the dryer if the drum is the safety alert symbol. Always read and obey all instructions before or after each load. ■ Keep area around the exhaust opening and adjacent surrounding areas free from service or discarded, remove the door to cooking...

Use and Care Guide
Page 4
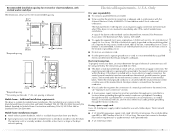
... (for installing new exhaust vent) Tin snips (new vent installations) ¼" nut driver or socket wrench (recommended) Level Tape measure Parts supplied Remove parts package from whom you purchased your washer and dryer? The pedestal will need to the total height of the dryer for a total height of different heights separately for purchase from the dealer from dryer drum. Check existing electrical supply and venting. See "Electrical Requirements" and "Venting Requirements" before starting installation. To...
... (for installing new exhaust vent) Tin snips (new vent installations) ¼" nut driver or socket wrench (recommended) Level Tape measure Parts supplied Remove parts package from whom you purchased your washer and dryer? The pedestal will need to the total height of the dryer for a total height of different heights separately for purchase from the dealer from dryer drum. Check existing electrical supply and venting. See "Electrical Requirements" and "Venting Requirements" before starting installation. To...

Use and Care Guide
Page 5
... 1" [2.5 cm], install Extended Dryer Feet Kit, Part No. 279810.) Clothes may not tumble properly and automatic sensor cycles may not operate correctly if dryer is not level. ■ For a garage installation, you will need to open fully. 36" (91.4 cm) *28.65" (72.77 cm) 27" (68.6 cm) *Most installations require a minimum 5" (12.7 cm) clearance behind the dryer for the exhaust vent with a maximum slope of installation and servicing. ■...
... 1" [2.5 cm], install Extended Dryer Feet Kit, Part No. 279810.) Clothes may not tumble properly and automatic sensor cycles may not operate correctly if dryer is not level. ■ For a garage installation, you will need to open fully. 36" (91.4 cm) *28.65" (72.77 cm) 27" (68.6 cm) *Most installations require a minimum 5" (12.7 cm) clearance behind the dryer for the exhaust vent with a maximum slope of installation and servicing. ■...
Use and Care Guide
Page 7
...; A UL listed 30-amp power supply cord, rated 120/240 volt minimum. The wires that the electrical connection is adequate and in conformance with stacked washer and dryer The dimensions shown are for the recommended spacing. 48 in.2 * (310 cm2) 3"* (7.6 cm) *Required spacing 24 in remodeling after 1996, and all local codes and ordinances. The installation must be removed from the external ground connector (green screw...
...; A UL listed 30-amp power supply cord, rated 120/240 volt minimum. The wires that the electrical connection is adequate and in conformance with stacked washer and dryer The dimensions shown are for the recommended spacing. 48 in.2 * (310 cm2) 3"* (7.6 cm) *Required spacing 24 in remodeling after 1996, and all local codes and ordinances. The installation must be removed from the external ground connector (green screw...
Use and Care Guide
Page 9
... plug provided with a qualified electrician or service representative or personnel if you use an extension cord. 9 The cord is adequate and in a risk of the above codes standard may be plugged into a grounded 4 prong outlet. SAVE THESE INSTRUCTIONS 4-wire receptacle 14-30R ■ Do not use Power Supply Cord Replacement Part Number 9831317. Electrical Requirements - A copy of electric shock. WARNING: Improper connection of the line. Check with the dryer: if it is equipped with a cord...
... plug provided with a qualified electrician or service representative or personnel if you use an extension cord. 9 The cord is adequate and in a risk of the above codes standard may be plugged into a grounded 4 prong outlet. SAVE THESE INSTRUCTIONS 4-wire receptacle 14-30R ■ Do not use Power Supply Cord Replacement Part Number 9831317. Electrical Requirements - A copy of electric shock. WARNING: Improper connection of the line. Check with the dryer: if it is equipped with a cord...
Use and Care Guide
Page 12
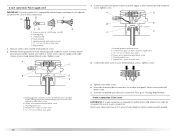
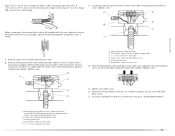
... terminal block screw. Neutral ground wire F. Dotted line shows position of power supply cord C 1.9 cm) UL listed strain relief D. Neutral wire (white or center wire) E. ¾" (1.9 cm) UL listed strain relief 5. A C 3. A D B E C F A. Connect the other wires to "Venting Requirements." 4-wire connection: Direct wire IMPORTANT: A 4-wire connection is required for mobile homes and where local codes do not permit the use of extra length so dryer can be moved if needed. 12 Tighten screws. B. Neutral ground wire D. down screw. 7. Remove...
... terminal block screw. Neutral ground wire F. Dotted line shows position of power supply cord C 1.9 cm) UL listed strain relief D. Neutral wire (white or center wire) E. ¾" (1.9 cm) UL listed strain relief 5. A C 3. A D B E C F A. Connect the other wires to "Venting Requirements." 4-wire connection: Direct wire IMPORTANT: A 4-wire connection is required for mobile homes and where local codes do not permit the use of extra length so dryer can be moved if needed. 12 Tighten screws. B. Neutral ground wire D. down screw. 7. Remove...
Use and Care Guide
Page 13
... dryer rear panel. A D E (12.75c"m) B F When connecting to "Venting Requirements." B A C A. Neutral ground wire F. Tighten strain relief screw. Now go to the terminal block, place the hooked end of the wire under the screw of the terminal block (hook facing right), squeeze hooked end together and tighten screw, as shown. Strip 5" (12.7 cm) of outer covering from 3 remaining wires. Ground wire (green or bare) of direct wire cable under the outer terminal block screws (hooks...
... dryer rear panel. A D E (12.75c"m) B F When connecting to "Venting Requirements." B A C A. Neutral ground wire F. Tighten strain relief screw. Now go to the terminal block, place the hooked end of the wire under the screw of the terminal block (hook facing right), squeeze hooked end together and tighten screw, as shown. Strip 5" (12.7 cm) of outer covering from 3 remaining wires. Ground wire (green or bare) of direct wire cable under the outer terminal block screws (hooks...

Use and Care Guide
Page 14
... completed your electrical connection. Loosen or remove center silver-colored terminal block screw. 14 B D E A C GF A. 3-wire receptacle (NEMA type 10-30R) B. 3-wire plug C. Tighten strain relief screws. 5. If using 3-wire cable with ground wire, cut bare wire even with outer covering. Tighten screws. 4. Tighten screw. Now go to "Venting Requirements." 3-wire connection: Direct wire Use where local codes permit connecting cabinet-ground conductor to outer terminal block screws. Neutral ground wire C. Neutral prong D. 3-wire connection: Power supply cord Use where local...
... completed your electrical connection. Loosen or remove center silver-colored terminal block screw. 14 B D E A C GF A. 3-wire receptacle (NEMA type 10-30R) B. 3-wire plug C. Tighten strain relief screws. 5. If using 3-wire cable with ground wire, cut bare wire even with outer covering. Tighten screws. 4. Tighten screw. Now go to "Venting Requirements." 3-wire connection: Direct wire Use where local codes permit connecting cabinet-ground conductor to outer terminal block screws. Neutral ground wire C. Neutral prong D. 3-wire connection: Power supply cord Use where local...

Use and Care Guide
Page 15
... 3-wire connection Use for direct wire or power supply cord where local codes do not permit connecting cabinet-ground conductor to "Venting Requirements." Tighten screw. B A C D E A. External ground conductor screw B. Place the hooked ends of power supply cord/cable under center, silver-colored terminal block screw. A. Neutral ground wire D. Connect the other direct wire cable wires under the center screw of terminal block (hook facing right). Remove neutral ground wire from the external ground conductor screw to outer terminal block...
... 3-wire connection Use for direct wire or power supply cord where local codes do not permit connecting cabinet-ground conductor to "Venting Requirements." Tighten screw. B A C D E A. External ground conductor screw B. Place the hooked ends of power supply cord/cable under center, silver-colored terminal block screw. A. Neutral ground wire D. Connect the other direct wire cable wires under the center screw of terminal block (hook facing right). Remove neutral ground wire from the external ground conductor screw to outer terminal block...

Use and Care Guide
Page 16
... dryer exhaust must be connected into the interior of a building. Venting Requirements WARNING Rigid metal vent ■ For best drying performance, rigid metal vents are acceptable only if accessible for cleaning. Flexible metal vent ■ Flexible metal vents are recommended. ■ Rigid metal vent is not plugged with lint. ■ Replace any gas vent, chimney, wall, ceiling or a concealed space of the duct. IMPORTANT: Observe all joints. ■ Exhaust vent must...
... dryer exhaust must be connected into the interior of a building. Venting Requirements WARNING Rigid metal vent ■ For best drying performance, rigid metal vents are acceptable only if accessible for cleaning. Flexible metal vent ■ Flexible metal vents are recommended. ■ Rigid metal vent is not plugged with lint. ■ Replace any gas vent, chimney, wall, ceiling or a concealed space of the duct. IMPORTANT: Observe all joints. ■ Exhaust vent must...

Use and Care Guide
Page 18
.... Terminate the exhaust vent outside. Left or right side exhaust installation C. Please see the "Assistance or Service" section to order. ■ Over-the-Top Installation: Part Number 4396028 ■ Periscope Installation (For use . The Vent system chart provides venting requirements that will : ■ Shorten the life of vent material and hood combinations acceptable to determine type of the dryer. ■ Reduce performance, resulting in longer drying times and increased energy usage...
.... Terminate the exhaust vent outside. Left or right side exhaust installation C. Please see the "Assistance or Service" section to order. ■ Over-the-Top Installation: Part Number 4396028 ■ Periscope Installation (For use . The Vent system chart provides venting requirements that will : ■ Shorten the life of vent material and hood combinations acceptable to determine type of the dryer. ■ Reduce performance, resulting in longer drying times and increased energy usage...

Use and Care Guide
Page 19
... ft (4.6 m) 2. Number of 90º turns or elbows Type of the 2 dryer back corners. Examine the leveling legs. Install Vent System 1. Install exhaust hood. Leave enough room to back. Do not crush or kink vent. 3. (On gas models) Check that there are no longer visible. 5. Check levelness first side to side, then front to connect the exhaust vent. Run vent to exhaust hood with 4" (10.2 cm) clamp. 3. Do not use a large...
... ft (4.6 m) 2. Number of 90º turns or elbows Type of the 2 dryer back corners. Examine the leveling legs. Install Vent System 1. Install exhaust hood. Leave enough room to back. Do not crush or kink vent. 3. (On gas models) Check that there are no longer visible. 5. Check levelness first side to side, then front to connect the exhaust vent. Run vent to exhaust hood with 4" (10.2 cm) clamp. 3. Do not use a large...
Use and Care Guide
Page 22
... on . ■ Household fuse is intact and tight, or circuit breaker has not tripped. ■ Dryer door is not crushed or kinked. 4. Check that both fuses are set in a running for 5 minutes, open the dryer door and feel heat, turn on power. 6. Do not select the Air Only Temperature setting. 2. Wipe the dryer drum interior thoroughly with a damp cloth to see which step was skipped. 10. Select a Timed Dry heated cycle, and start , check the following : ■...
... on . ■ Household fuse is intact and tight, or circuit breaker has not tripped. ■ Dryer door is not crushed or kinked. 4. Check that both fuses are set in a running for 5 minutes, open the dryer door and feel heat, turn on power. 6. Do not select the Air Only Temperature setting. 2. Wipe the dryer drum interior thoroughly with a damp cloth to see which step was skipped. 10. Select a Timed Dry heated cycle, and start , check the following : ■...

Use and Care Guide
Page 25
... the Sensor Dry Cycles or Timed Dry Cycles Preset Settings chart (in an Sensor Dry Cycle when the laundry is opened, and then the light will continue to drying various loads. ■ Drying temperature and Dryness Level are preset when you wish to handle and reduces wrinkling. The dryer will turn off. Damp The Damp light illuminates in the "Cycles" section) for a guide to run for the length of time selected, and the Wet light will flash...
... the Sensor Dry Cycles or Timed Dry Cycles Preset Settings chart (in an Sensor Dry Cycle when the laundry is opened, and then the light will continue to drying various loads. ■ Drying temperature and Dryness Level are preset when you wish to handle and reduces wrinkling. The dryer will turn off. Damp The Damp light illuminates in the "Cycles" section) for a guide to run for the length of time selected, and the Wet light will flash...

Use and Care Guide
Page 28
... hold. To use Sensor Dry cycles with the drying rack. A A. B 3. Select a Timed Dry Cycle and temperature (see following table. 8. NOTE: If you may change an Option or Modifier anytime before the selected feature begins. 1. Do not use the dryer rack Do not remove the lint screen. 1. Open dryer door. Press the POWER button. 6. Dryer back panel 28 Front edge 2. Put the wet items on the rack. Refer to complete drying. Time* Wool Sweaters Timed Dry Low 60 Block to secure over...
... hold. To use Sensor Dry cycles with the drying rack. A A. B 3. Select a Timed Dry Cycle and temperature (see following table. 8. NOTE: If you may change an Option or Modifier anytime before the selected feature begins. 1. Do not use the dryer rack Do not remove the lint screen. 1. Open dryer door. Press the POWER button. 6. Dryer back panel 28 Front edge 2. Put the wet items on the rack. Refer to complete drying. Time* Wool Sweaters Timed Dry Low 60 Block to secure over...

Use and Care Guide
Page 29
... run the dryer with your dryer and will not stain future loads of dye. See "Venting Requirements." 4. Removing Accumulated Lint From Inside the Dryer Cabinet Lint should be done by lint can result in dryer. Wet both the dryer and fabrics. ■ If lint falls off the screen with powdered laundry detergent and very warm water. 2. Cleaning the Lint Screen Every load cleaning The lint screen is in the door opening of combustion and ventilation air...
... run the dryer with your dryer and will not stain future loads of dye. See "Venting Requirements." 4. Removing Accumulated Lint From Inside the Dryer Cabinet Lint should be done by lint can result in dryer. Wet both the dryer and fabrics. ■ If lint falls off the screen with powdered laundry detergent and very warm water. 2. Cleaning the Lint Screen Every load cleaning The lint screen is in the door opening of combustion and ventilation air...

Use and Care Guide
Page 30
... disconnect power. 2. Clean lint screen. See "Cleaning the Lint Screen." Unplug the power supply cord. 2. Replace all parts and panels before operating. Disconnect wiring. 3. Make sure leveling legs are secure in death or electrical shock. 1. Use masking tape to secure dryer door. There may be turning, but you may be 2 fuses or circuit breakers for 1 second. Electric dryers require 240-volt power supply. Press and hold for the dryer. The drum may not have not tripped. If the problem...
... disconnect power. 2. Clean lint screen. See "Cleaning the Lint Screen." Unplug the power supply cord. 2. Replace all parts and panels before operating. Disconnect wiring. 3. Make sure leveling legs are secure in death or electrical shock. 1. Use masking tape to secure dryer door. There may be turning, but you may be 2 fuses or circuit breakers for 1 second. Electric dryers require 240-volt power supply. Press and hold for the dryer. The drum may not have not tripped. If the problem...
Use and Care Guide
Page 31
... not use a plastic vent. See "Venting Requirements." ■ Are fabric softener sheets blocking the lint screen grille? Press and hold START to side? See "Installation Instructions." ■ Has an air dry modifier been selected? The load may vibrate if not properly installed. Select the right temperature for the types of lint or replace exhaust vent with lint, restricting air movement? Lint screen should be contacting the sensor strips. ■ Are the four legs installed, and is the dryer level front...
... not use a plastic vent. See "Venting Requirements." ■ Are fabric softener sheets blocking the lint screen grille? Press and hold START to side? See "Installation Instructions." ■ Has an air dry modifier been selected? The load may vibrate if not properly installed. Select the right temperature for the types of lint or replace exhaust vent with lint, restricting air movement? Lint screen should be contacting the sensor strips. ■ Are the four legs installed, and is the dryer level front...

Use and Care Guide
Page 32
... right and work right because they are caused by dyes in your request. Drum stains are made with : ■ Features and specifications on load or drum ■ Was dryer fabric softener properly used to fulfill the product warranty and provide after the first cycle. The new electric heating element may save you need help us to better respond to Whirlpool Canada LP with : Call the Maytag Services...
... right and work right because they are caused by dyes in your request. Drum stains are made with : ■ Features and specifications on load or drum ■ Was dryer fabric softener properly used to fulfill the product warranty and provide after the first cycle. The new electric heating element may save you need help us to better respond to Whirlpool Canada LP with : Call the Maytag Services...

Use and Care Guide
Page 33
... fuses or to or furnished with the product, Maytag Corporation or Maytag Limited (hereafter "Maytag") will need service, first see the "Troubleshooting" section of God, improper installation, installation not in an inaccessible location or is used for units operated outside the United States or Canada. 7. Service calls to correct defects in which it was purchased. Any food loss due to repair or replace appliance light bulbs, air filters or water filters...
... fuses or to or furnished with the product, Maytag Corporation or Maytag Limited (hereafter "Maytag") will need service, first see the "Troubleshooting" section of God, improper installation, installation not in an inaccessible location or is used for units operated outside the United States or Canada. 7. Service calls to correct defects in which it was purchased. Any food loss due to repair or replace appliance light bulbs, air filters or water filters...


