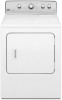
Maytag MEDC400BW Support Question
Maytag MEDC400BW Support Question
Find answers below for this question about Maytag MEDC400BW.Need a Maytag MEDC400BW manual? We have 3 online manuals for this item!
Question posted by Wandalou608 on February 4th, 2017
Turned Water Off Before We Went On Vacation...when We Came Home We Forgot To Tur
turn water off started washer now locked out what should I do to restart
Current Answers
Related Maytag MEDC400BW Manual Pages
Installation Guide - Page 2
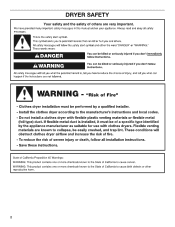
DRYER SAFETY
2
Installation Guide - Page 4
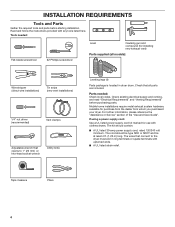
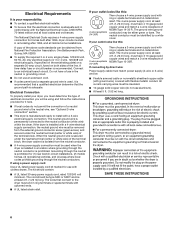
..., and read "Electrical Requirements" and "Venting Requirements" before starting installation. Check that all models):
Wire stripper (direct wire installations...ends.
■■ A UL listed strain relief. Mobile home installations require metal exhaust system hardware, available for use with ...parts.
The wires that opens to the dryer must end in dryer drum. The kit should be type SRD...
Installation Guide - Page 5
...) or 1½" (38 mm) (to support the total weight (dryer and load) of 3.8 cu. capacity washer). Wide opening hamper door
*Most installations require a minimum 5½" (140 mm) clearance behind the dryer for proper exhaust installation.
Closet door with vents
*Additional spacing recommended
3"* (76 mm)
Mobile home - See "Electrical Requirements."
■■ A sturdy floor to...
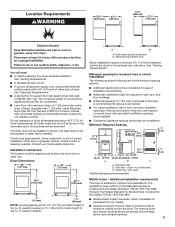
Installation Guide - Page 6
... in a location where grounding through the neutral conductor is prohibited.
Grounding through the neutral conductors. If using and follow the instructions provided for homes built after 1996, dryer circuits involved in remodeling after 1996, and all local codes and ordinances. The kit should be type SRD or SRDT and be at least...
Installation Guide - Page 7
.... Then, go to Venting Requirements.
Then go to Venting Requirements. This connection may be used with either a power supply cord or a direct wire connection.
7 capacity washer) from dryer carton; Then go to Venting Requirements.
3-wire direct connection: Go to match height of cardboard from bottom of...
Installation Guide - Page 8
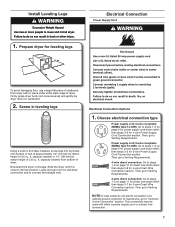
...strain relief.
A. Neutral ground wire F. Tighten strain relief screws just enough to strain relief
BC D A
E F
Before you start, disconnect power. For 3-wire Power Supply Cord Connection, see page 9. Center terminal block screw D. Do not further tighten strain relief... terminal block cover (A). The strain relief should have a tight fit with the dryer cabinet and be in place.
Installation Guide - Page 9
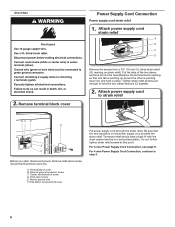
... D. Remove center screw
B
Remove center terminal block screw (B). 9 4-wire Power Supply Cord Connection
IMPORTANT: A 4-wire connection is required for mobile homes and where local codes do not permit the use of dryer rear panel. Spade terminals with hold-down screw.
A
B
F
5. Spade terminals with upturned ends F. 3/4" (19 mm) UL listed strain relief G. Prepare...
Installation Guide - Page 10
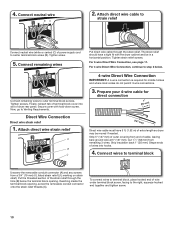
...screw.
The strain relief should have 5 ft. (1.52 m) of extra length so dryer may be in a horizontal position. Tighten strain relief screws. Direct Wire Connection
Direct wire strain relief
1. ... your 4-wire cable for mobile homes and where local codes do not permit 3-wire connections.
3. Strip insulation back 1" (25 mm). Put the threaded section of dryer rear panel. Reaching inside the ...
Installation Guide - Page 11
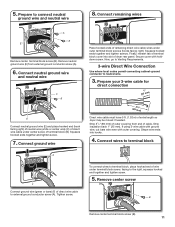
...direct wire cable to terminal block
A
F
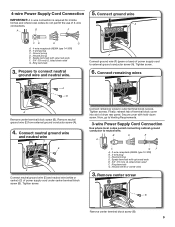
Connect ground wire (green or bare) (F) of dryer rear panel. Squeeze hooked ends together and tighten screws. Prepare your 3-wire cable for
direct connection...(893m½m" )
Direct wire cable must have 5 ft. (1.52 m) of extra length so dryer may be moved if needed. Tighten screw. Strip insulation back 1" (25 mm).
Prepare to neutral wire....
Installation Guide - Page 12
...terminal block screws (hooks facing right). Connect remaining wires
Place hooked ends of dryer rear panel. Secure cover with a qualified electrician that this grounding method is acceptable...slot of remaining wires under outer terminal block screws (hooks facing right). Place hooked ends of dryer rear panel. Optional 3-wire Connection
You must verify with holddown screw. Now, go to an...
Installation Guide - Page 15
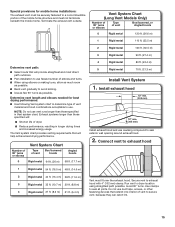
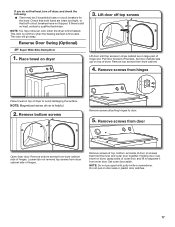
... not terminate beneath the mobile home. Use clamps to seal exterior wall opening around exhaust hood.
2. Secure vent to avoid kinking. ■■ Use as few 90° turns as possible. Avoid 90° turns. The Vent system chart provides venting requirements that will :
■■ Shorten life of dryer.
■■ Reduce performance...
Installation Guide - Page 16
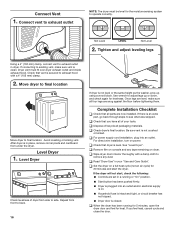
...After dryer is not level or the same height as the washer, prop up or down, and check again for levelness. Repeat from side to exhaust outlet
NOTE: The dryer must fit over dryer ...20 minutes and start , check the following: ■■ Controls are set in place, remove corner posts and cardboard from under the dryer. Use wrench to final location. For direct wire installation, turn on a ...
Installation Guide - Page 17
... or plastic door catches.
17 Remove screws from dryer cabinet side of door (4 screws) that both fuses are in large part of hinge slot. Loosen (do not feel heat, turn off dryer, and check the following: ■■ There may notice an odor when the dryer is helpful.
2. Set outer door aside. Lift door...
Use & Care Guide - Page 5

... type, load size, and temperature setting. Turn the WRINKLE CONTROL knob to start the dryer.
5 Press the PUSH TO START knob to select OFF or 90 min. If...laundry load.
Drying time will stop this feature. The WRINKLE CONTROL option periodically tumbles, rearranges, and fluffs the load to remove a load of Cycle Signal produces an audible sound when the drying cycle is finished. Turn...
Use & Care Guide - Page 8
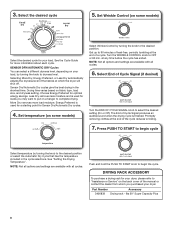
...the drying cycle is used for a starting point for more load moisture. Push and hold the PUSH TO START knob to begin cycle
Select temperature by turning the knob to the desired position....Select the desired cycle for your load.
DRYING RACK ACCESSORY
To purchase a drying rack for your dryer, please refer to "Assistance or Service" on fabric type, load size, and dryness setting. ...
Use & Care Guide - Page 9
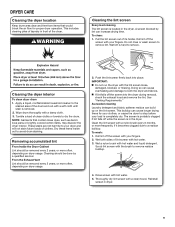
... piles of lint screen with hot water. 5. To clean: 1. Do not rinse or wash screen to remove. Wet lint is in the dryer.
Tumble a load of its holder. These stains are not harmful to both sides of laundry in dryer.
9 Doing so can cause longer drying times for proper dryer operation. See "Venting Requirements." This...
Use & Care Guide - Page 10

... to gas supply
line. 3. Turn off power at home. Use tape to locate, level, and connect the dryer. Changing the drum light (on some models)
1.
Replace the cover and secure with a 10-watt appliance bulb only. Unplug the power supply cord. 2. Replace all parts and panels before servicing. Vacation, storage, and moving care
Non...
Use & Care Guide - Page 11
... heat.
Separate the load items and restart the dryer. The exhaust vent or outside exhaust hood to dry quickly. If you may be turning, but you hear the dryer drum moving. The exhaust vent is normal. Long venting will bounce, causing the dryer to START knob until you may be turning, but you do not feel air...
Use & Care Guide - Page 13

...repair of this major appliance other than the representations contained in your home.
7. This limited warranty is valid only in the United States or...is effective from the date of original consumer purchase.
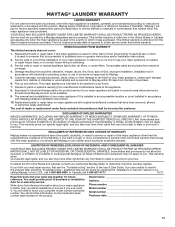
MAYTAG® LAUNDRY WARRANTY
LIMITED WARRANTY
For one year from the date of purchase, ..., air filters, or water filters. YOUR SOLE AND EXCLUSIVE REMEDY UNDER THIS LIMITED WARRANTY SHALL BE...
Warranty Information - Page 1
... DAMAGES. If you ever need it is installed in your home.
7. Write down the following information about your major appliance...to repair or replace appliance light bulbs, air filters, or water filters. ITEMS EXCLUDED FROM WARRANTY
This limited warranty does not ...warranty. In Canada, call 1-800-688-9900. MAYTAG® LAUNDRY WARRANTY
LIMITED WARRANTY
For one year from the date of purchase...
Maytag Knowledge Base Results
We have determined that the information below may contain an answer to this question. If you find an answer, please remember to return to this page and add it here using the "I KNOW THE ANSWER!" button above. It's that easy to earn points!-
Washer will not fill - Front-load Epic® washer
... position, approximately ½" will turn on ? The water level will not be as visible as it will not fill. Are the water-inlet valve screens on the water. Press and hold the Cycle End Signal button for about 2 minutes during filling. Select the Normal cycle and press Start. My Epic ® Turn on the washer clogged? -
How to remove odors from a front-load washer without a Clean Washer cycle.
The tablet will turn off the washer. Select the Heavy Duty cycle with the Clean Washer cycle (on Affresh washer cleaner, click Press Start. here . Leave the door slightly open to allow for details. If your laundry room is the first time you are washing requires cold water. Causes of the washer interior. or Neptune®... -
Detergent is on the load - Top-load washer
... cycles with a Variable Water Level option, turn the knob to clean well at temperatures above 60°F (15.5°C). Make sure the water level selected matches the load size. Is the wash-water temperature colder than conventional washers? Try selecting a higher water level setting. Is your detergent old? Top-load washer Detergent is not cleaning laundry - Use liquid...
Similar Questions

Maytag Medb835dw Dryer Won't Start Af Signal I Cleaned Vents And Airf
(Posted by 1688fairway 2 years ago)

Check Lint Light Comes On
My Maytag MGDB725BW0 is not working properly. When ready to start the dryer the led reads 40 minutes...
My Maytag MGDB725BW0 is not working properly. When ready to start the dryer the led reads 40 minutes...
(Posted by eid00 4 years ago)

Maytag Centennial Commercial Technology Mvwc6esww1 Nov 2009 Purchased.
The beginning of any cycle the machine fills and agitates together. It should only fill then when wa...
The beginning of any cycle the machine fills and agitates together. It should only fill then when wa...
(Posted by sharonmiller66114 7 years ago)

Can I Use A 3 Instead Of 4 Prong Plug Without Damage. Wire Is 10 Gage In House
Moved into an older home with three prong dryer plug (50 amp) and 10 gage wire. Can I replace 4 pron...
Moved into an older home with three prong dryer plug (50 amp) and 10 gage wire. Can I replace 4 pron...
(Posted by buffalo73375 9 years ago)

Have Maytag Medc400vw, Just Over A Year Old, Timer Is Bad,$250 To Fix !!
I have a maytag medc400vw, just over a year old...apparently timer is bad,$250 to fix...has maytag b...
I have a maytag medc400vw, just over a year old...apparently timer is bad,$250 to fix...has maytag b...
(Posted by FreddyL920 13 years ago)