
MSI X460 Support Question
MSI X460 Support Question
Find answers below for this question about MSI X460.Need a MSI X460 manual? We have 1 online manual for this item!
Question posted by josh3211 on July 14th, 2013
Graphics Card Switch
I have an MSI x460 DX laptop and it has 2 graphics cards. I've looked at the user manual and it says that there's supposed to be a Graphics Card Indicating Light near the power button. but there's no such light there. just the power light (blue for full and amber for charging) is there an internal means I can assign and check which graphics card is running for what applications/monitors?
Current Answers


Related MSI X460 Manual Pages
User Manual - Page 2
... ...1-6 CE Conformity ...1-6 Safety Instructions...1-7 Safety Guideline for Using Lithium Battery 1-11 WEEE Statement ...1-15 Optical Device Drive Notice ...1-22 Trademarks ...1-22 Reversion History ...1-22
Introductions
Manual Map ...2-2 Unpacking...2-3 Specification...2-4 Product Overview ...2-9
Top-Open View ...2-9 Front Side View ...2-14
User Manual - Page 3
... 3-9 TurboBattery+ Function...3-12 Power Management in Windows OS 3-15 Energy Saving Tips...3-17
Basic Operations ...3-18 Safety and Comfort Tips...3-18 Having a Good ...3-39 Preface
1-3 Left Side View...2-16 Right Side View ...2-18 Rear Side View...2-20 Bottom Side View ...2-21
Getting Started
Power Management ...3-2 Connecting the AC Power ...3-2 Using the Battery Power...3-4 ECO Engine --
User Manual - Page 5

....
NOTE Š The changes or modifications not expressly approved by turning the equipment off and on, the user is
connected. „ Consult the dealer or an experienced radio TV technician for compliance could void the user's authority to provide reasonable protection against harmful interference in a particular installation. Preface
1-5
Regulations Information
FCC-B Radio...
User Manual - Page 6

Preface
1-6 Š Shield interface cables and AC power cord, if any, must accept any interference received, including interference that may not cause harmful interference. „ This device must be used in the European ...
User Manual - Page 8

... cause an electrical shock. Never pour liquid into the opening that people are unlikely to step on card or module to the equipment. Š Always disconnect the AC power cord or uninstall the battery pack or switch off the wall socket if the equipment would be left unused for a certain time to achieve...
User Manual - Page 27
... when connected.
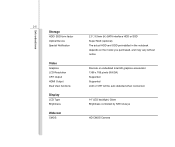
14" LED backlight, Glare Brightness controlled by K/B hot-keys
HD CMOS Camera Introductions
2-5
Storage
HDD/ SSD form factor Optical Device Special Notification
Video
Graphics LCD Resolution CRT Output HDMI Output Dual View functions
Display
LCD Type Brightness
Webcam
CMOS
2.5", 9.5mm (H) SATA interface HDD or SSD Super Multi (optional) The...
User Manual - Page 28

... Sound Volume
Realtek® ALC269Q 2 speakers x 1 K/B hot-key & SW
I/O Port
Monitor (VGA) USB Mic-in Headphone-out RJ45 HDMI Card Reader
15 pin D-Sub x 1 x 3 (USB 2.0 x 1, USB 3.0 x 2 optional) x 1 x 1 x 1 x 1 x 1 (MMC/ SDXC) The supported memory cards may vary without notice. Communication Port (Items listed here may vary without notice)
LAN
10/100/1000 (optional)
Wireless...
User Manual - Page 34

... the Windows Search function.
Š Press and hold the Fn button, and then press the F5 button repeatedly to switch among various power saving modes provided by ECO Engine, or to turn this function off recurrently.
Š Refer to the Power Management section in chapter 3 of this manual for the detailed information of this ECO Engine...
User Manual - Page 40

... device and attached through a rubberised metal cable. The end of the cable has a small loop which allows users to secure the notebook in place.
2. Introductions
2-18
Right Side View
5
43
1. USB Port
2
1
4. Kensington Lock Hole
2. Card Reader
5. Kensington Lock Hole This notebook provides a Kensington Lock hole, which allows the whole cable to...
User Manual - Page 41

... high quality sound blaster with stereo system and Hi-Fi function supported. Introductions
2-19
3.
Mic In/Line In: Used for speakers or headphones. Card Reader The built-in card reader may vary without notice.
5. Connect your speakers to connect USB-interface peripheral devices, such as shown below. USB Port The USB port...
User Manual - Page 55

Users may also switch among the different modes of each mode appearing on the keyboard at the same time repeatedly. To switch to point the desired ...ECO mode, and then left click the mouse on the selected icon. 5. To learn which ECO mode is selected presently, read the icon on behalf of the ECO Engine, or to turn it off recurrently by pressing the Quick Launch button...
User Manual - Page 57
... with the mouse cursor to bring up the Users may vary from the actual ones, depending on... menu may also press the TurboBattery+ Quick Launch Button, if equipped on it to achieve the demand ...left click the mouse
on the model users purchased. Move the mouse cursor to... setting menu for users to decide that the devices listed in the notebook should be switched off manually, such as Bluetooth...
User Manual - Page 61

... or uninstall the battery pack or switch off the display after 15 minutes Š Initiate Sleep after a period of the monitor. The power management feature allows the computer to initiate a lower-power or "Sleep" mode after 30 minutes
The computer exits Sleep when the power/Sleep button is enabled, the computer can also exit Sleep...
User Manual - Page 67
.... Function Keys
„ Windows Keys
You can find the Windows Logo key ( ) and one character to the right of the two keys, please refer to switch the typing mode between "insert" and "overtype" modes. The Backspace key, [Ins] and [Del] keys at upper right corner are used to your Windows...
User Manual - Page 68

Getting Started
3-24
„ [Fn] Key
Switch the display output mode between the LCD, external monitor and both. Decrease the built-in speaker's volume. Increase the LCD brightness. Increase the built-in speaker's volume. Enable or disable the touchpad function. Decrease the LCD brightness. Disable the computer's audio function.
User Manual - Page 69
... the Fn button, and then press the F4 button to launch the User Defined application.
Š Or, press and hold the Fn button, and then press the F4 button to launch the Windows Search function.
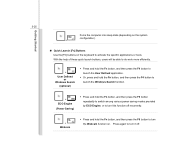
+ ECO Engine (Power Saving)
Š Press and hold the Fn button, and then press the F5 button repeatedly to switch among various power saving modes...
User Manual - Page 76

... and remain the fingers on the touchpad still.
Š Move a finger to the right or to the left to the lower side of "Computer"
Š Switching between all the windows that have been activated currently.
Functions
Š Browse the directory of the touchpad and remain the fingers on the touchpad.
Š...
User Manual - Page 85

Getting Started
3-41
HDMI (High Definition Multimedia Interface) is connected to the notebook, power on a single cable. Once the display is a new interface standard for PCs, displays and consumer...Alternately, you can change the display mode by pressing [Fn]+[F2]. If not, you can switch the display mode by configuring the settings in Display Properties of Windows operating system.
User Manual - Page 86

For more instructions or detailed steps on connecting to build a network connection. Getting Started
3-42
Connecting the Communication Devices
Using the LAN
The RJ-45 connector of the notebook allows you to connect the LAN (local area network) devices, such as a hub, switch and gateway, to the LAN, please ask your MIS staff or network manager for help.
User Manual - Page 107
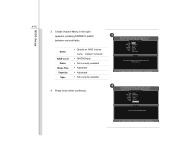
Create Volume Menu in the right
appears, pressing ENTER to switch
3
between various fields. Default: Volume0
Š RAID0(Stripe) Š Not currently available Š Adjustable Š Adjustable Š Not currently available
4
4. Name
RAID Level Disks
Stripe Size Capacity
Sync
Š Specify an RAID Volume name.
Press enter when confirmed. BIOS Setup
4-16
3.
Similar Questions

Graphics Card Help Msi Cx61
how do i connect the display in my msi cx61 to the dedicated graphics card.
how do i connect the display in my msi cx61 to the dedicated graphics card.
(Posted by gaguerra85 10 years ago)

Dual Graphics Msi Cx420 I5 Laptop
what will i download to use the dual graphics of my msi cx420 i5 laptop.. i have installed the intel...
what will i download to use the dual graphics of my msi cx420 i5 laptop.. i have installed the intel...
(Posted by ericksondeleon07 10 years ago)


Laptop Shut Down And Won't Start
My msi cx620 shut down by itself and won't start again. My charger was replaced once but it has a gr...
My msi cx620 shut down by itself and won't start again. My charger was replaced once but it has a gr...
(Posted by saraalbi 11 years ago)