
MSI MS-1722 Support Question
MSI MS-1722 Support Question
Find answers below for this question about MSI MS-1722 - Whitebook ID1 - 17.Need a MSI MS-1722 manual? We have 1 online manual for this item!
Question posted by shabbirjosh on July 15th, 2011
Xp Problem
I have a motherboard 7222 p4 3.2 ghz 1gb ram n 80 gb hdd with dvdrw and i cant load xp cd is booting it boot 2 files and when windows exicute file is come it is stop procesing
Current Answers
Related MSI MS-1722 Manual Pages
User Guide - Page 1

GX720 (MS-1722)Disassemble SOP
■ 1、Battery Pack ■ 2、BOTTOM DOOR ASSY ■ 3、THERMAL-KIT And CPU Module ■ 4、RAM、WLAN And TUNER Module ■ 5、HDD Module ASSY ■ 6、ODD Module ASSY ■ 7、HINGE COVER ASSY ■ 8、UP CASE ASSY ■ 9、LOWER CASE ASSY ■ 10、LCD MODULE ASSY
User Guide - Page 2
GX720(MS-1722)Disassemble SOP
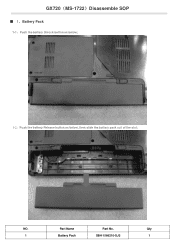
■ 1、Battery Pack
1-1:Push the battery Unlock button as below;
1-2:Push the battery Release button as below, then slide the battery pack out of the slot;
Qty
1
Battery Pack
S9N-1566210-SJ3
1 Part Name
Part No.
NO.
User Guide - Page 3

Qty
1
Screw
E43-I250551-H29
5
2
BOTTOM DOOR ASSY
307-721J211-Y31
1
NO.
Note:Screw driver torque is 2.0~2.5kgf.cm
2-2:Remove Bottom Door Assy as below; Part Name
Part No. GX720(MS-1722)Disassemble SOP
■ 2、BOTTOM DOOR ASSY
2-1:Remove the following 5pcs M2.5*5mm screws with Screw Driver.
User Guide - Page 4

Note:Screw driver torque is 2.0~2.5kgf.cm
Cable
3 2
1 4
NO. Qty
1
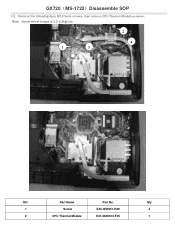
Screw
E43-I250551-H29
4
2
CPU FAN
E33-0800050-F05
1 GX720(MS-1722)Disassemble SOP
■ 3、THERMAL-KIT And CPU Module
3-1:Remove 4pcs M2.5*5mm screws, CPU Fan sink Cable and CPU Fan.
Part Name
Part No.
User Guide - Page 5
Note:Screw driver torque is 2.0~2.5kgf.cm
2
4
1
3
NO. Qty
1
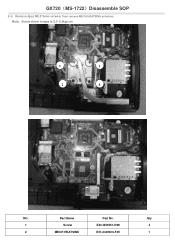
Screw
E43-I250551-H29
4
2
CPU Thermal Module
E31-0800610-F05
1
Part Name
Part No. GX720(MS-1722)Disassemble SOP
3-2:Remove the following 4pcs M2.5*5mm screws, then remove CPU Thermal Module as below;
User Guide - Page 6
Note:Screw driver torque is 2.0~2.5kgf.cm
3
1
2
4
NO.
GX720(MS-1722)Disassemble SOP
3-3:Remove 4pcs M2.5*5mm screws, Then remove MECH HEATSINK as below; Qty
1
Screw
E43-I250551-H29
4
2
MECH HEATSINK
E31-0403610-F05
1 Part Name
Part No.
User Guide - Page 7
GX720(MS-1722)Disassemble SOP
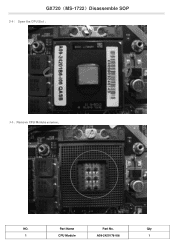
3-4: Open the CPU Slot ;
3-5:Remove CPU Module as below; NO.
Qty
1
CPU Module
A09-2420176-I06
1 Part Name
Part No.
User Guide - Page 8
Part Name
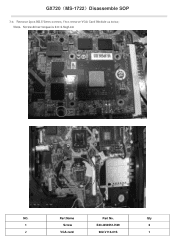
Part No. GX720(MS-1722)Disassemble SOP
3-6:Remove 2pcs M2.5*5mm screws, Then remove VGA Card Module as below; Qty
1
Screw
E43-I250551-H29
2
2
VGA card
602-V114-01S
1 Note:Screw driver torque is 2.0~2.5kgf.cm
NO.
User Guide - Page 9
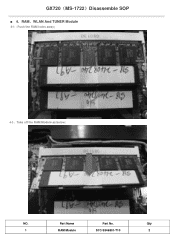
GX720(MS-1722)Disassemble SOP
■ 4、RAM、WLAN And TUNER Module
4-1:Push the RAM locks away;
4-2:Take off the RAM Module as below:
NO. Qty
1
RAM Module
S7C-S346801-T10
2
Part Name
Part No.
User Guide - Page 10

Note:Screw driver torque is 1.0~1.5kgf.cm
1
4-4:Remove WIRELESS CARD as below ;
Part Name
Part No.
NO. Qty
1
Screw
E43-1303501-H29
1
2
WIRELESS CARD
S57-0800180-I06
1 GX720(MS-1722)Disassemble SOP
4-3: Remove 1pcs M2*3mm screw, and then remove ANTENNA/HIGH-TEK/R-L as below ;
User Guide - Page 11

GX720(MS-1722)Disassemble SOP
4-5:Pull out Tuner Antenna, then remove 1pcs M2*3mm Screw as below ;
Qty
1
Screw
E43-1303501-H29
1
2
DVB-T MINI-PCIE CARD
S36-0000610-K45
1
NO. Note:Screw driver torque is 1.0~1.5kgf.cm
1
4-6:Remove DVB-T MINI-PCIE CARD as below ; Part Name
Part No.
User Guide - Page 12

Note:Screw driver torque is 2.0~2.5kgf.cm
5-2:Remove HDD DOOR ASSY as below ;
Qty
1
Screw
E43-I250551-H29
2
2
HDD DOOR ASSY
307-721K211-Y31
1 NO.
Part Name
Part No.
GX720(MS-1722)Disassemble SOP
■ 5、HDD Module ASSY
5-1:Remove 2pcs M2.5*5mm Screws , then remove HDD Door Assy as below ;
User Guide - Page 13

GX720(MS-1722)Disassemble SOP
5-3:Remove 2pcs M3*3.5mm Screws, then remove HDD Bracket as below;
Part Name
Part No.
Qty
1
Screw
E43-1303501-H29
2
2
HDD Bracket Assy
E2M-2211511-Y28
1
3
HDD MODULE ASSY
S71-2408505-W36
1 Note:Screw driver torque is 1.5~2.0kgf.cm
NO.
User Guide - Page 16

Note:Screw driver torque is 1.5~1.8kgf.cm
NO.
Qty
1
Screw
E43-1203003-H29
2
2
ODD Side Bracket
E2M-2211611-Y28
1
3
ODD MODULE ASSY
S7D-2270001-SI4
1 GX720(MS-1722)Disassemble SOP
6-3:Remove 2pcs M2*3mm Screws, Then remove ODD Bracket as below; Part Name
Part No.
User Guide - Page 18
NO. Qty
1
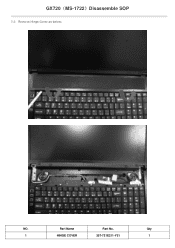
HINGE COVER
307-721E211-Y31
1 Part Name
Part No. GX720(MS-1722)Disassemble SOP
7-2:Remove Hinge Cover as below;
User Guide - Page 19

Part Name
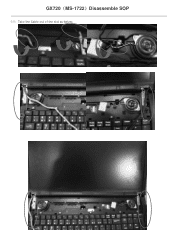
Part No. Qty
1
LCD LVDS Cable
K19-3036005-H39
1
2
MICROPHONE
S34-2100620-N44
1
3
CMOS CABLE
K10-3004055-H58
1 NO.
GX720(MS-1722)Disassemble SOP
7-3:Pull out LCD LVDS Cable, Then remove MICROPHONE Cable as below;
7-4:Pull out CMOS CABLE as below;
User Guide - Page 20
GX720(MS-1722)Disassemble SOP
7-5:Take the Cable out of the slot as below;
User Guide - Page 21

Part Name
Part No. Note:Screw driver torque is 2.0~2.5kgf.cm
7-7:Remove 3pcs M2.5*5mm Screws as below ; Qty
1
Screw
E43-I250551-H29
6
Note:Screw driver torque is 2.0~2.5kgf.cm
NO. GX720(MS-1722)Disassemble SOP
7-6:Remove 3pcs M2.5*5mm Screws as below ;
User Guide - Page 22

...;Remove Keyboard Cable as below ;
Qty
1
Screw
E43-1203003-H29
5
2
Screw
E43-I250551-H29
1
Keyboard
S1N-3UTC131-C54
1
NO. Part Name
Part No.
GX720(MS-1722)Disassemble SOP
■ 8、UPCASE ASSY
8-1:Remove 5pcs M2*3mm Screws、Remove1pcs M2.5*5mm Screw, Then remove Keyboard as below ;
User Guide - Page 23

Qty
1
Screws
E43-1250551-H29
16
Note:Screw driver torque is 2.0~2.5kgf.cm
NO. GX720(MS-1722)Disassemble SOP
8-3:Remove16pcs M2.5*5mm Screws as below; Part Name
Part No.
Similar Questions

Help Me Bios Password
I forget my bios password of my laptop .my laptop is msi cx640 ... please give me orginal password f...
I forget my bios password of my laptop .my laptop is msi cx640 ... please give me orginal password f...
(Posted by reza2402 1 year ago)

Mpp File Looks Not Working
I have an MPP file created in Microsoft Project 2010. It either hangs or causes Project 2010 to cras...
I have an MPP file created in Microsoft Project 2010. It either hangs or causes Project 2010 to cras...
(Posted by HunorBalazs 7 years ago)

What Is The Problem Of My Msi Laptop?
i try my stock battery (i didnt use it for a long time,almost 6 months) to my msi laptop.,just to kn...
i try my stock battery (i didnt use it for a long time,almost 6 months) to my msi laptop.,just to kn...
(Posted by ithek15 9 years ago)

System Crashing. Need To Update Bios?
Hi, I have a DIY PC that uses MSI motherboard. The model is MSI G31TM-P35 (MS-7529), with BIOS vers...
Hi, I have a DIY PC that uses MSI motherboard. The model is MSI G31TM-P35 (MS-7529), with BIOS vers...
(Posted by bretlaisy 11 years ago)

Msi Cr620 Laptop
when i turn on my laptop the light is on but the screen is dark and no display or boot at all ,and s...
when i turn on my laptop the light is on but the screen is dark and no display or boot at all ,and s...
(Posted by tonhilliman 11 years ago)