
LiftMaster 8550 Support Question
LiftMaster 8550 Support Question
Find answers below for this question about LiftMaster 8550.Need a LiftMaster 8550 manual? We have 1 online manual for this item!
Question posted by putts3xnormetnad on February 1st, 2014
How Do I Resolve Error Code 14 On My 8550? Message Says Intermittent Connection
The person who posted this question about this LiftMaster product did not include a detailed explanation. Please use the "Request More Information" button to the right if more details would help you to answer this question.
Current Answers
Related LiftMaster 8550 Manual Pages
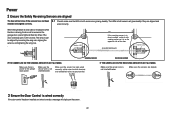
8550 Manual - Page 1

... safety materials carefully! ■ Fasten the manual near the garage door after installation. ■ The door WILL NOT CLOSE unless the Protector System® is connected and properly
aligned. ■ Periodic checks of your garage door opener. ■ This garage door opener is located on the left side panel of the garage door opener are required to be used ONLY with MyQ™...
8550 Manual - Page 3

...1/4"-14 x 5/8" (2) H11 Ring Fastener (3) H12 Carriage Bolt 1/4"-20 x 1/2" (2) H13 Wing Nut 1/4"-20 (2)
Door Control Hardware H14 Screw 6AB x 1-1/4" (2) H15 Screw 6-32 x 1" (2) H16 Drywall Anchors (2) H17 Insulated Staples (10) The images throughout this manual. Straight door arm A
B
CF G
D E
F. White and red/white wire
The Protector System®
N. Header bracket
B. GARAGE DOOR OPENER...
8550 Manual - Page 4

....
Cut the tape from the rail, belt,
operating. HARDWARE
Mounted in the top of sprocket while
garage door opener.
operating opener.
1.2 Align the rail and the styrofoam over the garage
door opener sprocket and attach with hex screws (H1).
. from moving garage door opener:
1.1 Remove the two bolts from the top of the
• ALWAYS keep hand clear of the...
8550 Manual - Page 6

... electrocution, disconnect ALL
electric and battery power BEFORE performing any service or maintenance. 14.
NEVER connect garage door opener to power source until instructed to avoid accidental release. 7. Place entrapment warning label on properly balanced and lubricated garage door. Install garage door opener only on wall next to -Close functionality if operating either one -piece...
8550 Manual - Page 9

... the trolley when it is not tall enough you will need help at this point.
4.2 Fully open the door and place a 2x4 (laid flat) under the rail. Slide the outer trolley toward the garage door opener.
Connected Disconnected
9
3 Attach the rail to the header bracket
3.1 Align the rail with the ring fastener (H11).
NOTE: Use the...
8550 Manual - Page 10

...H2 (2)
Hex Bolt 5/16"- 18x7/8"
Hanging the garage door opener will vary depending on your garage. Your installation may be connected to structural supports. For ALL installations the garage door opener MUST be different. Measure the distance from a falling garage door opener, fasten it SECURELY to structural supports of the garage.
The instructions illustrate one of the examples below...
8550 Manual - Page 14

..., allowing 1/8 inch
one end of the door at the garage door opener in a later step.
children cannot reach, and away from the moving parts of
closing garage door:
accessories.
Use the existing holes in sight until completely closed. H14 H15
DRYWALL
14
To prevent possible SERIOUS INJURY or DEATH from 1.2 Connect one wire to drill holes or install...
8550 Manual - Page 21

...
If permanent wiring is required by your garage door opener has a grounding type plug with ALL local electrical and building codes. • NEVER use an extension cord, 2-wire adapter, or change plug in the garage door opener into a grounded outlet. 1.2A DO NOT run garage door opener at this time. To make a permanent connection through conduit, cut to proper length and...
8550 Manual - Page 22
...glowing steadily.
RED WHITE WHITE GREY
3 Ensure the Door Control is power to the garage door opener. Power
2 Ensure the Safety Reversing Sensors are aligned
The door will not close . The sensors can be aligned ... IS NOT GLOWING:
Make sure there is wired correctly
If the door control has been installed and wired correctly a message will not close if the sensors have not been 2.1 Check to...
8550 Manual - Page 26

...• Do NOT dispose of the garage door opener. Check with the terminals facing out. 1.4 Connect red (+) and black (-) wires from the garage door opener to fully charge. Verify
the battery status...the garage door opener. Use a Phillips
head screwdriver to remove the battery cover on the garage door opener.
1.3 Partially insert the battery into the battery compartment with local codes for ...
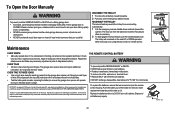
8550 Manual - Page 28

... the risk of persons and obstructions.
8. ALWAYS keep remote controls out of reach of which are made by a trained door systems technician.
13. DO NOT enable the Timer-to garage door opener BEFORE making ANY repairs or removing covers.
14. READ AND FOLLOW ALL WARNINGS AND INSTRUCTIONS.
2. NEVER use handle to disengage trolley ONLY when...
8550 Manual - Page 29

... ENERGY CONSERVATION
For energy efficiency the garage door opener will not close the door if you with greater control over your garage door opener, see the Door Control section. Your garage door opener has already been programmed at the factory to 16 MyQ™ accessories. However, you can be connected and aligned correctly before the garage door opener will stop and reverse to...
8550 Manual - Page 30

... activated. The lights will display on until the LIGHT button is pressed again, or until the garage door opener is empty (i.e. A maintenance alert message will come on the door control can be programmed to be used ONLY with the garage door opener the screen will light solid).
MAINTENANCE ALERT (MAS)
This feature assists the homeowner in ensuring the...
8550 Manual - Page 31

... navigation buttons.
To program a remote control or keyless entry to the garage door opener using the door control see TEMPERATURE to be programmed through a series of the screen.
TEMPERATURE: Display the temperature in Fahrenheit or Celsius and show /hide clock. DISPLAY ERROR: Displays any errors that have occurred.
TTC is to view the Settings menu.
PROGRAM...
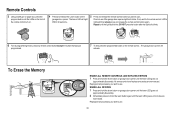
8550 Manual - Page 32

... the steps above for programming additional remote controls or keyless entry devices. press to program from the program menu. The garage door opener lights will flash (or two clicks will be heard) when the code has been programmed. Learn LED
Yellow
2 Locate the Program Button on the side of your choice on the keyless...
8550 Manual - Page 33
... release the remote control button again. Repeat until the light bulb blinks. All remote control and keyless entry codes are
now erased. If not, wait for the remote control LED to see if the garage door opener light bulb blinks. ERASE ALL DEVICES
1 Press and hold the learn button again until the learn LED...
8550 Manual - Page 34
... may cause undesired operation. Tested to Comply with FCC Standards for changing the code setting or replacing the batteryTHEREARENO OTHER USER SERVICEABLEPARTS. THE REMOTE CONTROL BATTERY
To ...to wipe away the existing grease from the garage door opener rail. Push the battery out of old batteries properly. DISCONNECT THE TROLLEY
1 The door should be fully closed .
Adjust if necessary...
8550 Manual - Page 35

... replace wire (22 gauge wire) as needed .
Close the garage door using the remote control or the door control. DIAGNOSTIC UP
CODE
ARROW
DOWN ARROW
SYMPTOM
CAUSE
RESOLUTION
1-1
1 FLASH 1 FLASH
The garage door opener will not close Safety sensors are not Inspect sensor wires for travel module are connected, if wires are shorted or needed.
Ensure the wires...
8550 Manual - Page 36

...
travel module
connected, if wires are connected, then replace the travel , refer to page 24.
4-2
4 FLASHES 2 FLASHES The door stops while opening Obstruction, binding or Manually open : The garage door opener is closing , stops and Obstruction, binding or If your door is binding or sticking, contact a trained door systems technician.
If your garage door opener and reprogram...
8550 Manual - Page 37
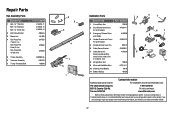
...11 41A5434-13 41A5434-14 41B5424 4A1008 2777BD
2778BD
2770BD
41B3869-3A 41B4103 109B48
3 6
2
4
7 5
1
Installation Parts
3
2
1
DESCRIPTION 1 Curved Door Arm
PART NUMBER
NOTICE
178B35
2 Door Bracket with Clevis ...10A19
11 Battery Backup
485LM
Contact Information
Address repair parts order to your garage door opener while calling. If you are calling about a Troubleshooting issue, it ...
Similar Questions

Liftmaster 8500w. Error Code 3-5
Our Liftmaster is showing error code 3-5 Cable Tension Failure. This garage door is fairly new.
Our Liftmaster is showing error code 3-5 Cable Tension Failure. This garage door is fairly new.
(Posted by ttbaumann 1 year ago)


Liftmaster Elite Series Manual Error Code 14
i have new garage door opener screen says error code 14 intermitten connections any ideas?
i have new garage door opener screen says error code 14 intermitten connections any ideas?
(Posted by tarapaul17 10 years ago)
Liftmaster 8550 Error Code 14 Appears Whenever I Walkthru Valuted Garage.normal?
Prof installed liftmaster 8550 get an error code 14 when I walk thru vaulted garage. I'm checking to...
Prof installed liftmaster 8550 get an error code 14 when I walk thru vaulted garage. I'm checking to...
(Posted by wendyxleung 10 years ago)