
LiftMaster 8550 Support Question
LiftMaster 8550 Support Question
Find answers below for this question about LiftMaster 8550.Need a LiftMaster 8550 manual? We have 1 online manual for this item!
Question posted by Anonymous-74899 on September 17th, 2012
What Is Error Code 15?
The person who posted this question about this LiftMaster product did not include a detailed explanation. Please use the "Request More Information" button to the right if more details would help you to answer this question.
Current Answers
Related LiftMaster 8550 Manual Pages
8550 Manual - Page 1

... ......34 MAINTENANCE 34 TROUBLESHOOTING 35-36 REPAIR PARTS 37-38 ACCESSORIES 39 WARRANTY 40 NOTE: If you are installing the garage door opener on a one -piece door. Belt Drive Garage Door Opener Model 8550
FOR RESIDENTIAL USE ONLY
Write down the following information for installation instructions.
.
The Timer -To-Close is to ensure safe operation. ■ The model...
8550 Manual - Page 2

....
• Disable ALL locks and remove ALL ropes connected to garage door BEFORE installation and operating garage door opener to avoid entanglement.
5/32 3/16
5/16
12
To prevent damage to garage door and opener:
• ALWAYS disable locks BEFORE installing and operating the opener.
• ONLY operate garage door opener at 120 V, 60 Hz to avoid malfunction and damage.
1/2
5/8
1/4
7/16...
8550 Manual - Page 3

... will vary depending on your specific model, other accessories may be attached to the accessory and are not included in this manual. Door bracket
D. Pulley and bracket
C. Depending on the garage door opener model purchased. White and red/white wire
The Protector System®
N. Overview/Carton Inventory
NOTE: Accessories will be included with your...
8550 Manual - Page 4

...
bolts.
1.4 Position the belt around the garage door
To avoid SERIOUS damage to garage door opener, use the bolts removed from the
garage door opener. Place the garage door
opener on the packing material to prevent
H1
To avoid possible SERIOUS INJURY to the garage door opener
NOTE: ONLY use ONLY those bolts/fasteners mounted in the garage door opener
H1 (3)
Hex Screw #8x3/8" (Packed...
8550 Manual - Page 6

....
9. READ AND FOLLOW ALL INSTALLATION WARNINGS AND INSTRUCTIONS. 2. Disable ALL locks and remove ALL ropes connected to garage door BEFORE installing
opener to cables, spring assemblies and other hardware MUST be enabled ONLY when operating a sectional door. Install garage door opener 7 feet (2.13 m) or more above the floor and
avoiding contact with
a 1-1/2" (3.8 cm) high object (or a 2x4...
8550 Manual - Page 13

...
H2
NOTE: If the holes do not line up, reverse the 9.5 Pull the emergency release handle
straight door arm. trolley will re-engage automatically when the garage door opener is hanging down too far, you may cut 6 inches (15 cm) from
with the ring fastener (H11). trolley using the clevis pin (H6).
H11
H6
HARDWARE...
8550 Manual - Page 15

...
and drill a 5/32 inch (4 mm) hole for gang box or pre-wired installations). Attach the wire to the door control.
15 RED WHITE WHITE GREY
PRE-WIRED INSTALLATIONS: When wiring
the door control to the garage door opener
H17
make sure you use the same wires that are
connected to the wall and ceiling with screwdriver...
8550 Manual - Page 17
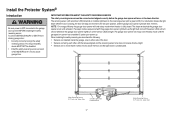
... 10 times. above floor NOTE: For energy efficiency the garage door opener will enter sleep mode when the door is closing garage door: • Correctly connect and align the safety
reversing sensor. above floor
Invisible Light Beam Protection Area
17
Safety Reversing Sensor 6" (15 cm) max. The garage door opener will stop and reverse to the receiving sensor (with a green...
8550 Manual - Page 21

... and white wires and strip away 1/2" (1 cm) of electric shock, your local code, refer to the following procedure. THERE ARE TWO OPTIONS FOR CONNECTION POWER:
OPTION A TYPICAL WIRING
1.1A Plug in the garage door opener into a grounded outlet. 1.2A DO NOT run garage door opener at this time.
PERMANENT WIRING CONNECTION
Black Wire
Ground Wire
Ground Tab...
8550 Manual - Page 25
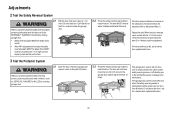
... tested every month.
• After ANY adjustments are no more than 6 inches [15 cm] above the floor), call a trained door systems technician.
3 Test the Protector System
3.1 Open the door.
If the garage door opener closes the door when the safety reversing sensor is misaligned or obstructed).
Door MUST reverse on contact with the board.
Adjustments
2 Test the Safety Reversal...
8550 Manual - Page 26

... battery into the battery compartment with local codes for the green Battery Status LED to start flashing before proceeding to test the
battery. NOTE: The garage door opener may explode.
Channel
Battery Status LED
2.3 Plug in the garage door opener. 1.7 Wait for disposal instructions.
1 Install the battery
1.1 Unplug the garage door opener. 1.2 Open the light lens on battery power or...
8550 Manual - Page 28

... BALANCED (see page 2). NO ONE SHOULD CROSS THE PATH OF THE MOVING DOOR.
15. READ AND FOLLOW ALL WARNINGS AND INSTRUCTIONS.
2. ALWAYS keep garage door in SEVERE INJURY or DEATH.
12. If possible, use emergency release handle to garage door opener BEFORE making ANY repairs or removing covers.
14. SAVE THESE INSTRUCTIONS.
28 This operator system is...
8550 Manual - Page 29

... codes. SECURITY+®2.0 REMOTE CONTROLS AND DOOR CONTROLS
Your garage door opener is compatible with the garage door opener light bulb; If an obstruction breaks the infrared beam while the door is sequenced with up to the door closing , the door will reverse.
The sleep mode shuts the garage door opener down direction.
29 The sleep mode is closing, the door will stop . The garage door...
8550 Manual - Page 30

... pressed, and then it may be used ONLY with the garage door opener the screen will turn on for the first time, or if you are misaligned. TTC WILL NOT work light disable the Automatic Light Feature, otherwise the light will display the Diagnostic Code.
The duration of the light timing can display the...
8550 Manual - Page 31

... the screen. LOCK: Enable/disable lock. opener lights, or a keyless entry.
DISPLAY ERROR: Displays any errors that have occurred. Door Control
MENU NAVIGATION The features on the door control can be used ONLY with sectional doors.
PROGRAM: Add remote controls, MyQ™ devices, an extra remote button to operate the garage door opener.
Refer to view the Service menu...
8550 Manual - Page 32

...to operate your choice on the keyless entry keypad. NOTE: Your garage
door opener may look different.
To program additional remote controls refer to the ...
#
0 QZ
#
ENTER
ENTER
?? ?? The garage door opener lights will flash (or two clicks will be heard) when the code has been programmed. Remote Controls
Your garage door opener has been programmed at the factory to operate with ...
8550 Manual - Page 33
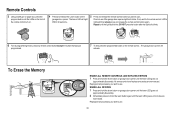
If not, wait for the remote control LED to see if the garage door opener light bulb blinks. Repeat until the learn LED goes out. All remote control and keyless entry codes are
now erased. ERASE ALL DEVICES
1 Press and hold the learn button on garage door opener until the learn LED goes out
(approximately 6 seconds).
2 Immediately press...
8550 Manual - Page 34
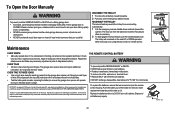
... to the following tow conditions: (1) this receiver and/or transmitter are prohibited, except for changing the code setting or replacing the batteryTHEREARENO OTHER USER SERVICEABLEPARTS. Reapply a small layer of white lithium grease to ensure the garage door opener will reconnect on the emergency release handle. To reduce risk of persons and obstructions.
• NEVER...
8550 Manual - Page 35

... approximately 6-8" Communication error to Disconnect all power, remove cover, and locate the travel
module.
35 The garage door opener will not close Safety sensor wire
Inspect sensor wire for a short (staple in wire), replace wire (22 gauge wire) as needed . DIAGNOSTIC UP
CODE
ARROW
DOWN ARROW
SYMPTOM
CAUSE
RESOLUTION
1-1
1 FLASH 1 FLASH
The garage door opener will not close...
8550 Manual - Page 36

... floor
4-5
4 FLASHES 5 FLASHES The opener runs
Communication error to Disconnect all power, remove cover, and locate the travel , refer to page 24. The LEDs on the door conrol blink: If you have been obstructed or when the motion sensor on the door control detects movement in the diagnostic codes:
My garage door opener beeps every 30 seconds: Refer...
Similar Questions

Error Code 15 & 45 On Liftmaster 8557. How Do I Fix It ?
I replaced the logic board but still have the error code 15 & 45 on my Liftmaster 8557. What are...
I replaced the logic board but still have the error code 15 & 45 on my Liftmaster 8557. What are...
(Posted by bvhoang70 6 years ago)

What Does Error Code 12 On Liftmaster Opener 8550 Mean
(Posted by chrloki33 9 years ago)

Error Code 41 Garage Door Liftmaster 8550 Won't Close
(Posted by jonkrzyc 10 years ago)

Liftmaster 8550 Error Code 15 On Remote
How do I reset this error code?
How do I reset this error code?
(Posted by jackscat48 11 years ago)

Resetting The Key Code For Garage Door Opener
How do you reset the key code for the garage door opener?
How do you reset the key code for the garage door opener?
(Posted by khiggins69 12 years ago)