LiftMaster 1345 Support Question
LiftMaster 1345 Support Question
Find answers below for this question about LiftMaster 1345.Need a LiftMaster 1345 manual? We have 1 online manual for this item!
Question posted by jameslohmann on September 18th, 2011
Light Bulb Socket Burned Out
The socket where the bulb screws into apparently has burned and no longer works. It is only about a year and a half old...what causes this and where do I get a replacement socket?
Current Answers
Related LiftMaster 1345 Manual Pages
1355 Manual - Page 1
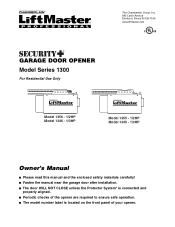
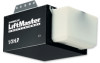
The Chamberlain Group, Inc. 845 Larch Avenue Elmhurst, Illinois 60126-1196 www.liftmaster.com
®
GARAGE DOOR OPENER Model Series 1300
For Residential Use Only
Model 1356 - 1/2HP Model 1346 - 1/3HP
Model 1355 - 1/2HP Model 1345 - 1/3HP
Owner's Manual
■ Please read this manual and the enclosed safety materials carefully! ■ Fasten the manual near...
1355 Manual - Page 2

...rail to the header bracket 15
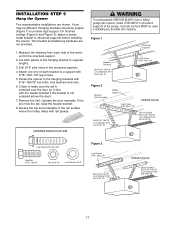
Position the opener 16
Hang the opener 17
Install the door control 18
Install the light and lens 19
Attach the emergency release rope ... safety instructions 31
Using your garage door opener 31
Using the wall-mounted door control 32
To open the door manually 32
Care of damage to
WARNING your garage door opener 33
Having a problem 34
Programming...
1355 Manual - Page 3

.... • Disable ALL locks and remove ALL ropes connected to
WARNING garage door BEFORE installing and operating garage
door opener to avoid entanglement. Carpenter's Level (Optional)
12
Tape Measure
Pencil Wire Cutters
Drill
3/16", 5/16" and
5/32" Drill Bits
Pliers
Stepladder
1/2" and 7/16" Sockets and Wrench
Screwdriver
Hack Saw Claw Hammer Adjustable End Wrench
3 If your...
1355 Manual - Page 6
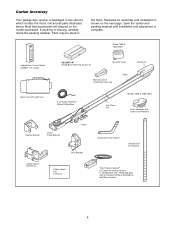
...the motor unit and all parts illustrated below. Carton Inventory
Your garage door opener is packaged in
the foam. Save the carton and packing material until installation and adjustment is missing, carefully check the packing material. Model 1355 & 1345 ONLY
Lighted Door Control Button w/6ABx1-1/2" screws
SECURITY✚® Single-Button Remote Control (1)
Sprocket Cover
Remote Control...
1355 Manual - Page 8
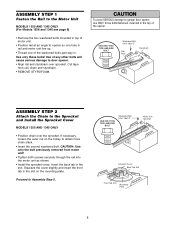
...
To avoid SERIOUS damage to garage door opener, use ONLY those bolts/fasteners mounted in the top of the washered bolts part way in. Use only these bolts! Squeeze the cover slightly and insert the front tab in the slot. Cut tape
from motor unit!
• Tighten both screws securely through the rail into...
1355 Manual - Page 9
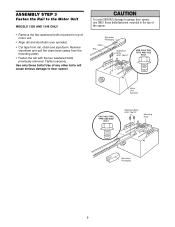
Tighten securely. WARNING
CAUTION
To avoid SERIOUS damage to garage door opener, use ONLY those bolts/fasteners mounted in top of motor unit.
• Align rail...and pull the chain back (away from rail, chain and styrofoam. Use of any other bolts will cause serious damage to door opener. Styrofoam Packaging
Chain Rail
Washered Bolts 5/16"-18x1/2"
USE ONLY THIS TYPE AND SIZE
BOLT
Motor Unit...
1355 Manual - Page 10
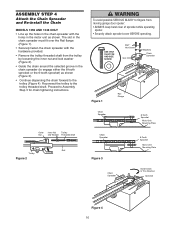
USE ONLY THIS TYPE AND SIZE SCREW
#8x1" Hex Screw
Slot
Washers
Chain Spreader
Figure 1
Rail Flange
Chain Spreader
Outer Nut
... with the hardware provided.
• Remove the trolley threaded shaft from
CAUTION moving garage door opener:
• ALWAYS keep hand clear of sprocket while operating opener.
• Securely attach sprocket cover BEFORE operating. The slot in the chain spreader...
1355 Manual - Page 11

... high object (or a 2x4 laid flat) on wall next to garage door control.
11. Upon completion of garage door.
12. WARNING
You have now finished assembling your garage door opener. Disable all locks and remove all ropes connected to garage door BEFORE installing opener to avoid entanglement.
5. Install garage door opener 7 feet (2.13 m) or more above floor.
7. Place manual release/safety...
1355 Manual - Page 14
... of Garage Door
Lag Screws 5/16"-9x1-5/8"
Door Spring
Highest Point of Garage Door Travel
Garage Door
Vertical...Door Spring
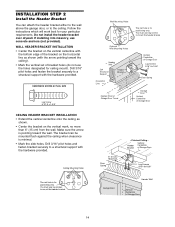
- Drill 3/16" pilot holes and fasten the bracket securely to a structural support with the hardware provided. Drill 3/16" pilot holes and fasten bracket securely to a structural support with the arrow pointing toward the wall.
Follow the instructions which will work...
1355 Manual - Page 16
... is used to determine the correct mounting height from ceiling.
16 INSTALLATION STEP 4
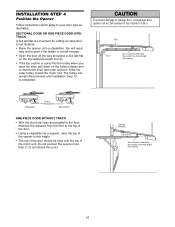
Position the Opener
Follow instructions which apply to garage door, rest garage door opener rail on 2x4 placed on the trolley release arm to this point.
Rail
Door
2x4 is used to determine the correct mounting height from ceiling. Header Bracket
Top of the...
1355 Manual - Page 17
...where the trolley slides with
5/16"-18x1-7/8" lag screws. 5. Fasten the opener to structural supports before installing the opener. If the door hits the rail, raise the header bracket. ...header bracket if the bracket is
centered over the door (or in the structural supports. 4. Measure the distance from a falling
CAUTION garage door opener, fasten it SECURELY to structural
supports of the ...
1355 Manual - Page 19
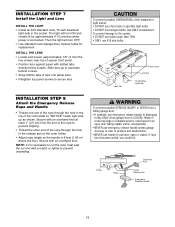
... lit for replacement
INSTALL THE LENS • Locate and loosen (approximately 1/8" (3 mm) the
two screws near top of the rope through the hole in the socket.
To prevent damage to pull door open door falling rapidly and/or unexpectedly.
• NEVER use A19 size bulbs. Secure with slotted tabs
directly below screws. Slide lens up as shown. Light Lens...
1355 Manual - Page 20
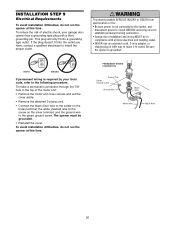
... the silver terminal;
To make it fit outlet. PERMANENT WIRING CONNECTION
Ground Tab Green Ground Screw
Ground Wire
Black Wire
White Wire
Black Wire
20 Be sure the opener is required by your garage door opener has a grounding type plug with all local electrical and building codes.
• NEVER use an extension cord, 2-wire adapter...
1355 Manual - Page 21

... eye (with a green indicator light). If an obstruction breaks the light beam while the door is closing.
No part of sectional garage doors without additional hardware. above floor
Invisible Light Beam Protection Area
Facing the door from a closing , the door will flash 10 times. Either can be connected and aligned correctly before the garage door opener will detect an obstacle in...
1355 Manual - Page 30

...; Any repair to or adjustment of the garage door
(including springs and hardware). • Any repair to or buckling of the garage floor. • Any repair to test adjustment. The door will not move more than an inch, and the opener lights will not close from a remote if the indicator light in either sensor is off (alerting...
1355 Manual - Page 31

... obstructions to garage door opener BEFORE making any remote, follow the instructions in ;
The light will close from a hand-held Remote Control: Hold the push
button down until the door starts to ...use handle to disengage trolley ONLY when garage door is 75 watts maximum.
31 Bulb power is CLOSED. If the door has been stopped in the opening , the door will reverse. If you can be ...
1355 Manual - Page 34
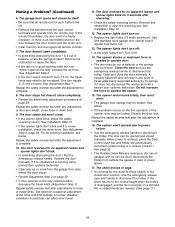
...? Use A19 standard neck garage door opener bulb if regular bulb burns out.
13. Do not increase the force to disconnect the trolley. Use the emergency release rope and handle to operate the opener.
15. The door doesn't open all remote controls.
7.
The door reverses for no apparent reason and opener lights blink for no apparent reason and opener lights don't blink:
• Is...
1355 Manual - Page 35
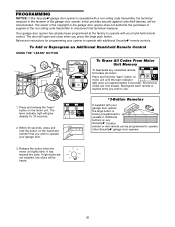
... remote* that technical measure. All previous
codes are instructions for 30 seconds.
1
2
KG
2. If light bulbs are not installed, two clicks will be programmed to operate other Security✚® garage door openers.
3.
Press and release the "learn indicator light will open and close when you press the large push button. The owner of the copyright in...
1355 Manual - Page 36
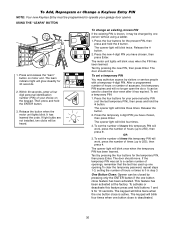
... Button Close: Opener can be heard. To set a temporary PIN:
1. If light bulbs are not installed, two clicks will blink once when the PIN has been learned. KG
2. The opener light will glow steadily... button. The keypad will no longer open the door. The door should move .
1. The opener light will blink twice. Press the four buttons for your garage door opener.
1355 Manual - Page 39
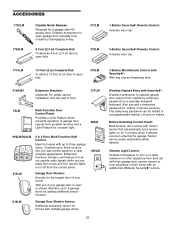
...✚®: Enables homeowner to lock out outside radio signals while you if your home! Remote Light Control: Enables homeowner to a programmable number of garage door opener from portable remotes and a Light Feature for constant light.
98LM
902LM/903LM
2 & 3 Door Multi-Function Wall Control:
Ideal for homes with up to three controls into one wall control panel...
Similar Questions

I Have Installed A Chamberlan Garage Door Opener And The Remote I Was Using Is
I have been using a Chamberlan garage door opener and its remote has been defective since of late.Pl...
I have been using a Chamberlan garage door opener and its remote has been defective since of late.Pl...
(Posted by donweera42 8 months ago)

All Remote Controls Of My Lm 1345 Stop Working Suddenly. Door Control Still Ok.
All remote controls of my LM 1345 stop working all the sudden. When I press the transmit button on a...
All remote controls of my LM 1345 stop working all the sudden. When I press the transmit button on a...
(Posted by huangtingwei 9 years ago)

Why Is There A Red Light On My Liftmaster Garage Door Opener
(Posted by Jlubney 10 years ago)

Just Installed And When I Hit Button Makes Noise And Light Flickers But No Movem
(Posted by Lightsout34 11 years ago)
Liftmaster Cptk-3, How Do I Program My New Key Remote To Existing Garage Door
(Posted by alisonwood 11 years ago)