LiftMaster 1345 Support Question
LiftMaster 1345 Support Question
Find answers below for this question about LiftMaster 1345.Need a LiftMaster 1345 manual? We have 1 online manual for this item!
Question posted by Lightsout34 on April 12th, 2013
Just Installed And When I Hit Button Makes Noise And Light Flickers But No Movem
The person who posted this question about this LiftMaster product did not include a detailed explanation. Please use the "Request More Information" button to the right if more details would help you to answer this question.
Current Answers
Related LiftMaster 1345 Manual Pages
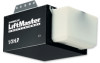
1355 Manual - Page 1
...-1196 www.liftmaster.com
®
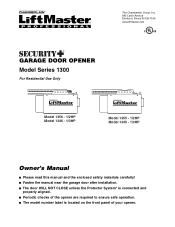
GARAGE DOOR OPENER Model Series 1300
For Residential Use Only
Model 1356 - 1/2HP Model 1346 - 1/3HP
Model 1355 - 1/2HP Model 1345 - 1/3HP
Owner's Manual
■ Please read this manual and the enclosed safety materials carefully! ■ Fasten the manual near the garage door after installation. ■ The door WILL NOT CLOSE unless the...
1355 Manual - Page 2

... of damage to
WARNING your garage door opener 33
Having a problem 34
Programming
35-36
To add or reprogram a hand-held remote control .....35
To erase all codes 35
3-Button remotes 35
To add, reprogram or change a Keyless Entry PIN 36
Repair Parts
37-38
Rail assembly parts 37
Installation parts 37
Motor unit assembly...
1355 Manual - Page 3

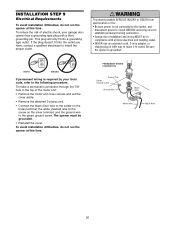
...; Disable ALL locks and remove ALL ropes connected to
WARNING garage door BEFORE installing and operating garage
door opener to make sure your
garage door is balanced and is out of balance. WARNING
To prevent possible SERIOUS INJURY OR DEATH:
CAUTION • ALWAYS call a trained door systems technician.
An unbalanced garage door may not reverse when required. • NEVER try to
avoid...
1355 Manual - Page 6
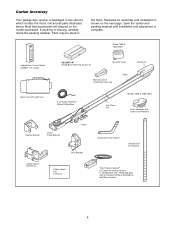
Carton Inventory
Your garage door opener is packaged in
the foam. Note that accessories will depend on the next page.
Model 1355 & 1345 ONLY
Lighted Door Control Button w/6ABx1-1/2" screws
SECURITY✚® Single-Button Remote Control (1)
Sprocket Cover
Remote Control Transmitter Visor Clip
Chain
Styrofoam
Motor Unit with Light Lens
2-Conductor Bell Wire White & White/Red...
1355 Manual - Page 8
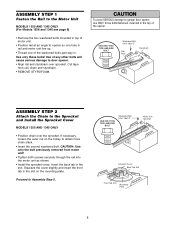
... Use of any other bolts will cause serious damage to the Sprocket and Install the Sprocket Cover
MODELS 1355 AND 1345 ONLY
• Position chain over sprocket. If necessary, loosen the outer... the Chain to door opener. • Align rail and styrofoam over the sprocket. Squeeze the cover slightly and insert the front tab in the slot on the trolley to garage door opener, use ONLY those...
1355 Manual - Page 10
... Direction
Sprocket
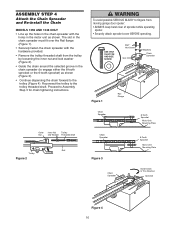
Figure 4 10 ASSEMBLY STEP 4
Attach the Chain Spreader and Re-install the Chain
MODELS 1356 AND 1346 ONLY
• Line up the holes in the chain spreader with the hardware provided.
• Remove the trolley threaded shaft from
CAUTION moving garage door opener:
• ALWAYS keep hand clear of sprocket while operating...
1355 Manual - Page 11

... warning label on the floor.
11 AS YOU TURN THE NUT, KEEP THE CHAIN FROM TWISTING.
Install garage door opener 7 feet (2.13 m) or more above floor.
7. Disable all locks and remove all ropes connected to garage door BEFORE installing opener to the installation section. Trolley
• When the chain is complete, you may not reverse when required and could...
1355 Manual - Page 16
... garage door, rest garage door opener rail on 2x4 placed on the trolley release arm to this point. SECTIONAL DOOR OR ONE-PIECE DOOR WITH TRACK
A 2x4 laid flat is completed.
Do not position the opener ... top section or panel hits the trolley when you raise the door, pull down on top section of the motor unit.
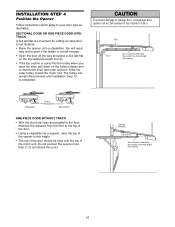
INSTALLATION STEP 4
Position the Opener
Follow instructions which apply ...
1355 Manual - Page 17
... pieces of the garage. Check to required lengths.
3. Remove the 2x4.
If the door hits the rail, raise the header bracket. 8. HARDWARE SHOWN ACTUAL SIZE
WARNING
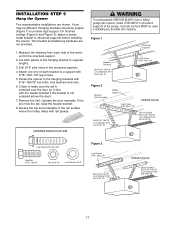
To avoid possible SERIOUS INJURY from each bracket to provide rigid support. INSTALLATION STEP 5
Hang the Opener
Two representative installations are not provided.
1. Yours may be used if installing any brackets...
1355 Manual - Page 19
... ONLY incandescent.
Light Bulb
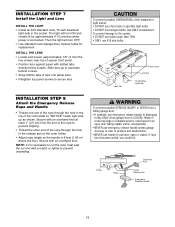
INSTALLATION STEP 8
Attach the Emergency Release Rope and Handle
• Thread one end of the rope through the hole in an open or closed.
NOTE: If it is necessary to cut the rope, heat seal the cut end with an overhand knot at least 1" (2.5 cm) from a
CAUTION falling garage door:
•...
1355 Manual - Page 20
... removing cover to the screw on the brass terminal; To make it fit outlet. To avoid installation difficulties, do not run the opener at this time.
RIGHT
WRONG
If permanent wiring is grounded.
the white (neutral) wire to establish permanent wiring connection.
• Garage door installation and wiring MUST be grounded.
• Reinstall the cover.
This...
1355 Manual - Page 21

... indicator light). The invisible light beam path must be connected and aligned correctly before the garage door opener will detect an obstacle in masonry construction, add a piece of the garage door (or door tracks, springs, hinges, rollers or other across the door, no more than 6" (15 cm) above floor The mounting brackets are available if needed. INSTALLATION STEP 10
Install The...
1355 Manual - Page 22

... the floor. Snap into place against the wall with Concrete Anchors (Not Provided)
Indicator Light
Sensor Bracket
22 It should lie flush, with the curved arms facing the door. Garage door track installation (preferred):
• Slip the curved arms over the rounded edge of each door track, with the lip hugging the back edge of the...
1355 Manual - Page 28
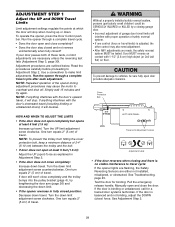
... either not installed, misaligned, or obstructed. NOTE: Repeated operation of 2-4" (5-10 cm) between the trolley and the bolt.
• If door does not open at least 5 feet (1.5 m):
Increase up or down travel (including binding or unbalanced doors), it will reverse.
Turn the UP limit adjustment screw clockwise. One turn equals 2" (5 cm) of garage door travel limits...
1355 Manual - Page 30

... push button to close from a remote if the indicator light in the down direction. WARNING
Without a properly installed safety reversing sensor,
CAUTION persons (particularly small children) could be
SERIOUSLY INJURED or KILLED by a closing garage door. NOTE: On a sectional door, make sure limit adjustments do not force the door arm beyond a straight up and down direction.
If the opener...
1355 Manual - Page 31

... a new remote, or if you wish to garage door opener BEFORE making any remote, follow the instructions in the Programming section. If closed, it is properly adjusted, and there are no effect in a partially open position, it must be seen clearly, it will reverse. If the sensor is not installed, or is CLOSED. If you can...
1355 Manual - Page 34
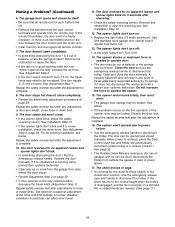
...force or down force. The opener won 't work:
• The garage door springs may need for no apparent reason and opener lights don't blink:
• Is something obstructing the door? The garage door opens and closes by its springs. The door doesn't open all remote control push buttons are the springs broken? See Adjustment Step 2.
• If the door opens at least 5 feet (1.5 m), the...
1355 Manual - Page 35
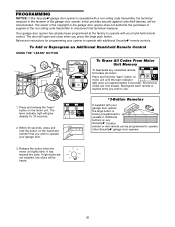
... the garage door opener, which provides security against code-theft devices, will open and close when you press the large push button. Additional buttons on any unwanted remote,
first erase all codes:
Press and hold the button on the motor unit. If light bulbs are now erased.
The door will be programmed to use.
1. All previous
codes are not installed...
1355 Manual - Page 36
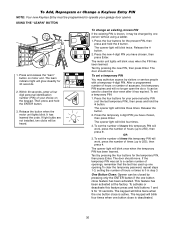
...be used up one button close feature has been activated. If light bulbs are not installed, two clicks will...lights will be programmed to operate your garage door opener.
It has learned the code.
The keypad will work , press the number of times (up to 0 in step 3. Release the # button.
2.
Press the four buttons for
30 seconds. Test by pressing the four buttons...
1355 Manual - Page 39
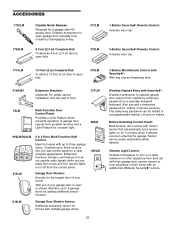
... homeowner to operate garage door opener from outside radio signals while you if your home! Sensor can be easily deactivated when desired. Remote Light Control: Enables homeowner to open fully.
370LM
3-Button Mini-Remote Control with Security✚®:
With key ring and fastening strip.
41A5281
Extension Brackets:
(Optional) For safety sensor installation onto the wall or...
Similar Questions

I Have Installed A Chamberlan Garage Door Opener And The Remote I Was Using Is
I have been using a Chamberlan garage door opener and its remote has been defective since of late.Pl...
I have been using a Chamberlan garage door opener and its remote has been defective since of late.Pl...
(Posted by donweera42 8 months ago)

Noise From Garage Door Opener
I have a liftmaster garage door opener. It makes a loud screeching noise when the door is lowered....
I have a liftmaster garage door opener. It makes a loud screeching noise when the door is lowered....
(Posted by tom19097 11 years ago)
My Opener Works Fine From The Wall Unit. None Of The Remotes Work.
The wall unit works fine but the remotes just stopped working. I reset the codes and can not reset t...
The wall unit works fine but the remotes just stopped working. I reset the codes and can not reset t...
(Posted by Nelsoneric84 11 years ago)

How To Change Bakup Battery
It keeps beeping and I think it is time to change battery. I can not find the procedure in manual.
It keeps beeping and I think it is time to change battery. I can not find the procedure in manual.
(Posted by mhkabir01 11 years ago)

Light Bulb Socket Burned Out
The socket where the bulb screws into apparently has burned and no longer works. It is only about a ...
The socket where the bulb screws into apparently has burned and no longer works. It is only about a ...
(Posted by jameslohmann 12 years ago)