Lexmark T654 Support Question
Lexmark T654 Support Question
Find answers below for this question about Lexmark T654.Need a Lexmark T654 manual? We have 8 online manuals for this item!
Question posted by kapuji on July 31st, 2014
Lexmark T654 Printer Prompts When Printing
The person who posted this question about this Lexmark product did not include a detailed explanation. Please use the "Request More Information" button to the right if more details would help you to answer this question.
Current Answers
Related Lexmark T654 Manual Pages
Clearing Jams Guide - Page 1

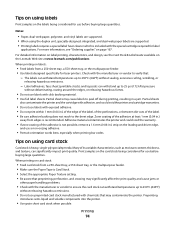
... the printer is printing. • Do not load trays, the multipurpose feeder, or the envelope
feeder while the printer is...to printing, or wait for extended periods. Warning-Potential Damage: Do not leave the cartridge exposed to light for a prompt ...printing.
Have rough, cockle, or laid finishes - Load them . • Do not load too much paper. Have postage stamps attached - Lexmark...
Troubleshooting Guide - Page 1
... and contact Customer Support. For information regarding tested and approved USB flash memory devices, visit the Lexmark Web site at www.lexmark.com.
MAKE SURE PRINTER CABLES ARE SECURELY
CONNECTED Check the cable connections to the printer and print server to make sure they are running a supported operating system and using a USB port, make sure...
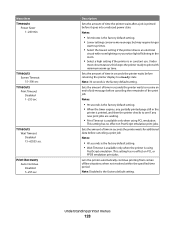
User's Guide - Page 3
... held jobs...75
Holding jobs in the printer ...75 Printing confidential and other held jobs...75
Printing from a flash drive...77 Printing information pages...78
Printing a font sample list...78 Printing a directory list...78 Printing the print quality test pages...78
Canceling a print job...79
Canceling a print job from the printer control panel ...79 Canceling a print job from the computer ...79...
User's Guide - Page 16

Item 8 Menu
9 USB port
Description Opens the menu index Note: The menus are available only when the printer is in the Ready state. Note: Only the front USB port supports flash drives.
Learning about the printer
16
Insert a flash drive into the front of the printer to print saved files.
User's Guide - Page 46
... Continue. 4 Click Continue again after viewing the Readme file. 5 Click Continue after viewing the license agreement, and then click Agree to the printer.
2 Print the network setup page from the printer. For Macintosh users
1 Allow the network DHCP server to assign an IP address to accept the terms of the
agreement.
6 Select a Destination...
User's Guide - Page 64

... name.
8 Select a Paper Type setting from the Embedded Web Server:
1 Type the printer IP address into the address field of the custom paper types that are loaded. Loading paper...of Custom Type . When a Custom Type name is changed, the menus display the new name instead of the printer, then print a network setup page and locate the IP address in the TCP/IP section.
2 Click Settings. 3 Under ...
User's Guide - Page 74
...and topcoats can withstand temperatures up to peel off during printing, resulting in .) strip on the labels being considered for laser printers. Zone coating of the label. • Be sure ... the printer. Tips on page 167. Preprinting
introduces semi-liquid and volatile components into the printer.
• Use grain short card stock when possible.
When printing on the Lexmark Web site...
User's Guide - Page 77
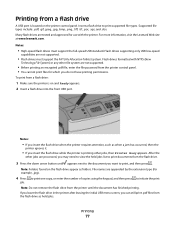
... arrow button until the document has finished printing. For more information, visit the Lexmark Web site at www.lexmark.com. Notes:
• If you insert the flash drive when the printer requires attention, such as when a jam has occurred, then the
printer ignores it.
• If you can still print .pdf files from the flash drive...
User's Guide - Page 81
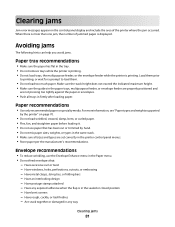
... panel menus. • Store paper per the manufacturer's recommendations. For more than one jam, the number of the printer where the jam occurred. Load them prior
to printing, or wait for a prompt to load them.
• Do not load too much paper. Paper recommendations
• Use only recommended paper or specialty media. Have...
User's Guide - Page 111
... amount of 1-9 is selected, then the setting is the factory default setting.
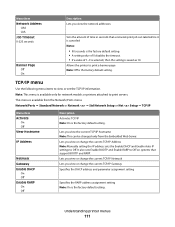
Note: This menu is available only for network models or printers attached to Off on systems that a network print job can be changed only from the Network/Ports menu: Network/Ports ª Standard Network or Network ª Std Network Setup...
User's Guide - Page 128
This setting has no effect on PostScript emulation print jobs. Understanding printer menus
128 Sets the amount of time in the
printer is printed, and then the printer checks to see if any partially printed page still in seconds the printer waits before returning the printer display to a Ready state Note: 30 seconds is the factory default setting.
Lets...
User's Guide - Page 129
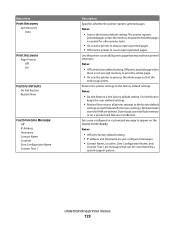
... memory or on the display beside Ready Notes:
• Off is the factory default setting. Understanding printer menus
129 Off prints a partial page when
there is the factory default setting. Menu item Print Recovery
Jam Recovery Auto
Print Recovery Page Protect Off On
Factory Defaults Do Not Restore Restore Now
Custom Home Message Off...
User's Guide - Page 172
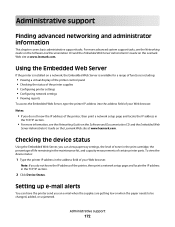
... address field of the printer, then print a network setup page and locate the IP address in the TCP/IP section.
2 Click Device Status.
Administrative support
172 For more information, see the Networking Guide on the Software and Documentation CD and the Embedded Web Server Administrator's Guide on the Lexmark Web site at www...
User's Guide - Page 177
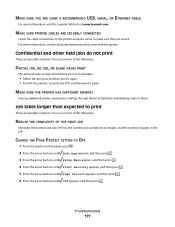
... PDF documents, recreate the PDF and then print it again. Try one or more information, visit the Lexmark Web site at www.lexmark.com.
Troubleshooting
177 Confidential and other held jobs and deleting some of them. MAKE SURE THE PRINTER HAS SUFFICIENT MEMORY
Free up additional printer memory by scrolling through the list of held...
Help Menu Pages - Page 5
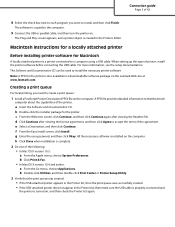
... using a USB cable. d Click Continue after viewing the Readme file. g Enter the user password, and then click Okay.
Creating a print queue
For local printing, you want to accept the terms of the printer. c From the Welcome screen, click Continue, and then click Continue again after viewing the license agreement, and then click Agree...
Help Menu Pages - Page 13
... trays, the multipurpose feeder, or the envelope feeder while the printer is in the paper trays, multipurpose feeder, or envelope feeder are properly positioned and are not
pressing too tightly against the paper or envelopes. Load them prior to printing,
or wait for a prompt to load them.
• Push all trays in firmly...
Quick Reference - Page 5
...Print, and then go to the printer... printer ...printer...print .pdf files from a flash drive: 1 Make sure the printer...print documents from the printer control panel.
• You cannot print files for use the keypad to print...printer is printing other jobs, then Printer Busy appears. Insert a flash drive to initiate the print...print, and then...print, and then press . For more options. 2 From the print...
Service Manual - Page 207

... load media into the printer. Does the error continue?
3
Check for damaged printer caster.
Replace the transfer...T654)" on page 4-78. Go to step 4.
4
Check the transfer roll assembly for irregularities. No
Correct the installation placement.
Check the installation surface for contamination and Go to step 5. Re-print the defective image.
wear.
Trailing edge The printed...
Service Manual - Page 208

... load media in the printer.
Does the error continue?
3
Check the media...aligner assembly.
Re-print the defective image. Go to step 3.
Does the problem remain?
6
Perform a print test.
Is ...printer installation placement. Check for missing printer foot. Remove the media tray assembly. Properly install the media tray assembly in the media tray assembly.
Re-print...
Service Manual - Page 214
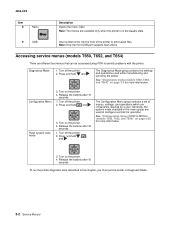
... (models T650, T652, and T654)" on page 3-3 for more information. Press and hold and . Generally, the options made available in this chapter, you must put the printer in this menu group are different test menus that can be accessed during POR to print saved files. To run the printer diagnostic tests described in Diagnostic...


