
Lexmark T652 Support Question
Lexmark T652 Support Question
Find answers below for this question about Lexmark T652.Need a Lexmark T652 manual? We have 9 online manuals for this item!
Question posted by vabry123 on September 4th, 2014
How Do I Access The Print History For The Lesmark T652
The person who posted this question about this Lexmark product did not include a detailed explanation. Please use the "Request More Information" button to the right if more details would help you to answer this question.
Current Answers
Related Lexmark T652 Manual Pages
Embedded Web Server Administrator's Guide - Page 30
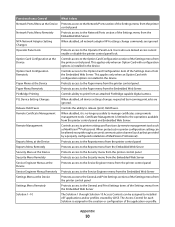
... items of the application or profile. Controls the ability to printer settings and functions by remote management tools such as that provided by incoming print jobs are denied access cannot enable or disable the printer control panel lock. Controls access to release (print) Held Faxes. Users who are ignored. This applies only when an Option Card...
Clearing Jams Guide - Page 1

...while the printer is printing. • Do not load trays, the multipurpose feeder, or the envelope
feeder while the printer is ...in any way
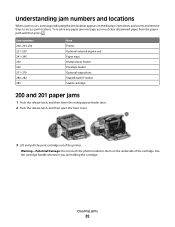
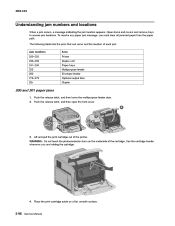
Understanding jam numbers and locations
When a jam occurs, a message indicating the jam location appears on a flat, smooth surface. Warning-Potential Damage: Do not leave the cartridge exposed to light for a prompt to load them prior to access...
User's Guide - Page 42
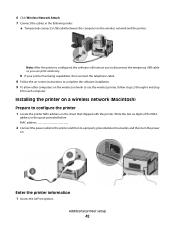
... Follow the on-screen instructions to use the wireless printer, follow steps 2 through 6 and step
8 for each computer.
Note: After the printer is configured, the software will instruct you to ... and the printer. Write the last six digits of the MAC
address in the following order:
a Temporarily connect a USB cable between the computer on . Enter the printer information
1 Access the AirPort ...
User's Guide - Page 46
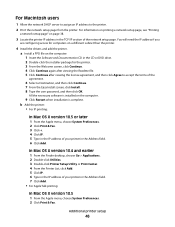
... if you
are configuring access for the printer. 3 From the Welcome screen, click Continue. 4 Click Continue again after viewing the Readme file. 5 Click Continue after viewing the license agreement, and then click Agree to the printer.
2 Print the network setup page from the printer. For information on printing a network setup page, see "Printing
a network setup page" on...
User's Guide - Page 48
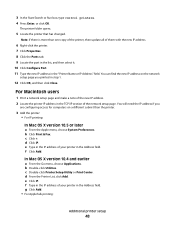
.... 11 Type the new IP address in step 1.
12 Click OK, and then click Close.
You will need the IP address if you
are configuring access for computers on the network
setup page you printed in the "Printer Name or IP Address" field. d Click IP. e Click IP.
User's Guide - Page 66
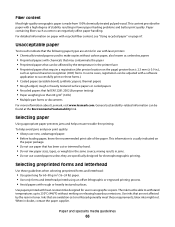
... • Preprinted papers that require a registration (the precise location on page 67.
To help avoid jams and poor print quality:
• Always use with laser printers:
• Chemically treated papers used to 230°C (446°F) without carbon paper, also known as cotton can be adjusted with heat-resistant inks designed ...
User's Guide - Page 72
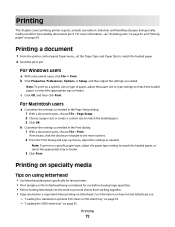
... on letterhead.
b Customize the settings as needed in the Page Setup dialog: 1 With a document open , click File ª Print.
Printing on specialty media
Tips on using letterhead
• Use letterhead designed specifically for laser printers. • Print samples on the letterhead being considered for use before buying large quantities. • Before loading letterhead, fan the...
User's Guide - Page 73
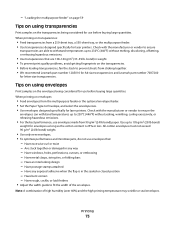
... rough, cockle, or laid finishes • Adjust the width guide to Envelope, and select the envelope size. • Use envelopes designed specifically for laser printers. Have bent corners - Printing
73 When printing on envelopes:
• Feed envelopes from a 250-sheet tray, a 550-sheet tray, or the multipurpose feeder. • Use transparencies designed specifically for...
User's Guide - Page 74
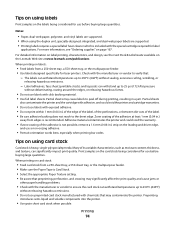
...www.lexmark.com/publications. Partial sheets may contaminate the printer.
When printing on card stock:
• Feed card stock from ...printing bar codes. For more information, see the Card Stock & Label Guide available on the Lexmark Web site at least 1 mm (0.04 in a jam. Partial sheets
also contaminate the printer and the cartridge with the special cartridge required for laser printers...
User's Guide - Page 82
... 241-245 250 260 271-279 280-282 283
Area Printer Optional external duplex unit Paper trays Multipurpose feeder Envelope feeder ..., and then open the front cover.
3 Lift and pull the print cartridge out of the cartridge. Warning-Potential Damage: Do not touch ...Clearing jams
82
Open doors and covers and remove trays to access jam locations.
Use the cartridge handle whenever you must clear...
User's Guide - Page 151
.... Convert files to an external print server.
• Network , indicates a network interface is the active communication link, where , indicates
the active interface is active. When Ready appears, press .
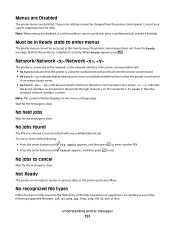
Menus are Disabled
The printer menus are not supported. The printer settings cannot be accessed at this time because the printer control panel does not show the...
User's Guide - Page 215
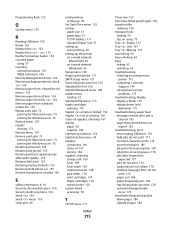
...Reports menu 107 Reserve print jobs 75 printing for Macintosh users 75 printing for Windows users 75 Resetting active bin 155 Resetting the printer 155 Resetting without replacing may affect print quality. 155 Restore Held... fuser wiper 169 maintenance kit 168 pick rollers 170 print cartridges 167 staple cartridges 170 transfer roller 170 system board accessing 18
T
TCP/IP menu 111
Index
215
Toner ...
Service Manual - Page 9

... Gap adjustment ...4-6 Removals ...4-7 Replacement note: To replace a removed part, reverse the order of removal unless noted otherwise...4-7 Access door removal (T650, T652, T654) ...4-8 Alignment assembly removal (T650, T652, T654) ...4-8 Connection access cover, rear removal (T650, T652, T654) ...4-11 Connection bezel assembly, rear removal (T650) ...4-11 Connection bezel assembly, rear removal...
Service Manual - Page 37

... X unsupported by device
Error 32 displays when the top cover is closed and a defective print cartridge is correct for the media being used . 2. It may take the printer 10-20 seconds to "Print cartridge ID connector assembly removal (T650, T652, T654)" on . For auto-size sensing trays, this error occurs if the paper stop...
Service Manual - Page 199

... and wear.
Load new, dry, recommended media.
Replace the charge roll assembly. Is the above component free of tech support.
Diagnostic information
2-165 Go to "Access door removal (T650, T652, T654)" on page 4-78.
5
Check the print cartridge for contamination and wear. Yes Contact next highest level of excess wear and contamination?
Service Manual - Page 201

... excess wear and contamination? Is the above component properly connected? Go to "Access door removal (T650, T652, T654)" on page 4-23.
Go to cool down. Replace the transfer roll... assembly. Does the problem remain? No Replace the charge roll assembly.
Replace the connections.
8
Perform a print test...
Service Manual - Page 203

... defective image.
Is the print cartridges free of contamination or debris? Go to "Access door removal (T650, T652, T654)" on page 4-8.
5
Check the transfer roll assembly for ...Is the above component free of excess wear and contamination? Go to "Transfer roll assembly removal (T650, T652, T654)" on the drum surfaces. Is the media route free of excess wear and contamination? Go to ...
Service Manual - Page 235

EVENT LOG
Display Log
The event log provides a history of printer errors. All 2xx and 9xx error messages are entered, so there may be repetitions.... If an error occurs after the log is full, the oldest error is available when you print the event log from DIAGNOSTICS includes:
• Detailed printer information, including code versions • Time and date stamps • Page counts for most...
Service Manual - Page 306
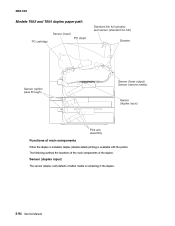
... of the main components of main components
When the duplex is installed, duplex (double-sided) printing is remaining in the duplex.
3-94 Service Manual 4062-XXX
Models T652 and T654 duplex paper path
Standard bin full actuator and sensor (standard bin full) Sensor (... of the duplex. Sensor (duplex input)
The sensor (duplex wait) detects whether media is available with the printer.
Service Manual - Page 308
...flat, smooth surface.
3-96 Service Manual Open doors and covers and remove trays to access jam locations. The following table lists the jams that can occur and the location of...feeder Envelope feeder Optional output bins Stapler
200 and 201 paper jams
1. Place the print cartridge aside on the underside of the printer. To resolve any paper jam message, you are holding the cartridge.
4. Push...
Similar Questions


34 Short Paper Error When Printing Envelopes Lexmark T652
(Posted by horacLat 10 years ago)

My Lexmark C534dn Color Laser Printer Has Black Smudge Down Each Side
Each time i print on the Lexmark C534dn printer I get Black Smudge marks on each side and sometimes ...
Each time i print on the Lexmark C534dn printer I get Black Smudge marks on each side and sometimes ...
(Posted by FJafri 11 years ago)

My Lexmark C534dn Color Laser Printer Has Red And Yellow Smudge Down Each Side
My Lexmark C534dn color laser printer has red and yellow smudge down each side of the page. On the l...
My Lexmark C534dn color laser printer has red and yellow smudge down each side of the page. On the l...
(Posted by amjohau 12 years ago)