Lexmark T650 Support Question
Lexmark T650 Support Question
Find answers below for this question about Lexmark T650.Need a Lexmark T650 manual? We have 9 online manuals for this item!
Question posted by TGILBERT510 on September 10th, 2012
Can Not Get Printer To Go Into Diagnostics Mode
ALREADY REPLACED MAIN BOARD. GOES INTO CONFIGURATION MODE FINE
Current Answers
Related Lexmark T650 Manual Pages
Service Manual - Page 3

... 1-3 Fully configured model 1-4 Supported paper sizes, types, and weights 1-6 Paper sizes supported by the printer 1-6 Paper types and weights supported by the printer 1-7 Paper types and weights supported by the output bins 1-7 Tools required 1-8 Acronyms 1-9
Diagnostic information 2-1
Start 2-1 Confirm the installation status 2-2 Power-on Reset sequence 2-2
Entering Diagnostics mode...
Service Manual - Page 4
...176
Network service check 2-177
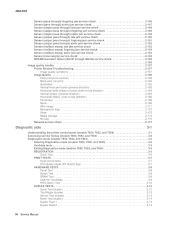
Diagnostic aids 3-1
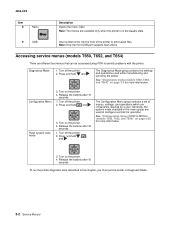
Understanding the printer control panel (models T650, T652, and T654 3-1 Accessing service menus (models T650, T652, and T654 3-2 Diagnostics mode (models T650, T652, and T654 3-3
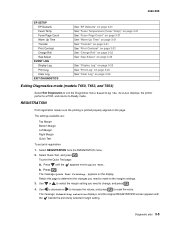
Entering Diagnostics mode (models T650, T652, and T654 3-3 Available tests 3-3 Exiting Diagnostics mode (models T650, T652, and T654 3-5 REGISTRATION 3-5
Quick...
Service Manual - Page 36

...8226; Customer maintenance parts have been replaced at a place subjected to extreme temperature, extreme humidity or rapid changes
in temperature.
• The printer is not installed close to water...for proper installation. The fuser unit assembly lamps turn on . 4. Turn the printer on . 5. Entering Diagnostics mode
1. The Lexmark splash screen appears with a progress bar in the center until...
Service Manual - Page 160
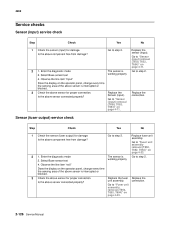
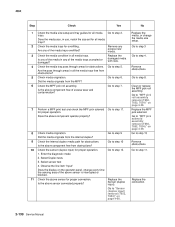
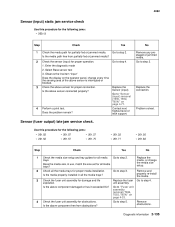
...step 2. Enter the diagnostic mode 2. Is the above sensor connected properly?
Enter the diagnostic mode 2. Select Base sensor test
The sensor is
Go to "Sensor (input) removal (T650, T652, T654)" ... or blocked.
3 Check the above sensor for proper connection.
Replace the fuser unit assembly. Replace the connection.
2-126 Service Manual
Is the above component free ...
Service Manual - Page 161
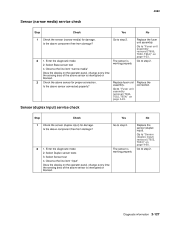
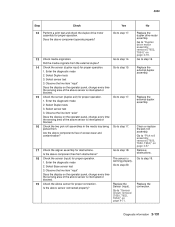
...unit assembly removal (T650, T652, T654)" on page 4-23.
working properly
4. Go to "Fuser unit assembly removal (T650, T652, T654)" on page 4-23.
2 1. Replace the connection.
Select...(duplex input) for proper connection. Go to step 2.
Replace fuser unit assembly. Replace the fuser unit assembly. Enter the diagnostic mode 2. Observe the line item "input"
Does the display ...
Service Manual - Page 164
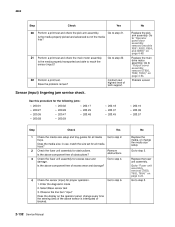
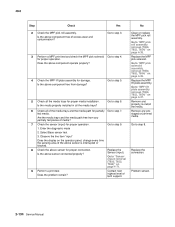
... the MPF?
6 Check the MPF pick roll assembly. Enter the diagnostic mode
2. Select Duplex tests
3. Go to step 13
Remove obstructions. Go to step 6. Replace the Sensor (duplex input).
Go to step 8. Replace the connection.
2-130 Service Manual Go to "MPF pick solenoid assembly removal (T650, T652, T654)" on the operator panel, change the media...
Service Manual - Page 165
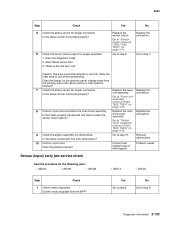
...above sensor is working properly. Go to step 15. Replace the connection.
Enter the diagnostic mode 2.
Replace the duplex drive motor assembly. Select sensor test
3. ...Replace the external duplex assembly.
3.
Go to step 17. Replace the Sensor (input).
Did the media originate from . Diagnostic information 2-131 Go to "Pick roll assembly removal (T650...
Service Manual - Page 166
...the fuser unit assembly for all media trays. Go to "Fuser unit assembly removal (T650, T652, T654)" on page 4-49.
Select Base sensor test
3. Go to .... Enter the diagnostic mode
2. Observe the line item "input"
Does the display on page 4-54.
Is the media properly transported and able to step 6.
1. Replace the main drive motor assembly. Problem solved.
Replace the fuser unit...
Service Manual - Page 167
... the display on page 4-71.
Replace the main drive motor assembly.
Remove obstructions.
10 Perform a print test. Problem solved.
Diagnostic information 2-133 Go to "Sensor (input) removal (T650, T652, T654)" on the operator panel, change every time the sensing area of tech support. Go to "Fuser unit assembly removal (T650, T652, T654)" on page 4-54...
Service Manual - Page 168
... media path for partially Go to "Sensor (input) removal (T650, T652, T654)" on the operator panel, change every time the sensing area of excess wear and contamination?
Go to step 4.
Remove and properly re-install the media. Enter the diagnostic mode
2.
Go to step 7. Replace the MPF pick solenoid. Remove any partially fed pieces...
Service Manual - Page 169
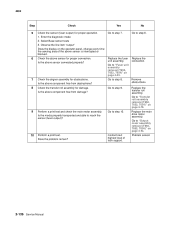
... unit assembly for proper media installation.
Enter the diagnostic mode
2. Is the above component damaged or has it exceeded life? Go to "Sensor (input) removal (T650, T652, T654)" on page 4-23.
4 Check... size, in all the media trays for damage and life expiration.
Replace the connection. Problem solved. Replace the media, or change every time the sensing area of tech support...
Service Manual - Page 170
...removal (T650, T652, T654)" on page 4-78.
9 Perform a print test and check the main motor assembly. Does the problem remain? Go to "Fuser unit assembly removal (T650, ... the diagnostic mode
2. Replace the fuser unit assembly. Is the above component free from obstructions? Go to step 10. Replace the main drive motor assembly.
Go to step 9.
Replace the transfer...
Service Manual - Page 171

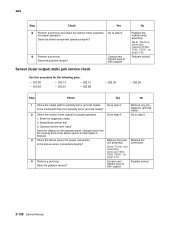
... the sensor (fuser output) for proper connection. Select Base sensor tests
3. Replace the fuser unit assembly. Replace the connection.
7 Check the redrive assembly for damage and life expiration.
Go...Fuser unit assembly removal (T650, T652, T654)" on page 4-83.
unit assembly. Is the above component properly closed?
Go to step 4. Enter the diagnostic mode
2. Observe the line ...
Service Manual - Page 172
...solved.
2-138 Service Manual Go to "Fuser unit assembly removal (T650, T652, T654)" on page 4-23.
Is the media path free from partially fed or jammed...step 2. Enter the diagnostic mode
2. Observe the line item "input"
Does the display on page 4-62. No
Replace the redrive motor assembly. Is the above component operate properly?
9 Perform a print test. Replace the connection.
4 ...
Service Manual - Page 189

...:
• Operator panel assembly
• System card assembly
Only replace one or the printer will be rendered inoperable. Was the operator panel assembly recently replaced?
Go to step 2.
Is the above sensor connected properly?
4 Perform a print test using the output option. Enter the diagnostic mode
The sensor is operating in another machine. Select Base sensor...
Service Manual - Page 214
... 10
seconds. 4062-XXX
Item 8
Menu
Description Opens the menu index Note: The menus are infrequently required by a user. See "Diagnostics mode (models T650, T652, and T654)" on the printer. 4. The Configuration Menu group contains a set of the printer to print saved files. The Diagnostics Mode group contains the settings and operations used to identify problems with the...
Service Manual - Page 215

4062-XXX
Diagnostics mode (models T650, T652, and T654)
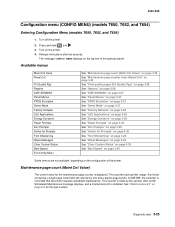
Entering Diagnostics mode (models T650, T652, and T654)
1. Press and hold and . 2. Release the buttons after 10 seconds. Available ...Test" on page 3-8 See "Button Test" on page 3-8 See "DRAM Test" on page 3-8 See "USB HS Test Mode" on page 3-9 See "RFID Option Test" on . 3. Turn the printer on page 3-10
Diagnostic aids 3-3 Turn the...
Service Manual - Page 217
...press .
4. appears on the page.
Resetting the Printer displays, the printer performs a POR, and returns to exit the Diagnostics menu. 4062-XXX
EP SETUP EP Defaults Fuser Temp... 3-23 See "Clear Log" on page 3-24
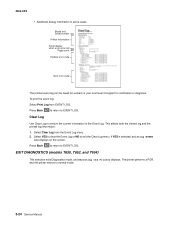
Exiting Diagnostics mode (models T650, T652, and T654)
Select Exit Diagnostics to Ready mode.
The message Submitting selection displays, and the original REGISTRATION ...
Service Manual - Page 236
... to EVENT LOG. Press Back
to return to exit the Clear Log menu.
Select Clear Log from EVENT LOG. EXIT DIAGNOSTICS (models T650, T652, and T654)
This selection exits Diagnostics mode, and Resetting the Printer displays.
To print the event log:
Select Print Log from the Event Log menu.
2. If YES is selected, Deleting EVENT...
Service Manual - Page 237
...available, depending on the printer. 4. Diagnostic aids 3-25 Press and...printer.
Available menus
Maint Cnt Value Reset Cnt
Prt Quality Pgs Reports SIZE SENSING Panel Menus PPDS Emulation Demo Mode Factory Defaults LES Applications Energy Conserve Paper Prompts Env Prompts Action for the part number. This counter is reset by two.
4062-XXX
Configuration menu (CONFIG MENU) (models T650...


