
Lexmark C543DN Support Question
Lexmark C543DN Support Question
Find answers below for this question about Lexmark C543DN - Taa/gov Compliant.Need a Lexmark C543DN manual? We have 2 online manuals for this item!
Question posted by Anonymous-45697 on December 16th, 2011
How To Print A One Hundred Pages Booklet
I keep getting this large black arrow and the text printed on it. Please help me
Current Answers
Related Lexmark C543DN Manual Pages
User Manual - Page 3
......21
Installing hardware options...23
Installing a 650-sheet duo drawer ...23
Attaching cables...24 Verifying printer setup...25
Printing menu settings pages ...25 Printing a network setup page ...26
Setting up the printer software...26
Installing printer software ...26 Updating available options in the printer driver...27
Setting up wireless printing...28
Information you will need to set up the...
User Manual - Page 25
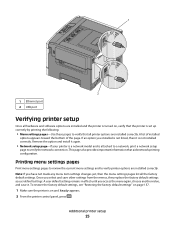
... and software options are installed and the printer is turned on, verify that the printer is set up correctly by printing the following:
• Menu settings pages-Use these pages to verify the network connection. Printing menu settings pages
Print menu settings pages to review the current menu settings and to verify printer options are installed correctly. A user default setting...
User Manual - Page 34
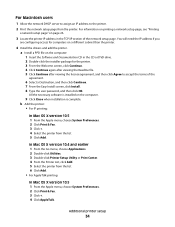
... click Continue. 7 From the Easy Install screen, click Install. 8 Type the user password, and then click OK. For information on printing a network setup page, see "Printing
a network setup page" on page 26.
3 Locate the printer IP address in the CD or DVD drive. 2 Double-click the installer package for computers on the computer.
9 Click Close when...
User Manual - Page 81
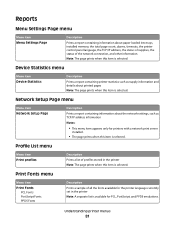
...Description
Prints a report containing printer statistics such as supply information and details about the network settings, such as TCP/IP address information
Notes:
• This menu item appears only for PCL, PostScript, and PPDS emulations. Network Setup Page menu
Menu item Network Setup Page
Description
Prints a report containing information about printed pages Note: The page prints when...
User Manual - Page 87
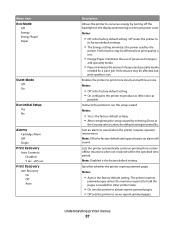
... is needed for other printer tasks.
• On sets the printer to always reprint jammed pages. • Off sets the printer to never reprint jammed pages. The printer reprints
jammed pages unless the memory required to hold the pages is the factory default setting and means no alarm will sound. Enables the printer to print more slowly and with less...
User Manual - Page 111
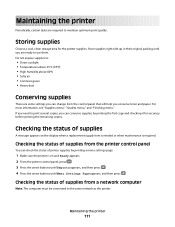
...the printer control panel, press . 3 Press the arrow buttons until Reports appears, and then press . 4 Press the arrow buttons until you conserve toner and paper.
Maintaining the printer
111 Maintaining the printer
...will help you are ready to use them. Do not expose supplies to print several copies, you can conserve supplies by printing a menu settings page:
1 Make sure the printer is...
Service Manual - Page 43
...:
• Press Select ( ) to clear the message and continue printing. • Order the waste toner bottle so it on the printer.
1. See "Waste toner bottle removal" on page 4-60. Diagnostic information 2-9 No data may not print correctly.
• Turn the printer power off and unplug the printer. 2. Any data received on the USB port is not...
Service Manual - Page 61

... 15 +5 V dc 16 Ground
Are the values approximately correct? Yes
Go to step 2. See "Rear shield removal" on page 4-11. 5025-2xx, 4xx
Autocompensator mechanism service check
Step
Questions / actions
1 Turn the printer off , and remove the rear shield.
Go to step 3. Repair or replace the bin full sensor.
See "Controller board...
Service Manual - Page 63

...the flag on the shaft broken?
7 Verify the cable is setting on page 4-21.
No Make sure the printer is correctly connected to JFUSES1 on , and then release the buttons when ...the display indicate InputS1-Media Clear...?
3 Pull tray 1 out.
Perform the Base Sensor Test. Turn the printer on page 4-19. Select Base Sensor Test, and press Select ( ). 2. 5025-2xx, 4xx
Duplex/manual feed sensor...
Service Manual - Page 64
... and close the front door, and observe the display.
Open the toner cover, and check the motion of the printer. Is there any damage to step 4. See "Right cover assembly removal" on page 3-16.
1. Go to step 6. Replace the controller board.
5025-2xx, 4xx
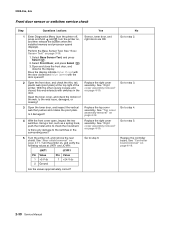
Front door sensor or switches service check
Step...
Service Manual - Page 70

... test?
3 Remove the rear shield. Did any of troubleshooting components.
The Panel Test should show errors on page 4-9. Replace the operator panel assembly. "Rear shield removal" on page 4-9. See "Panel Test" on page 3-12 in another printer. Replace the operator panel assembly. 5025-2xx, 4xx
Operator panel service check
Warning: Replace one , or the...
Service Manual - Page 71

.... See "Controller board removal" on page 4-9.
Turn the printer on page 4-2. Yes Go to step 3. Replace the operator panel assembly. Replace the front cover assembly. Diagnostic information 2-37 Go to step 2.
Replace the controller board. 5025-2xx, 4xx
Operator panel display blank, five beeps
Service tip: The printer has detected a problem with the controller...
Service Manual - Page 72

....
Replace the front cover assembly. See "Controller board removal" on top of the printer. See "Operator panel removal" on page 4-2.
2-38 Service Manual Replace the controller board. See "Front cover assembly removal" on page 4-9. 5025-2xx, 4xx
Operator panel display blank, printer beeps five times and pauses
Step
Questions / actions
Yes
No
1 Turn the...
Service Manual - Page 74

... to step 2.
Replace the front cover assembly. See "Front cover assembly removal" on page 4-11. Do all diamonds, five beeps
Step
Questions / actions
Yes
No
1 Turn the printer off, and remove the rear shield. See "Rear shield removal" on page 4-2.
2-40 Service Manual Note: Remove the three screws holding the operator panel, and...
Service Manual - Page 75

...page 4-2. The cable connector pins will be exposed and easier to step 2. Replace the controller board.
See "Front cover assembly removal" on top of the printer.... 5025-2xx, 4xx
Operator panel display is dim and unchanging
Step
Questions / actions
Yes
No
1 Turn the printer off, and remove the rear shield. See "Rear shield removal" on the controller board:
JOPP1
Pin Value 1...
Service Manual - Page 76
... sure the following :
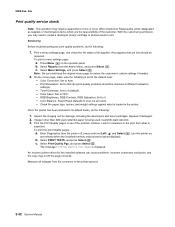
1. Color Balance: Select Reset Defaults to the default level: - Look for variations in the print from what is loaded in the printer. To print the print Quality pages:
a. c. An incorrect printer driver for damage, including the developers and toner cartridges. Select Menu Settings, and press Select ( ). RGB Brightness, RGB Contrast, RGB Saturation: Set...
Service Manual - Page 86

.... Does the operator panel display a change in state.
Turn the printer on the cartridge, rotate the gear clockwise to step 2. See "Toner meter cycle (TMC) card removal" on page 4-11. Enter Diagnostics menu (turn the printer on page 3-16.
See "Rear shield removal" on page 4-55.
2-52 Service Manual Are the lenses blocked, damaged, or...
Service Manual - Page 87
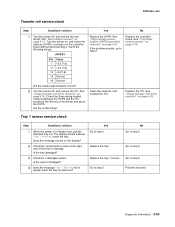
5025-2xx, 4xx
Transfer roll service check
Step
Questions / actions
Yes
No
1 Turn the printer off , and remove the ITU. See "Controller board removal" on page 4-33.
See "Image transfer unit (ITU) removal" on page 4-19.
2 Turn the printer off , and remove the rear shield. Insert the tray. Is the sensor dislodged?
4 Does the message...
Service Manual - Page 94

... makes sure the black printing plane is also the first step in the bottom margin. It is properly aligned on the display, and the page prints. Press Select ( ) to normal mode. The default is 0.
-25 to the right.
3-4 Service Manual A positive offset moves text down the page and increases the top margin. A positive change moves the...
Service Manual - Page 161

Repair information 4-23
Remove the sensor, and disconnect the cable (D) from the duplex sensor.
Note: Close the front cover, and slightly lift the front of the printer to get better access. 5025-2xx, 4xx
6.
Similar Questions

How Do I Print A Test Page On My Lexmark S400 Printer
(Posted by filLeo 10 years ago)

Can I Setup C543dn Lexmark Only Print Black Ink
(Posted by bwaArtipi 10 years ago)

How To Print A One Hundred Pages Booklet
I keep getting this large black arrow and the text printed on it. Please help me
I keep getting this large black arrow and the text printed on it. Please help me
(Posted by Anonymous-45700 12 years ago)
How To Print A One Hundred Pages Booklet
I keep getting this large black arrow and the text printed on it. Please help me
I keep getting this large black arrow and the text printed on it. Please help me
(Posted by Anonymous-45694 12 years ago)
How To Set My Printer To Use The Black Ink Only Without Coloured Ink Catridges.
My job entails the use of black ink a lot. I replaced 5 black ink catridges before I was prompted th...
My job entails the use of black ink a lot. I replaced 5 black ink catridges before I was prompted th...
(Posted by itdjagmah 12 years ago)