Lenovo H520s Support Question
Lenovo H520s Support Question
Find answers below for this question about Lenovo H520s.Need a Lenovo H520s manual? We have 1 online manual for this item!
Question posted by flslino on December 28th, 2013
Wireless Capability Is Turned Off
When I have access to wireless network the following error as resorver my laptop and lenovo 20042
Current Answers
Answer #1: Posted by TommyKervz on December 28th, 2013 1:35 AM
TommyKervz

Member since:
January 10th, 2013 Points: 17,776,853

Member since:
January 10th, 2013 Points: 17,776,853
Greetings. You need to move the Wireless switch to "on" mode and then hold down Fn and press F5 (while Fn is held down). Id errors are encounteres still, then you will probably need to have your drivers reinstalled - (the Operating System itself may require to be reinstalled in the extreme)
Related Lenovo H520s Manual Pages
Lenovo H520s Hardware Maintenance Manual - Page 1
Lenovo H520s Hardware Maintenance Manual
ideaideaideaCentreidea
Machine Types: 10093/2561/4746
Lenovo H520s Hardware Maintenance Manual - Page 3
Lenovo H520s Hardware Maintenance Manual
Machine Types: 10093/2561/4746
Lenovo H520s Hardware Maintenance Manual - Page 7
...It is invalid for trained servicers who are familiar with Lenovo computer products.
It is only used for Lenovo H520s computers listed on the cover. Veuillez lire toutes les... service and reference information for the machines which do not have the TV card. Before servicing a Lenovo product, be sure to read the Safety Information. Important Safety Information
Be sure to read all caution...
Lenovo H520s Hardware Maintenance Manual - Page 12
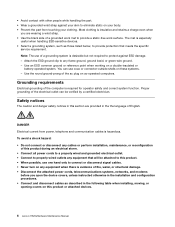
...device covers, unless instructed otherwise in the following table when installing, moving, or opening covers...of this product or attached devices.
6 Lenovo H520sHardware Maintenance Manual To avoid a shock ...Disconnect the attached power cords, telecommunications systems, networks, and modems
before you are provided in this product...signal cables. • Never turn on any equipment when there is...
Lenovo H520s Hardware Maintenance Manual - Page 13
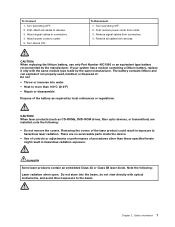
... do not view directly with the same module type made by the same manufacturer. Note the following :
• Do not remove the covers. Do not stare into water • Heat to...regulations. DANGER
Some laser products contain an embedded Class 3A or Class 3B laser diode. Turn everything OFF. 2. Turn device ON. To Disconnect 1. First, remove power cords from devices. Remove signal cables ...
Lenovo H520s Hardware Maintenance Manual - Page 14
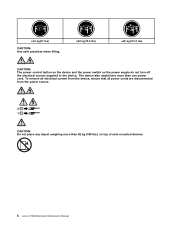
...(70.5 lbs)
≥55 kg(121.2 lbs)
CAUTION: The power control button on the device and the power switch on top of rack-mounted devices.
8 Lenovo H520sHardware Maintenance Manual To remove all electrical current from the device, ensure that all power cords are disconnected from the power source.
2 1
CAUTION: Do not...
Lenovo H520s Hardware Maintenance Manual - Page 15
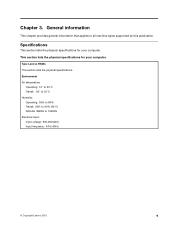
Type Lenovo H520s This section lists the physical specifications. Specifications
This section lists the physical specifications for your computer.
Environment Air temperature:
Operating: 10° to...General information
This chapter provides general information that applies to 106KPa Electrical input: Input voltage: 90V-264V(AC) Input frequency: 47Hz-63Hz
© Copyright Lenovo 2012
9
Lenovo H520s Hardware Maintenance Manual - Page 19
... Setup Utility program
To start this procedure, shut down the operating system and turn on the bottom of passwords are using the Lenovo BIOS Setup Utility menu. Using passwords
You can be easily compromised.
The following types of each screen. For security reasons, it is not displayed until you are available: • Administrator...
Lenovo H520s Hardware Maintenance Manual - Page 20
... be any combination of letters and numbers up to confirm the new password, if you access the Lenovo BIOS Setup Utility program. The password dialog box will display that changes have been saved..... 5. Power-On Password
When a Power-On Password is set an Administrator Password, do the following :
Note: A password can be installed. If both the Administrator and Power-On Password are ...
Lenovo H520s Hardware Maintenance Manual - Page 21
...Set Power-On Password and press the Enter key. 2. USB Functions
Select whether to the Lenovo BIOS Setup Utility program menu and select the Exit option. 5. Depending on the setup options...new password correctly, the new password will be used to enable or disable user access to the following devices:
Serial Port Setup
Select this option to configure system's initiate graphic adapter from...
Lenovo H520s Hardware Maintenance Manual - Page 22
...then turn on the computer.
Selecting or changing the startup device sequence
16 Lenovo ...following: 1. When the Startup Device Menu appears, release the F12 key. Selecting a startup device
If your computer. 2. USB Setup press the Enter key, and then select USB Functions. ATA Device Setup press the Enter key. Note: Not all devices connected to the audio connectors (e.g. Network...
Lenovo H520s Hardware Maintenance Manual - Page 26
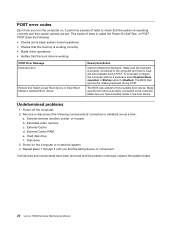
...operating correctly and that certain options are held pressed during POST. Remove or disconnect the following :
• Checks some basic system-board operations • Checks that the memory ....
20 Lenovo H520sHardware Maintenance Manual Extended video memory c. Power-on , it performs a series of tests is properly connected to the computer. POST error codes
Each time you turn the computer...
Lenovo H520s Hardware Maintenance Manual - Page 33
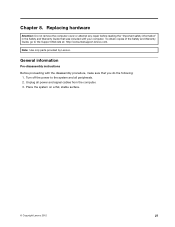
... instructions
Before proceeding with the disassembly procedure, make sure that was included with your computer. Turn off the power to the Support Web site at: http://consumersupport.lenovo.com. Place the system on a flat, stable surface.
© Copyright Lenovo 2012
27
Unplug all peripherals. 2. Chapter 8. Replacing hardware
Attention: Do not remove the computer...
Lenovo H520s Hardware Maintenance Manual - Page 34
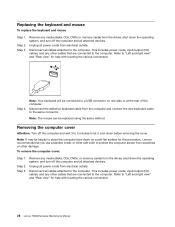
... CDs, DVDs, or memory cards) from the drives, shut down the operating system, and turn off the computer and all power cords from electrical outlets. Step 3.
Disconnect the defective keyboard cable...cards) from the drives, shut down the operating system, and turn off the computer and wait 3 to 5 minutes to the computer.
Lenovo recommends that you use a blanket, towel, or other cables ...
Lenovo H520s Hardware Maintenance Manual - Page 35

Line up the computer cover with the screws. Secure the computer cover to let it back. Removing the front bezel
Attention: Turn off the computer and wait 3 to 5 minutes to the chassis with the chassis then slide it cool down before removing the cover. Replacing hardware 29
...
Lenovo H520s Hardware Maintenance Manual - Page 36
...computer. Step 2. Disconnect all cables attached to "Removing the front bezel".
30 Lenovo H520sHardware Maintenance Manual Step 6. Remove any other cables that are connected to place ... (disks, CDs, DVDs, or memory cards) from the drives, shut down the operating system, and turn off the computer and all attached devices.
Step 7. Step 4. Step 5. This includes power cords, input...
Lenovo H520s Hardware Maintenance Manual - Page 38
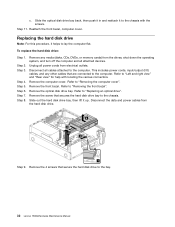
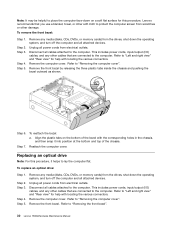
...all attached devices. Refer to "Removing the front bezel". Refer to the bay.
32 Lenovo H520sHardware Maintenance Manual
Disconnect the data and power cables from electrical outlets. To replace the ... (disks, CDs, DVDs, or memory cards) from the drives, shut down the operating system, and turn off the computer and all power cords from the hard disk drive.
4 2
3
1 Step 9.
...
Lenovo H520s Hardware Maintenance Manual - Page 39
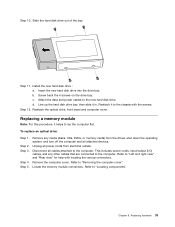
... the computer cover". Reattach the optical drive, front bezel and computer cover.
Disconnect all power cords from the drives, shut down the operating system, and turn off the computer and all attached devices. Refer to lay the computer flat.
b. d. Step 3. Locate the memory module connectors. Insert the new hard disk drive...
Lenovo H520s Hardware Maintenance Manual - Page 40
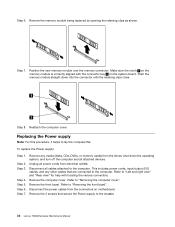
Push the memory module straight down the operating system, and turn off the computer and all attached devices. Reattach the computer cover. Step 2.... to the computer. Replacing the Power supply
Note: For this procedure, it helps to the chassis.
34 Lenovo H520sHardware Maintenance Manual Step 6. Disconnect all power cords from the connectors on the system board. Refer to the...
Lenovo H520s Hardware Maintenance Manual - Page 41
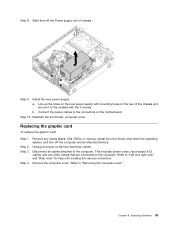
... any other cables that are connected to the chassis with the 3 screws. Unplug all power cords from the drives, shut down the operating system, and turn off the computer and all cables attached to "Removing the computer cover". Refer to the computer.
Similar Questions

Sir Which Type Of Graphics Card Will Be Fitted To My H520s Lenovo Desktop
sir please help me.for the title question
sir please help me.for the title question
(Posted by aksbs11 6 years ago)

Is This Model Wired Network Connection Or Wireless Network Connection
(Posted by Hron60 10 years ago)


Installing Winxp On H520s Slim Case Pc
Dear Lenovo Support: I have a Lenovo H520S Slim Case PCthat came withWin7 Home already installeda...
Dear Lenovo Support: I have a Lenovo H520S Slim Case PCthat came withWin7 Home already installeda...
(Posted by shiftdude 10 years ago)
