Kodak ESP 7250 Support Question
Kodak ESP 7250 Support Question
Find answers below for this question about Kodak ESP 7250 - All-in-one Printer.Need a Kodak ESP 7250 manual? We have 4 online manuals for this item!
Question posted by Anonymous-78496 on October 10th, 2012
Code 3550
error message: top tray jammed pull tray out press OK to continue. (code 3550)
nothing jammed in copier back or front
what to do
Current Answers
Related Kodak ESP 7250 Manual Pages
Networking Setup Guide - Page 4
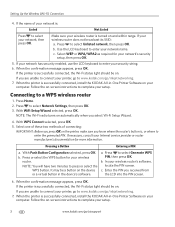
... LCD keyboard to select Unlisted network, then press OK.
c. When the confirmation message appears, press OK. When the printer is successfully connected, install the KODAK All-in-One Printer Software on the device or a virtual button in -One Printer Software on and within range.
Select one of these two methods of your computer. Pressing a Button
Entering a PIN
a. It may be...
Extended user guide - Page 11

.... Press Home. 2.
KODAK ESP 7200 Series All-in-One Printer
Connecting to a wireless network
To connect your printer to an 802.11 wireless (Wi-Fi) network, refer to the following procedures and use a wireless access point/router that uses Dynamic Host Configuration Protocol (DHCP). • Your network name (SSID -
With WiFi Setup Wizard selected, press OK...
Extended user guide - Page 13
..., then press OK.
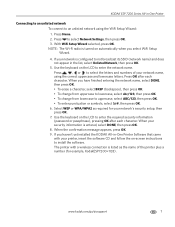
8. When your security information is listed as required for example, KodakESP7200+1133). The printer with your network name, using the WiFi Setup Wizard:
1.
Press OK after each character. Press to uppercase, select ABC/123, then press OK. • To enter punctuation or symbols, select !@#, then press OK.
6. When the confirmation message appears, press OK. 9. www...
Extended user guide - Page 15
...000.000.000.000.
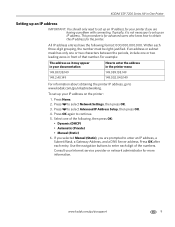
To set up an IP address. Press Home. 2. Press to continue. 5. Press OK again to select Advanced IP Address Setup, then press OK. 4. Select one or two leading zeros in front of...not necessary to set up your IP address on the printer:
1. www.kodak.com/go /inkjetnetworking. KODAK ESP 7200 Series All-in-One Printer
Setting up an IP address
IMPORTANT: You should only...
Extended user guide - Page 16
... wireless all-in the main paper tray, page 16.) 2. c. Select No, my printer is detected, driver installation begins.
10
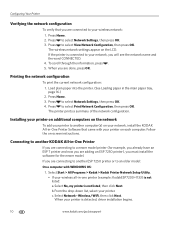
www.kodak.com/go/aiosupport From the drop-down list, select your printer is not listed, then click Next. Press Home. 2. Press to another ESP 7250 printer or to select Network Settings, then press OK. 3. The wireless network settings appear on...
Extended user guide - Page 17
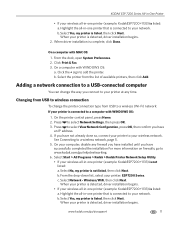
... from USB to wireless connection
To change the way you have
an IP address. 4. Changing from the list of available printers, then click Add. Press to your network. Press to select View Network Configuration, press OK, then confirm you have
successfully completed the installation For more information on firewalls, go to a computer with WINDOWS OS...
Extended user guide - Page 31
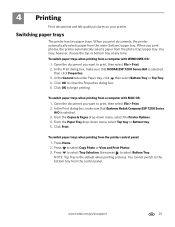
... OK to select Bottom Tray. You cannot switch to print, then select File > Print. 2.
In the Print dialog box, make sure that KODAK ESP 7200 Series AiO is selected,
then click Properties. 3. From the Paper Tray drop-down menu, select the Printer Options. 4. When you print photos, the printer automatically selects paper from the printer control panel: 1. Press...
Extended user guide - Page 33
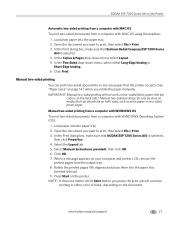
... or black, depending on your computer and printer LCD, remove the
printed pages from a computer with MAC OS using the duplexer:
1.
Load paper into the paper tray
(printed side up). 9. Select Manual (Instructions provided), then click OK. 6. When a message appears on the document. Open the document you press;
Rotate the printed pages 180 degrees and...
Extended user guide - Page 37
... card to your computer, press OK then Start. (Your printer and computer must be connected with a USB cable.) Press OK to PC -- The printer detects when you load photo paper and sets Best quality automatically. KODAK ESP 7200 Series All-in the paper tray, the printer automatically arranges the pictures to 99 Top Tray (default) Bottom Tray
Print Size
Plain Paper...
Extended user guide - Page 39

...press OK. 5. Press to print, then press OK. 3.
IMPORTANT: Use only one slot or port at a time. Press to select Tray Selection, then press to begin printing. Press Start to select Bottom Tray. 6. Front USB port
2. Press to select Print Size, then press... the
printer while printing. Press Home. 4. www.kodak.com/go/aiosupport
33 KODAK ESP 7200 Series All-in-One Printer
Printing...
Extended user guide - Page 45
....
2. www.kodak.com/go/aiosupport
39 KODAK ESP 7200 Series All-in-One Printer
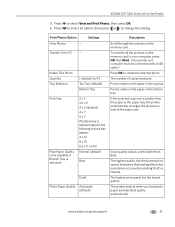
Copy Document Option
Setting
Description
Plain Paper Quality Normal (default)
Good quality output;
Close the lid. Save as Defaults
No / Yes
To save settings as the new default, press OK, select Yes, then press OK.
6. eliminates the banding
effect that sometimes occurs...
Extended user guide - Page 47
... of the scanner glass.
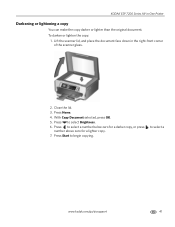
2. to select Brightness. 6. Close the lid. 3. Press to select a
www.kodak.com/go/aiosupport
41 Lift the scanner lid, and place the document face down in -One Printer
Darkening or lightening a copy
You can make the copy darker or lighter than the original document. With Copy Document selected, press OK. 5.
Extended user guide - Page 49
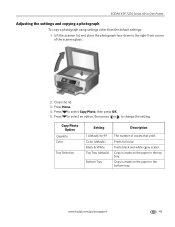
.... 3. Copy is made on the paper in the top tray. Prints black and white (gray scale). Copy Photo Option
Quantity Color
Tray Selection
Setting
Description
1 (default) to select Copy Photo, then press OK. 5. Lift the scanner lid, and place the photograph face down in -One Printer
Adjusting the settings and copying a photograph
To copy a photograph...
Extended user guide - Page 51
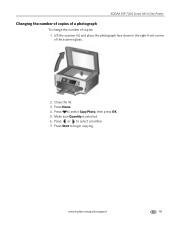
... to begin copying. Press Start to select a number. 7. Press Home. 4.
Press to select Copy Photo, then press OK. 5. Lift the scanner lid, and place the photograph face down in -One Printer
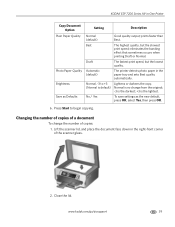
Changing the number of copies of a photograph
To change the number of the scanner glass.
2. Make sure Quantity is selected. 6. KODAK ESP 7200 Series All-in...
Extended user guide - Page 53
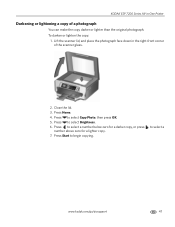
Lift the scanner lid, and place the photograph face down in -One Printer
Darkening or lightening a copy of the scanner glass.
2. Press to select Copy Photo, then press OK. 5. Close the lid. 3.
To darken or lighten the copy:
1. Press to select Brightness. 6. KODAK ESP 7200 Series All-in the right-front corner of a photograph
You can make...
Extended user guide - Page 57
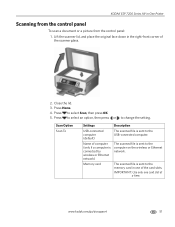
... the original face down in -One Printer
Scanning from the control panel
To scan a document or a picture from the control panel: 1.
IMPORTANT: Use only one of computer (only if a computer is connected by wireless or Ethernet network)
The scanned file is sent to select Scan, then press OK. 5. Close the lid. 3. Scan Option...
Extended user guide - Page 71
... settings: 1.
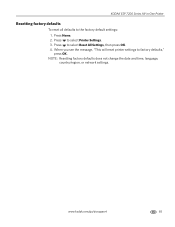
KODAK ESP 7200 Series All-in-One Printer
Resetting factory defaults
To reset all defaults to select Reset All Settings, then press OK. 4. NOTE: Resetting factory defaults does not change the date and time, language, country/region, or network settings. When you see the message, "This will reset printer settings to select Printer Settings. 3. Press Home. 2. www...
Extended user guide - Page 73
... need to www.kodak.com/go /aiosupport
67 Select All-in -One Printer
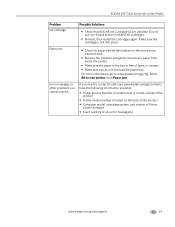
Problem Ink cartridge
Possible Solutions
• Check that KODAK Ink Cartridge(s) are installed. Error messages or other problems you cannot resolve
If you do not overload the paper tray. Paper jam
• Check for paper behind the duplexer in the rear-access...
Extended user guide - Page 75

... for available wireless networks within range.
The printer is ready
Wi-Fi status light
Power light Off Blinks continuously Blinks intermittently
On
What it means
The printer is searching for the printer to a wireless network. To find any available wireless networks within range, press OK, turn on the printer, one that the power cord is busy.
The...
Extended user guide - Page 91
...Photo paper tray, location, 1 Photo printing features, 70 Pictures printing, 28 from a BLUETOOTH Technology enabled
device, 35 from a wireless device, 35 ...printer, 73 Start button, 2 System requirements, 74
T
Time to low power, setting, 4 Transferring pictures to a computer, 36 Transparency sizes, 75 Troubleshooting, 66
error messages, 67 getting help on the Web, 68 ink cartridge, 67 paper jam...
Similar Questions

My Kodak Esp 7250 Error 3550 Won't Clear
(Posted by eatssamiar 9 years ago)

Kodak Esp 7 Error Code 3806
Kodak esp 7 error code 3806, I turned the printer off for 30 seconds turned back on still had same e...
Kodak esp 7 error code 3806, I turned the printer off for 30 seconds turned back on still had same e...
(Posted by skifrance1 10 years ago)

How To Fix A Stuck Printer Cartridge Model Esp 7250
(Posted by gemindo 10 years ago)
Kodak Esp 5250 Error Message Printhead Jam But Head Wont Move Over To Fix
(Posted by doedmont 10 years ago)
Code Error Message 105-100009
I am trying to print a document its reading this code error message 105-100009.. what does that mean...
I am trying to print a document its reading this code error message 105-100009.. what does that mean...
(Posted by ccbccc 11 years ago)