KitchenAid KUDC10FXSS Support Question
KitchenAid KUDC10FXSS Support Question
Find answers below for this question about KitchenAid KUDC10FXSS.Need a KitchenAid KUDC10FXSS manual? We have 4 online manuals for this item!
Question posted by jgauthie on August 1st, 2011
Brand New Dishwasher Will Not Funtion At All
No LED lights lit on control panel, Pressing touch sensative controls causes no response. Unit will not Start/Run. Verified good incomming power. Good water supply and the drain is connected. Is there an internal breaker or fuse?
Current Answers
Related KitchenAid KUDC10FXSS Manual Pages
Dimension Guide - Page 1

...gap a rubber hose (not provided) will be connected
to heat and detergent, and fits the 1" (2.5 cm) drain connector of the dishwasher. For panel ready models, dishwasher depth is recommended. Follow the kit instructions for use with a power supply cord: Use Power Supply Cord Kit (Part No. 4317824) marked for installing the power supply cord. external pipe threads on all local codes...
Installation Guide - Page 2

...-New Utilities 7 Prepare and Route Water Line 8 Install Drain Hose 10 Install Moisture Barrier 11 Prepare Dishwasher 11 Make Power Supply Cord Connection 12 Determine Cabinet Opening 13
Installation Instructions (cont.) Install the Door Handle 14 Custom Panel Dimensions 14 Install Custom Panel 15 Choose Attachment Option 17 Move Dishwasher Into Cabinet Opening 17 Connect to Water...
Installation Guide - Page 3

... and Parts
Gather the recommended tools and parts before starting installation. Read and follow the instructions provided with and 1¹⁄₂" hole saw bits
Small tubing cutter Wire stripper
Shallow pan
Wood block
Parts supplied:
Drain hose Drain hose
2 -
suggested) or flexible braided water supply line
See "Electrical Requirements" section.
NOTE: Parts available for...
Installation Guide - Page 6

... standards can be verified by a licensed plumber.
• 120°F (49°C) water at dishwasher O.D. It is not recommended. • A 90° elbow with ³⁄₄" hose connection with 20 to 120 psi (138 to 862 kPa) water pressure can be connected to an air gap. If connecting dishwasher with a power supply cord:
• Use UL Listed power supply cord kit...
Installation Guide - Page 7

...
If the water line and the cable extend to the locations shown, proceed to the dishwasher cabinet opening dimensions.
7 Prepare Cabinet Opening-New Utilities
Prepare and route the electrical supply
What type of electrical connection will you already have utility
hookups? INSTALLATION INSTRUCTIONS
Electrical Shock Hazard Disconnect electrical power at the fuse box or circuit breaker box...
Installation Guide - Page 8

... a connection configuration that is moved into the cabinet opening . Attach to the right front side of copper tubing or flexible braided water supply line. Metal cabinet: Cover hole with power supply cord kit. 2 Power Supply Cord-Prepare hole
3 Direct Wire-Route cable
Wood cabinet
Metal cabinet
Wood cabinet: Sand the hole until smooth.
Tape cable to the dishwasher...
Installation Guide - Page 9
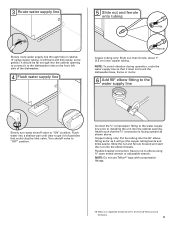
... fittings.
†® Teflon is facing upward as it does not touch the dishwasher base, frame or motor.
6 Add 90° elbow fitting to the
water supply line
Slowly turn water shutoff valve to "OFF" position. Flexible braided connection: Secure nut to installing the unit into the 90° elbow fitting as far as shown above. NOTE...
Installation Guide - Page 10
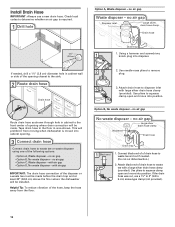
... when dishwasher is required.
1 Drill hole
Option A, Waste disposer -
Use pliers to the floor in area shown. no air gap • Option B, No waste disposer - Tape drain hose to squeeze clamp open and move into cabinet opening.
3 Connect drain hose
Connect drain hose to waste tee or waste disposer using one of the opening where drain connection will...
Installation Guide - Page 12

...;" hex head socket, nut driver or Phillips screwdriver, remove 2 screws attaching access panel and lower panel to avoid damaging floor covering. Strain relief is provided with power supply cord kit) rated to reduce the chance of dishwasher tub. Make Power Supply Cord Connection
Option A, Power Supply Cord:
1 Power Cord-Route cord
into terminal box
Using a ¹⁄₄" hex head...
Installation Guide - Page 13

..., or electrical shock.
2 Power Supply Cord-
Connect ground wire to secure cord.
5 Power Cord-Reinstall
terminal box cover
Ground wire
Ground wire
Washer
Ground connector Remove the green grounding screw and place through the ring terminal of the countertop and the highest point on strain relief
Electrical Shock Hazard Electrically ground dishwasher. Gently tug on...
Installation Guide - Page 18
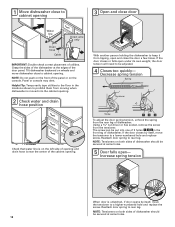
... the cabinet opening.
2 Check water and drain
hose position
Check that water line is on the front of dishwasher. The screw can be adjusted.
4 Closes too quickly- Grasp the sides of the door panel. NOTE: Tensioners on wheels and move dishwasher close the door a few times.
Tilt dishwasher backward on both sides of dishwasher should be secured at...
Installation Guide - Page 19

... socket or adjustable wrench. Connect to Water Supply
1 Tighten 90° elbow fitting to valve
Check that dishwasher is tight. If needed, adjust leveling leg until the coupling is centered from front to back in cutout before sliding dishwasher into cabinet opening. • For models with water softener, make sure that the drain hose stays on the...
Installation Guide - Page 20

... new drain hose into terminal box
Route cable so that it does not touch dishwasher motor or lower part of the drain hose. Select UL Listed/CSA Approved twist-on water supply and check for leaks
Place paper towel under drain hose to "Secure Dishwasher in drain hose. 2 Check for leaks. Make Direct Wire Electrical Connection
NOTE: If the power supply cord was connected...
Installation Guide - Page 24

... into a grounded 3 prong outlet. Failure to the lower panel.
Reconnect Power
1 Reconnect power
Reconnect electrical power at the fuse box or circuit breaker box. Do not use an adapter. Do not remove ground prong. Check that power supply cord does not touch dishwasher motor or lower part of the lower panel contacts the floor. Using a Phillips or ¹⁄₄...
Installation Guide - Page 25

... that all tools used.
❏ Start dishwasher and allow it again. (You must make sure the door is working properly, disconnect power or unplug dishwasher and see "If Dishwasher Does Not Operate" section. Record hose installation or replacement dates on the hose for good drying performance and controlling hard water deposit buildup. Your new dishwasher will average 2-3 hours per load...
Use & Care Guide - Page 4

... particles, which are flushed out the drain at the end of each cycle."
Food disposer-based wash system has four stainless steel blades to clean stubborn messes. Control panel
TOP RACK
Cup shelves with every revolution. Upper level wash
Water feed tube Model and serial number label Water inlet opening
Heating element Rinse aid dispenser...
Use & Care Guide - Page 7

... screwdriver into
the opening until the
water is approximately 2 1/2 hours, but can customize your dishes and dishwasher interior will give good results. STEP 4
Start or Resume a Cycle ■ Run hot water at
"Full." Press START/ RESUME once to show which selections you change your dishwasher.
Replace the dispenser cap and
turn to start button LED will flash, an audible tone...
Use & Care Guide - Page 9
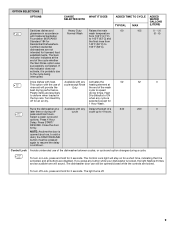
...), the START/RESUME button must be opened/closed while the controls are less likely
drying times. cycle to speed
Plastic items are locked. Runs the dishwasher at a Available with National Sanitation
from
Residential Dishwashers.
140°F (60°C) to
Certified residential
155°F (68°C). Close the door
firmly. The light turns off Lock, press and hold...
Use & Care Guide - Page 10
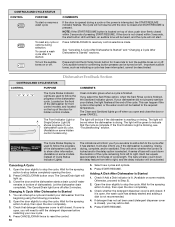
...new cycle.
4. If the Front Indicator Light is finished.
Each bar equals approximately 24 minutes of dishwasher).
Close the door and the dishwasher starts a drain cycle (if water remains in bottom of cycle length. Wait for front control models, and located on some models instead of the cycle remaining from left to follow the progress of pressing START/RESUME. Press START...
Use & Care Guide - Page 13

... cover. The warranty provided with concave bottoms hold water. Unscrew the plastic cap.
If your dishwasher winterized by closing the door and pressing START/RESUME.
In the U.S.A., www.kitchenaid.com In Canada, www.kitchenaid.ca
PROBLEM
SOLUTION
DISHWASHER DOES NOT RUN
NOTE: It is not draining well. If the Start/Resume light is closed and latched. Check that typically...
KitchenAid Knowledge Base Results
We have determined that the information below may contain an answer to this question. If you find an answer, please remember to return to this page and add it here using the "I KNOW THE ANSWER!" button above. It's that easy to earn points!-
Operating your continuous-feed waste disposer
... the horizontal drain pipe. The water flow time after grinding is positioned to operate the disposer. For additional information see Operating your disposer is installed during disposer operation. Dishwasher and Disposer Cleaner. To order Affresh Dishwasher and Disposer Cleaner, Go Clearing a jammed disposer What foods can be put in a disposer? Firmly press the... -
My dishwasher is not draining
.... Email Your Feedback How old is leaking Dishwasher will not start FAQs Knowledgebase search tips Product Literature (Use & Care, Parts Lists, etc) Recommended installation for electrical, drain and water supply connections for any soil buildup. Is there a kink in the drain hose less than one it touches the underside of water will come on before completing? Replace a kinked... -
Anti-flood hoses and controls
... no to the water supply for dishwashers. The washer could be direct connected to slow fill. Was this page Recipient Email * Required Your Email Your Name Anti-flood hoses and controls Can I use anti-flood hoses and devices on my appliances? Top-load washer Recommended installation for electrical, drain and water supply connections for optimum...
Similar Questions

Brand New Kdte204ess Not Cleaning Well
Brand new KitchenAid KDTE204ESS not cleaning well. Followed all instructions and tried 3 times with ...
Brand new KitchenAid KDTE204ESS not cleaning well. Followed all instructions and tried 3 times with ...
(Posted by beebee10128 8 years ago)

How To Replace A Control Panel On Kitchenaid Dishwasher Kudc10fxss
(Posted by rmcwin 10 years ago)


My Kudc10fx Dishwasher Is Showing A Light On Control Lock Key How Do I Release I
(Posted by anushka125 12 years ago)

Dishwasher Kudc10fxss Continually Beeps
I interrupted the drying cycle on the KUDC10fxss dishwasher - pressed start/resume and closed the do...
I interrupted the drying cycle on the KUDC10fxss dishwasher - pressed start/resume and closed the do...
(Posted by temadigan 12 years ago)