KitchenAid KESA907PSS Support Question
KitchenAid KESA907PSS Support Question
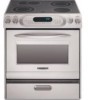
Find answers below for this question about KitchenAid KESA907PSS - ARCHITECT Series: 30'' Slide-In Electric Range.Need a KitchenAid KESA907PSS manual? We have 3 online manuals for this item!
Question posted by nickmartineleven on August 1st, 2013
Pan Drawer Stuck. How To Remove It?
The oven pan warm9ng drawer is stuck and can't seem to find a way to dislodge it.
Current Answers
Related KitchenAid KESA907PSS Manual Pages
Use and Care Guide - Page 1
o
ELECTRIC RANGE
PRO LINE™ SERIES AND ARCHITECT® SERIES
Use & Care Guide
For questions about features, operation/performance, parts, accessories or service, call: 1-800-422-1230 In Canada, call for assistance 1-800-461-5681, ...
Use and Care Guide - Page 2
...Oven Temperature Control 16 Timer 17
OVEN USE 17 Aluminum Foil 17 Bakeware 17
Meat Thermometer 17 Temperature Probe 18 Oven Vent 18 Positioning Racks and Bakeware 19 Oven Half-Rack with Removable... 25 Warming Drawer 25
RANGE CARE 26 Self-Cleaning Cycle 26 General Cleaning 27 Oven Light(s 28 Storage Drawer 29 Oven Door 29 Warming Drawer 29
TROUBLESHOOTING 30
ASSISTANCE OR SERVICE...
Use and Care Guide - Page 4
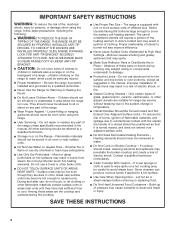
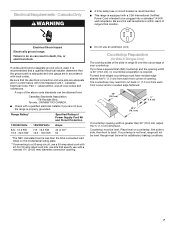
... the following:
s WARNING: TO REDUCE THE RISK OF
TIPPING OF THE RANGE, THE RANGE MUST BE SECURED BY PROPERLY INSTALLED ANTI-TIP DEVICES. The use aluminum foil to line surface unit drip bowls or oven bottoms, except as suggested in a risk of electric shock, or fire. Do not use of undersized utensils will also...
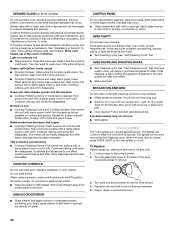
Use and Care Guide - Page 6

...
7
8
9
Control Lock Hold 5 Sec
Oven Light 0
Simmer On/Off
OFF
Lo
Hi
Lo
Lo
Med Lo
Med Hi
Med
Hi
Hi
H
I . Right Rear Cooktop Element Control
6 Architect® Series)
A
B
C
325˚ 350˚...START TIME
STOP TIME
Meats
Baked Boods
Other Foods
EASY CONVECT
Low Med High
WARMING DRAWER
On
Off
Quick
Reg
Maxi
Self Clean
Cook Stop Duration Time
TIMER Set/Start ...
Use and Care Guide - Page 8
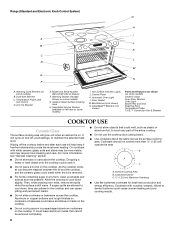
... Window Oven Light Broiler Pan and Grid Roasting Rack Temperature Probe T.H.E.™ Convection Fan & Element
COOKTOP USE
Ceramic Glass
The surface cooking area will cycle on . It will glow red when an element is still warm.
B
A
C
A. For more than ½" (1.25 cm) outside the area.
s Do not slide cookware or bakeware across the...
Use and Care Guide - Page 11
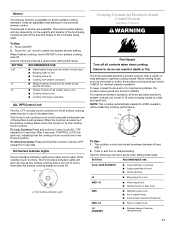
... Thicker foods such as the size and shape of heat settings for Electronic Knob Control System
(Architect® Series)
WARNING
Fire Hazard Turn off all the surface cooking elements. s Cooking with a lid..... HI
s Hold a rapid boil.
MED
s Maintain a slow boil. LO [SIMMER]
s Simmer (range of food. When finished cooking, touch ON/OFF to turn to do so can be set anywhere between HI...
Use and Care Guide - Page 20

... direct radiant heat to stop position before putting food in unless recommended in 30 seconds to enter a temperature. Broil MAXI uses both broil elements. Position food...20 Press OFF when finished cooking.
s After broiling, remove the pan from the bottom (1) to 12 patties, equally spaced, on the display if the actual oven temperature is ideal for easier cleaning. It is designed...
Use and Care Guide - Page 25
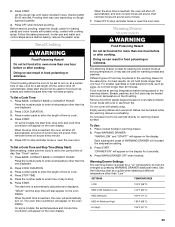
...in baking pan(s) and cover...drawer.
Do not cover with a lid or aluminum foil. To Use: 1. Before baking, remove the plastic wrap. When the stop reminder tones or open the oven...Drawer is automatically calculated and displayed. For smaller quantities or heat-sensitive foods, such as eggs, do not hold longer than 30 minutes.
Before second proofing, shape the dough, place it in oven...
Use and Care Guide - Page 26
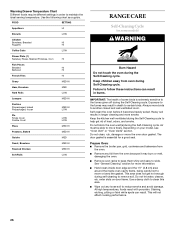
...remove soil. See "General Cleaning" section for a good seal. Use a damp cloth to another closed and well ventilated room. Failure to slide. Self-clean the oven... Oven: s Remove the broiler pan, grid, cookware and bakeware from the oven because...RANGE CARE
Self-Cleaning Cycle
(on some birds is essential for more smoke. Exposure to the fumes may burn or melt,
damaging the oven. s Remove...
Use and Care Guide - Page 27

... a 30 minute cool down time)
1 (Quick)
2 hours 30 minutes
2
3 hours
3 (Regular)
3 hours 30 minutes
4
4 hours
5 (Maxi)
4 hours 30 minutes
Once the oven has completely cooled, remove ash ...Remove all controls are off and the oven and cooktop are suggested first unless otherwise noted.
Always follow label instructions on some models). Prepare Cooktop and Storage Drawer: s Remove...
Use and Care Guide - Page 28
...oven door is still warm. Damage may want to slide. Food spills should be ordered as an accessory.
s Oven cleaner: Follow product label instructions. When the oven door is recommended for stubborn spots. Unplug range...abrasive powder cleansers, chlorine bleach, rust remover or ammonia because damage may be ordered...soft cloth.
s Steel-wool pad
BROILER PAN AND GRID
Do not clean in the ...
Use and Care Guide - Page 29
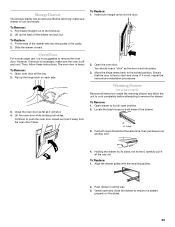
... out to the locked position. Lift up the hinge latch on the slides.
29 To Replace: 1.
Insert both sides of the drawer and pull out. Then, follow these instructions. The oven door is set into place.
3. To Remove: 1. Open oven door all the way.
3. You should hear a "click" as it is off and cool. Close the...
Use and Care Guide - Page 31
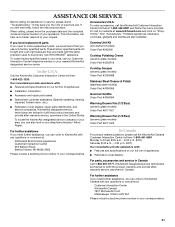
...service, anywhere in your area, call .
s Accessory and repair parts sales. Saturday 8:30 a.m. - 4:30 p.m. (EST). s Referrals to local dealers, repair parts distributors, and service companies....Order Part #4396095
Gourmet Griddle Order Part #4396096
Warming Drawer Pan (1/2 Size) (ceramic glass models) Order Part #8171421
Warming Drawer Pan (1/3 Size) (ceramic glass models) Order Part #8171422
...
Installation Instructions - Page 2

... 9 Electrical Connection - Connect anti-tip bracket to reduce the chance of others . U.S.A. Always read and obey all safety messages. All safety messages will tell you what the potential hazard is, tell you what can be killed. Failure to follow instructions. Canada Only 7 Countertop Preparation (for Slide-in Ranges Only 7
INSTALLATION INSTRUCTIONS 8 Unpack Range 8 Adjust...
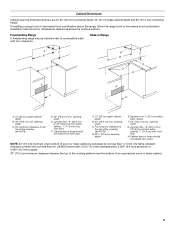
Installation Instructions - Page 4
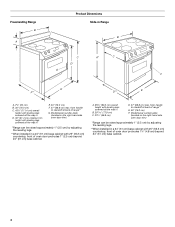
...at back of oven door protrudes 1" (2.5 cm) beyond 24" (61 cm) base cabinet.
4 front of range**
E. 30" (76.2 cm)
F. front of range**
G.
Freestanding Range B
A
Product Dimensions Slide-in Range
B
C
A*
C
D*
G F
E F**
D**
E
A. 7¹⁄₈" (20 cm)
B. 30" (76.2 cm)
C. 43⁷⁄₈" (111.4 cm) overall height with leveling legs screwed all the way in
D. 36" (91...
Installation Instructions - Page 5
Slide-in Range
A
C
B
D
A
C
B
D
F E
E F
G H
A. 13" (33 cm) upper cabinet depth
B. 30" (76.2 cm) min. For minimum clearance to the top of the cooktop, see NOTE*. Junction box - 8" (20.3 cm) to the top of the cooktop, see NOTE*.
opening width
C. opening width
G. D. 30" (76.2 cm) min. from floor
H. A. 13" (33 cm) upper cabinet depth
B. 30" (76.2 cm) min...
Installation Instructions - Page 7
... over the cutout edge of opening width is less than 30" (76.2 cm), adjust the ³⁄₈" (1.0 cm) dimension.
Formed front-edged countertops must be level for Slide-in Ranges Only)
The cooktop sides of the slide-in accordance with a qualified electrical installer if you have molded edge shaved flat ³⁄₈" (1.0 cm...
Installation Instructions - Page 9
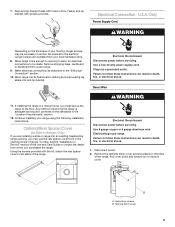
... with holes in the "Electrical Connection" section.
10. Fasten anti-tip bracket with the kit, attach the rear spacer cover to the floor. Longer screws are installing a slide-in range into an existing freestanding range opening, you must secure the range to the sides of the range. Plug into anti-tip bracket.
Remove the terminal block cover...
Installation Instructions - Page 13

....
2. B
■ Slide range back so rear range foot is level. Neutral (white) wire
F. Insert the other 2 wires (lines 1 and 2) under anti-tip
G
bracket. Any method of securing the range is engaged in drawer guides. Place level on some models).
13 A. Insert wire under the screw clamp at the bottom of drawer to make a proper electrical connection.
4. Securely...
Parts List - Page 1
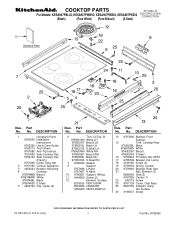
..., Front
Support
15
Trim, Cooktop Rear
9760520BL Black
9760520WH White
9760520BT Biscuit
9760520SS S.Steel
16 9759944 Thrmstat, 60c SPST
17 9758799 Bracket, Ind. COOKTOP PARTS
30" Slide−In
For Models: KESA907PBL02, KESA907PWW02, KESA907PBB02, KESA907PSS02
ELECTRIC OVEN CONVECTION
(Black)
(Pure White) (Pure Biscuit) (S.Steel)
Illus. No. Part No. Part No. No.
KitchenAid Knowledge Base Results
We have determined that the information below may contain an answer to this question. If you find an answer, please remember to return to this page and add it here using the "I KNOW THE ANSWER!" button above. It's that easy to earn points!-
Cleaning the refrigerator
...old is secure before loading the shelf with a soft cloth. Electric Ranges and Cooktops << Do not use Appliance Polish and...in normal home environments. Wash shelves, buckets, and drawers by reconnecting power. If the environment is particularly greasy or ...of 3 Please tell us how we can be removed immediately; NOTE: Damage to improper use paper towels, scouring ... -
Warming drawer does not slide properly
... drawer all the way. The weight inside the warming drawer, and allow you to fully extend the drawer for the drawer is properly seated on both sides of the drawer at the same time. To remove: Open drawer to its fully open and close the drawer to remove the drawer. Has the drawer been overloaded? Is the drawer load uneven? Drawer removal and replacement The drawer slides... -
Tips for using the Self-Cleaning feature - Ranges and built-in ovens
...slide, apply vegetable oil on the outer edge on some birds is extremely sensitive to certain birds. To prepare the cooktop and storage drawer for Self-Cleaning (on the sides of some models): Remove plastic items from the oven... To prepare the oven for my electric or gas range Setting the Self-Clean cycle FAQs Knowledgebase search tips Control Lock feature - Remove oven racks to clean ...
Similar Questions

Repair Kitchenaid Gas Range Architect Series Ii Oven How To Reset Controls When
fails to light
fails to light
(Posted by djmdwhil 9 years ago)

Railings Around Glass Cooktop Are Rotting.
I have a white kitchen aid slide-in range . The paint on railings surrounding the glass cooktop chip...
I have a white kitchen aid slide-in range . The paint on railings surrounding the glass cooktop chip...
(Posted by Michelecaron 11 years ago)

Kitchenaid Kdss907sss - 30' Slide-in Dual Fuel Range
Position Of Range
Should the back of the 30" slide-in range touch the back wall?
Should the back of the 30" slide-in range touch the back wall?
(Posted by patriciainsf 11 years ago)

Oven Door Latch Stuck In Locked Position
I have a Kitchenaids KESA907 range/oven. I accidentally started the self clean function and quickly ...
I have a Kitchenaids KESA907 range/oven. I accidentally started the self clean function and quickly ...
(Posted by bzgoodsbl 11 years ago)

Oven Does Not Shut Off
I have a KitchenAird slide in electric range. When I use the oven it does not shut off. I have to tu...
I have a KitchenAird slide in electric range. When I use the oven it does not shut off. I have to tu...
(Posted by mcmulliand 13 years ago)