Kenwood KVT-719DVD Support Question
Kenwood KVT-719DVD Support Question
Find answers below for this question about Kenwood KVT-719DVD.Need a Kenwood KVT-719DVD manual? We have 1 online manual for this item!
Question posted by plcamperman on May 3rd, 2013
How Do I Upgrade My Units Gps
The person who posted this question about this Kenwood product did not include a detailed explanation. Please use the "Request More Information" button to the right if more details would help you to answer this question.
Current Answers
Related Kenwood KVT-719DVD Manual Pages
Installation Manual - Page 1
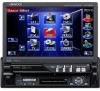
KVT-719DVD KVT-739DVD
MONITOR WITH DVD RECEIVER
INSTALLATION MANUAL
MONITOR CON RECEPTOR DVD
MANUAL DE INSTALACIÓN
© B54-4513-00/00 (KV/RV)
Installation Manual - Page 3
...your car's ignition does not have been activated. Always connect those wires to install the unit so that the mounting angle is installed, check whether the brake lamps, blinkers, wipers, ...other similar material.
Connect the wiring harness connector to a rear output terminal.
• After the unit is 30° or less. To prevent a short circuit, remove the key from the ignition...
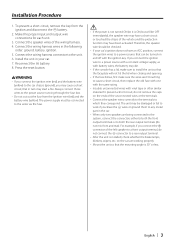
Installation Manual - Page 4
... power amplifier, connect to connect the parking sensor.
Depending on what antenna you are made, do not let the cable come out from the tab.
4 | KVT-719DVD/KVT-739DVD Connection
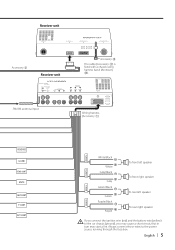
Monitor/Player unit
Do not connect.
Installation Manual - Page 5
..., that in turn may start a fire.
CONT EXT. FM/AM antenna input
Wiring harness (Accessory 1)
REVERSE ILLUMI REMO.CONT MUTE ANT CONT P. English | 5
Receiver unit
Accessory 3
Receiver unit
Accessory @
The cable (Accessory 3) is fixed with a chassis using harness band (Accessory @). CONT
FRONT L
FRONT R
White/Black White +
Gray/Black +
Gray Green/Black
+ Green...
Installation Manual - Page 6
... Connection
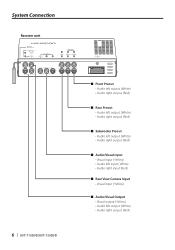
Receiver unit
6 | KVT-719DVD/KVT-739DVD
■ Front Preout • Audio left output (White) • Audio right output (Red)
■ Rear Preout • Audio left output (White) • Audio right output (Red)
■ Subwoofer Preout • Audio left output (White) • Audio right output (Red)
■ Audio/Visual input • Visual input (Yellow) • Audio left...
Installation Manual - Page 7
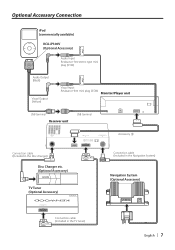
...iPod (commercially available)
KCA-iP300V (Optional Accessory)
Audio Input Resistance-free stereo type mini plug (3.5Ф)
iPod VIDEO IN
Audio Output (Black)
Visual Output (Yellow)
Visual Input Resistance-free mini plug (3.5Ф)
Monitor/Player unit
USB terminal Receiver unit
USB terminal
Accessory 3
Connection cable (Included in the Disc changer)
Disc Changer etc. (Optional Accessory...
Installation Manual - Page 8
...screw (ø4 × 16 mm) (Accessory 8)
8 | KVT-719DVD/KVT-739DVD
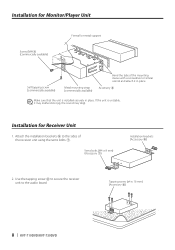
If the unit is installed securely in place. Installation for Monitor/Player Unit
Screw (M4X8) (commercially available)
Firewall or metal support
Self-tapping screw (commercially available)
Metal mounting strap (commercially available)
Bend the tabs of the receiver unit using the sems bolts 7. Use the tapping screw...
Installation Manual - Page 9
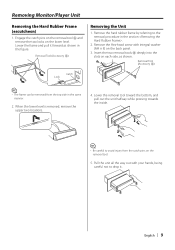
...-head screw with your hands, being careful not to drop it forward as shown. Lower the removal tool toward the bottom, and pull out the unit halfway while pressing towards the inside.
⁄
• Be careful to the removal procedure in the same manner.
2. Insert the two removal tools 6 deeply into...
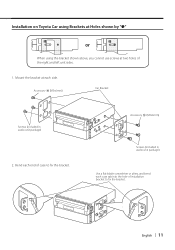
Installation Manual - Page 10

... by "●"
or
Accessory 0 (M5x6mm) or Accessory ! (M5x7mm)
Car Bracket
Accessory 0 (M5x6mm) or Accessory ! (M5x7mm)
Screws (included in audio unit package)
Audio unit or others
Screws (included in audio unit package)
⁄
• Do not use the wrong screws, you use your own screws. Use only the screws provided. If you could damage
the unit.
10 | KVT-719DVD/KVT-739DVD
Installation Manual - Page 11
... above, you cannot use screws at each side. Accessory 0 (M5x6mm)
Screws (included in audio unit package)
2.
Bend each case tab into the hole of the right and left unit sides.
1. English | 11
Accessory 0 (M5x6mm)
Car Bracket
Screws (included in audio unit package)
Use a flat-blade screwdriver or pliers, and bend each end of case to...
Similar Questions


How To Update The Software For A Car Audio Kenwood Kvt 514
(Posted by jfmkaykud 9 years ago)

My Sirius Sat Freezes Up On My Kvt-719dvd Any Idiea Why
(Posted by RDWYER 10 years ago)