Kenwood CMOS-300 Support Question
Kenwood CMOS-300 Support Question
Find answers below for this question about Kenwood CMOS-300.Need a Kenwood CMOS-300 manual? We have 1 online manual for this item!
Question posted by jmitchell4 on September 13th, 2012
Dnx9980hd/cmos-300 Button Greyed Out
I have a DNX 9980HD that I just added a CMOS-300 rearview camera. I have the exact same setup on my other vehicle. When I attempt the camera setup on the headunit, the CMOS 300 button is greyed out. I can only select other. The back up camera works fine on reverse interupt except for the multi angle camera functions thought the headunit. I have the reverse wire connected to the backup lights but I see in the instructions that I dont need to do that with this headunit. I have tried it both ways and have recheck all connections to accesories, power and ground. Also the camera works fine with the CMOS switch unit for multi angle. I dont understand why the button is grayed out on the camera setup. Is there another option that needs to be set. Also I used the switch for the CMOS camera to validate that the ID is set to ID1.
Current Answers
Related Kenwood CMOS-300 Manual Pages
Instruction Manual - Page 1

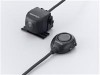
...on the warranty card, and in the space provided below. Refer to read through this instruction manual. CMOS-300 CMOS-200
UNIVERSAL MULTI-VIEW CAMERA/ UNIVERSAL REAR VIEW CAMERA
INSTRUCTION MANUAL
CAMÉRA MULTI-VUES UNIVERSELLE/ CAMÉRA DE RECUL UNIVERSELLE
MODE D'EMPLOI
UNIVERSAL ... Kenwood product at www.Kenwoodusa.com
© B64-4756-18/01 (W) For your new Universal Camera.
Instruction Manual - Page 2

...If you when reversing to a TV with an RCA video input is narrow, which may result in the same ...this unit is installed in the following
order: ground, ignition, reverse and camera unit.
4 Connect the wiring harness connector to the car chassis
(Ground...unit.
5 Install the unit in locations such as the
2 | CMOS-300/CMOS-200
above because of the danger of malfunction due to high temperatures.)...
Instruction Manual - Page 3

...camera bracket) ..........1 Camera connection cord ..........1
Power supply box..........1 Double-side adhesive tape (Large)..........1
Power cord ..........1
Waterproof packing ..........1 Camera bracket clamping screw..........1
CMOS-300... or gets torn, there is a danger of the wiring short-circuiting to the vehicle body. • When replacing the fuse, be attached before installing. • ...
Instruction Manual - Page 4
... the rear center position of the vehicle.
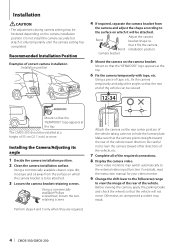
Installation
CAUTION • The adjustments during camera setting may be hindered depending on which it will not move. Perform steps 4 and 5 only when they are required.
4 | CMOS-300/CMOS-200 Some video monitors may result.
Camera bracket
5 Mount the camera on the camera bracket. Before viewing the camera, apply the parking brake and...
Instruction Manual - Page 5

... carpet on the front passenger seat side.
Vehicle rear part or bumper
When adjusting the camera angle, be attached.
2 Attach double-side adhesive tape on the
bottom of the monitor screen. If they are loose, tighten them firmly.
12 Perform the operations in "Camera Setting"
(page 8). (CMOS-300 only) If an adjustment is visible...
Instruction Manual - Page 6

... a dedicated rearview camera video input.
Main fuse
-
+
Battery GND
GND cord (Black): 1 m (39.4 inch)
Connect to a metallic part of vehicle (a part of chassis connected to the negative side of the battery to vehicle's reverse lamp harness. Camera's cord length 5 m (197 inch), Camera connection cord length 3 m (118 inch)
Switch unit (CMOS-300 only): 2 m (78.7 inch)
CAMERA
CAMERA Power...
Instruction Manual - Page 7

...
CAM+ (green/red)
control terminals of the
head unit.
Video cord Camera connection cord
Camera 1 (Used as rearview camera)
(ID1: Default) Connect to the dedicated rearview camera video input. Video cord
English | 7 Select the external video input to the external video input. For details, see "Camera ID Setting" (page 13). • Connect the power supply in the system connection...
Instruction Manual - Page 8

... frame.
2 Advance the vehicle.
• Move the vehicle forward until the entire parking space can be viewed in
advance.
2 Display the camera video. button to select an item and press the view button to enter the selection. • When using the camera as the rearview camera,
select [OK]. • When using the camera as the front camera, select
[Switch to Normal...
Instruction Manual - Page 9

... the vehicle.
button to adjust it and press the view button to the center line of the switch unit so
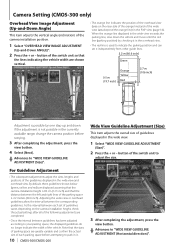
that item to the default. • Select [ ] to the left and right. Overhead View Image Adjustment (Centering)
This item adjusts the center of the camera installation position.
1 Select "OVERHEAD VIEW IMAGE ADJUSTMENT
(Right-and...
Instruction Manual - Page 10
...CMOS-300/CMOS-200
Wide View Guideline Adjustment (Size)
This item adjusts the overall size of the switch unit to
adjust the size.
3 After completing the adjustment, press the
view button. If the adjustment is 80 cm (31.5 inch) and that
the lines indicating the vehicle... -
button of guidelines displayed in the currently available range, change the camera position before attempting to ...
Instruction Manual - Page 11

... + or - Wide View Guideline Adjustment (Horizontal Direction)
This item adjusts the left -right positioning.
3 After completing the adjustment, press the
view button. button of the red line. Advances to the vehicle.
English | 11 By default, the red line is superimposed with the yellow line that is closest to "WIDE VIEW GUIDELINE ADJUSTMENT (Red...
Instruction Manual - Page 12
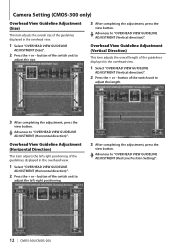
... ADJUSTMENT (Vertical direction)". Overhead View Guideline Adjustment (Horizontal Direction)
This item adjusts the left -right positioning.
3 After completing the adjustment, press the
view button. Camera Setting (CMOS-300 only)
Overhead View Guideline Adjustment (Size)
This item adjusts the overall size of the guidelines displayed in the overhead view.
1 Select "OVERHEAD VIEW GUIDELINE...
Instruction Manual - Page 13

... [Next]. By default, the red line is superimposed with the camera control function, it is closest to the vehicle. Camera ID Setting
When connecting two CMOS-300 units to "SETTING COMPLETE". button of the switch unit to
select [Finish] and press the view button. Advances to a Kenwood navigation system equipped etc. The red line can be used...
Instruction Manual - Page 14

Display View Switching (CMOS-300 only)
Display View Switching
The CMOS-300 camera system can display 5 kinds of camera images.
1 With an image displayed on the monitor, press
the view button of the screen. Each press switches the ... from the viewpoint straight up above the vehicle.
14 | CMOS-300/CMOS-200
PinP View The overhead view is displayed on the upper half of about 135°....
Instruction Manual - Page 15

... AND ELECTRONIC EQUIPMENT".
English | 15 This symbol mark indicates that this product so as household waste. Specifications
Camera Unit (CMOS-300)
Output video : Wide-angle mirror image (for rearview)/wideangle normal image (for front view)
Sensor: 1/4-inch color CMOS sensor Number of pixels: Approx. 310,000 pixels Lens
: Wide angle, focal length f=0.82mm, F value 2.6 Angles of...
Similar Questions

My Kvt696 Was Working Fine, But Now The Slide Out Flip Up Screen Won't Slide Out
My kvt696 slide out flip up screen won't slide out
My kvt696 slide out flip up screen won't slide out
(Posted by Diversixtyniner 6 years ago)

Everytime I Put A Fuse In It Blows Was Working Fine A Day Ago Keneood Exelon 396
(Posted by murielmcjunkin 10 years ago)


Own A Kenwood Kdc Bt948hd Head Unit And It Had Been Working Fine. Has Power But
Now does not turn on. Even after turning vehicle off and thenback on.....any ideas????
Now does not turn on. Even after turning vehicle off and thenback on.....any ideas????
(Posted by Ffmedic14 12 years ago)

Kmr 330 Won't Allow Me To Change The Source. Stays On Standby. Worked Fine Befor
(Posted by richeyhsi 12 years ago)