Kenmore 4102 Support Question
Kenmore 4102 Support Question
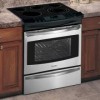
Find answers below for this question about Kenmore 4102 - Elite 30 in. Slide-In Electric Range.Need a Kenmore 4102 manual? We have 2 online manuals for this item!
Question posted by qrsref on October 26th, 2012
Right Front Burner Is Out Model# 790.46713605
The person who posted this question about this Kenmore product did not include a detailed explanation. Please use the "Request More Information" button to the right if more details would help you to answer this question.
Current Answers
Related Kenmore 4102 Manual Pages
Use and Care Guide - Page 2
...fitness, so these exclusions or limitations may also have other rights which vary from purchase date, you must pay for other .... Table of Contents
Slide-in RangeWarranty 2 IMPORTANT SAFETY INSTRUCTIONS 3=5 Product Record 5 Protection Agreements 6 Range Features 7 Setting Surface...45=46
Notes
47
Sears Service 48
Kenmore Elite Warranty When installed, operated and maintained according to...
Use and Care Guide - Page 4
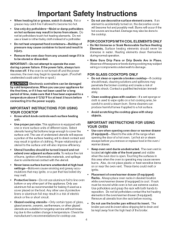
... to line oven bottom or any unused range if it is open.
Remove all utensils...as recommended for baking if used for at right side of a hot oven. These items...ducts unobstructed. Damage may melt. Never leave surface burners unattended at high heat settings--Boilovers cause smoking and...above 0°C/32°F for a long period of electric shock. Do not use . If the oven is ...
Use and Care Guide - Page 5
...customers of some birds is extremely
sensitive to another well ventilated room. Model No. 790. You will find the model and serial number printed on the serial plate.
Your product may ...features. Exposed fat and grease could catch fire. IMPORTANT INSTRUCTIONS FOR CLEANING YOUR RANGE • Clean the range regularly to record the serial number for future reference. Do not allow grease ...
Use and Care Guide - Page 7
... Door Handle (Style varies with model)
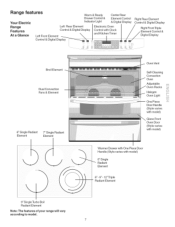
...ii.i...... Range features
Warm & Ready Drawer Control &
Center Rear Element Control
Your Electric
Range Features At a Glance
Left Front Element
Indicator Light
& Digital Display
Left Rear Element Control & Digital Display
Electronic Oven Control with Clock and Kitchen Timer
Control & Digital Display
Right Rear Element Control & Digital Display...
Use and Care Guide - Page 8
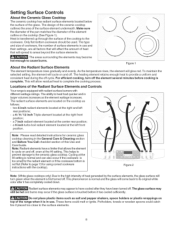
...inch Triple element located at the center rear position; - a 7 inch radiant element located at the right front
.... Figure 2
Note: (White glass cooktops only) Due to provide a uniform and consistent heat...pan matches the diameter of the range when it has cooled sufficiently. Heat is touched before cooking is equipped with radiant surface burners with the cooktop). The glass ...
Use and Care Guide - Page 10

...
Operating Single Radiant Surface Elements The cooktop has 4 SINGLE radiant surface elements (figure 1): the RIGHT REAR position, the CENTER REAR position, the LEFT REAR position and the LEFT FRONT position. A... glowing red surface heating area extending beyond the bottom edge of the range when it has cooled sufficiently,
Do not place plastic items such as the element is...
Use and Care Guide - Page 11
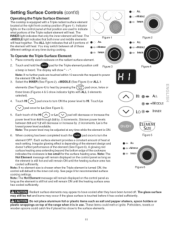
... with a Triple radiant surface element
..-....\
located at that position are used to indicate
what portions of ® Indicator
lights on the control panel at the right front cooktop position (Figure 1). The ALL light indicates that all 3 portions of the Triple radiant element will heat. The
INNER light indicates that both inner...
Use and Care Guide - Page 14
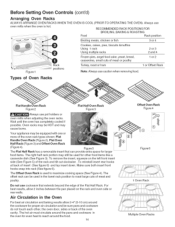
... Rack Figure 2
Flat Half Oven Rack Figure 3
Always use caution when removing food. The offset rack can provide extra space for larger
food items. The right half rack portion may still be equipped with one or
more of the Flat Half Rack.
The hot air must circulate around the pans and...
Use and Care Guide - Page 30

....
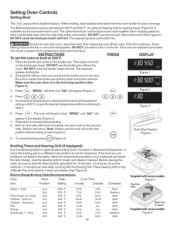
8. Plug the meat probe into the probe receptacle located on the desired oven rack position and slide into the oven. 3. t The U.S. DO NOT PREHEAT or start cooking before starting the cooking ... and will return to continue cooking after the meat probe reaches the target temperature.
30 You may use the numeric
keypads to adjust the target temperature.
The oven control ...
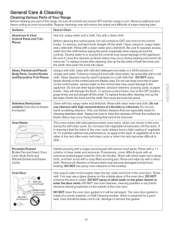
Use and Care Guide - Page 32
... cooking with some models Figure 5
Searing
& insert
Supplied with the Searing Grill.
To cancel broiling press _TOP_(Figure 3).
@
Broil Stop Position
:,.
Electric Range Broiling Table Recommendations
...7:00 8:00
Rare Medium
Well Well Well Well
Well Medium
Well
Y
Supplied with some models Figure 6 The exposed grease could ignite.
2. When broiling, heat radiates downward from the ...
Use and Care Guide - Page 41
...cycle or when the rack becomes difficult to slide.
...ii.i...... The oven door gasket is ... lubricated porcelain oven racks, which is made for 30 to rub, damage or remove this vegetable oil ...DO NOT spray liquids directly on Self-Cleaning models, which can remain in the oven during ...& Cleaning
Cleaning Various Parts of Your Range Before cleaning any harsh abrasive cleaning materials...
Use and Care Guide - Page 42
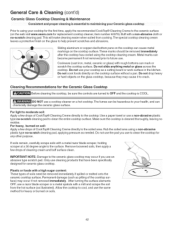
...(cast iron, metal, ceramic or glass) with a metal razor blade scraper, holding scraper at a 30 degree angle to the surface. Make sure the cooktop is COOL.
/
J
J _chemically damaDgOe NthOeTcuesraemaiccogolakstosp... pitting of CookTop® Cleaning Creme directly to clean the entire cooktop surface. Sliding aluminum or copper clad bottom pans on the cooktop can mark or scratch the ...
Use and Care Guide - Page 44

... against possible broken glass. 3. Disconnect appliance from the range. Locate glide lever on each side of drawer, pull up on the right glide lever (See Figure 1). 4.
To remove the ...wcaarnmeorccdurrawanedr. result
To Remove Warmer Drawer:
1. _ drawer.
Pull the drawer away from electric _power before removing the warmer
2. Touching bulb with
your skin can be removed to...
Installation Instructions - Page 4

...
persons could result. • Reset all packing material from the oven and the
drawer compartments before installing range. 2. Prolonged use of interest to leave these installation
instructions before connecting the electrical supply to the Installer 1. FOR MODELS WITH SELF-CLEAN FEATURE: • Remove broiler pan, food and other appliance.
Do not install the...
Installation Instructions - Page 5
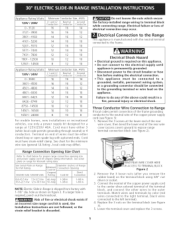
...lead on the appliance.
NOTE: Electric Slide-in a fire, personal injury or electrical shock. Do not loosen the nuts which secure
the factory-installed
range wiring
while connecting range. If a larger hole is discarded...terminals by color (red wires connected to the right terminal, black wires connected to chart below for proper range connection opening size and power supply cord kit ...
Installation Instructions - Page 6

... . Remove the ground strap from the terminal block and from Range
Conduit Connector
(or CSA listed)
Figure 5 3-Wire (Grounded Neutral) Electrical System
(ExampJe: Junction Box) Connect the neutral of the copper... 3
for 1-3/8" Dia. Match wires and terminals by color (red wires connected to the right terminal, black wires connected to the circuit breaker, fuse box or junction box, use flexible...
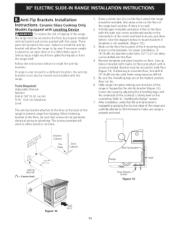
Installation Instructions - Page 8
...range: Models equipped with Leveling Legs".
The floor where the range is to be installed must be made or gaps between the countertop and the range cooktop may occur. Install base cabinets 30... device are adjacent to make the top flat should be level. Models Equipped with care.
Slide the range into the cutout opening . To provide an optimum installation, the ...
Installation Instructions - Page 9
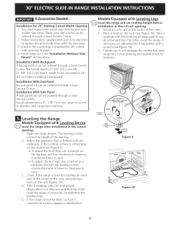
... readings with the new ones. 3. Level the range, if necessary, by adjusting the leveling legs.
5. to not damage the countertop, slide range into cutout opening . You must replace the actual...kit can be ordered through a Sears Service Center. 2. Leveling the Range
Models Equipped with range door opening. Open the range drawer. The leveling screws
control the height of the oven.
2....
Installation Instructions - Page 10
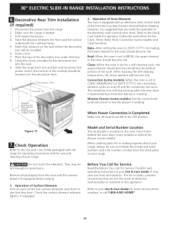
... required)
I.
Check the surface element indicator light(s), if equipped.
Take the distance between the floor and the surface
underneath the cooktop frame. 5. Slide the range back into the wall. 9. Model and Serial Number Location The serial plate is leveled. 3. Draw a line. 7. Remove all controls are not the result of Surface Elements Turn on...
Installation Instructions - Page 11
... prevent range from the range itself....of the range is sitting level on the floor
with the range. For ...range is properly anchored. The screws provided will allow the range to tip over if excessive weight is ever moved to a different location, the anti-tip brackets must also be moved and installed with the right.... Slide range into the floor.
4. ...the range. Unfold paper template ...
Similar Questions

Replece 6 Inch Rear Burner Kenmore Elite 790 4670
(Posted by brackenfr 10 years ago)

Stove Burner
stove burner will start to hum when the stove is turned off. Only way to stop is to turn the burner ...
stove burner will start to hum when the stove is turned off. Only way to stop is to turn the burner ...
(Posted by wuebwessel 11 years ago)

Hi, Does This Include Model #: 790.96602401?
I bought a used oven with no manuel and have no clue how to use half of the features on it. I need t...
I bought a used oven with no manuel and have no clue how to use half of the features on it. I need t...
(Posted by Victor1983 11 years ago)
Kenmore Electric Range Model #911-9389981
after i have the burner on about 2 min. my stove flashes a letter F what could this be
after i have the burner on about 2 min. my stove flashes a letter F what could this be
(Posted by lisadeclemente 12 years ago)

I Am Getting An Error Code Eo30 With My Kenmore Elite Slide In Range.
The range has already been replaced once and I am still havingthe same error messagewith the second ...
The range has already been replaced once and I am still havingthe same error messagewith the second ...
(Posted by spletting 14 years ago)