Kenmore 4102 Support Question
Kenmore 4102 Support Question
Find answers below for this question about Kenmore 4102 - Elite 30 in. Slide-In Electric Range.Need a Kenmore 4102 manual? We have 2 online manuals for this item!
Question posted by brackenfr on October 5th, 2013
Replece 6 Inch Rear Burner Kenmore Elite 790 4670
The person who posted this question about this Kenmore product did not include a detailed explanation. Please use the "Request More Information" button to the right if more details would help you to answer this question.
Current Answers
Related Kenmore 4102 Manual Pages
Use and Care Guide - Page 2
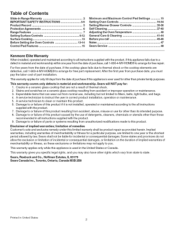
...you may not apply to you. Table of Contents
Slide-in RangeWarranty 2 IMPORTANT SAFETY INSTRUCTIONS 3=5 Product Record 5 Protection Agreements 6 Range Features 7 Setting Surface Controls 8-12 Surface Cooking ... & Cleaning 4144
Before you call 45=46
Notes
47
Sears Service 48
Kenmore Elite Warranty When installed, operated and maintained according to all instructions supplied with the...
Use and Care Guide - Page 3

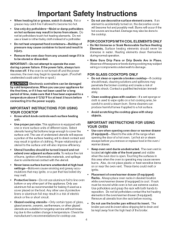
... breaker or heating up the room. Destroy the carton and plastic bags after use the oven or warmer drawer (if equipped) for warming up
electrical power to the range. Install only per installation instructions provided in color. chemical or foam=type extinguisher.
3
...ii.i...... All safety messages will identify the hazard, tell you...
Use and Care Guide - Page 4
... turned inward and not extend over adjacent surface units.
Only use . Never leave surface burners unattended at high heat settings--Boilovers cause smoking and greasy accumulations that may cause severe burns...oven door or warmer drawer (if equipped)--Stand to the side of the range when opening the door of electric shock. The oven vent is not turned off . Do not let ...
Use and Care Guide - Page 5
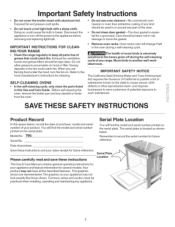
...must be kept clean. Doing so could catch fire. IMPORTANT INSTRUCTIONS FOR CLEANING YOUR RANGE • Clean the range regularly to keep all the described features. Do not clean door gasket--The door ... on .
Product Record
Serial Plate Location
In this Use and Care Guide. Model No. 790. Serial No. You will find the model and serial number printed on your appliance and feature...
Use and Care Guide - Page 7
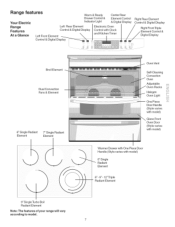
... features
Warm & Ready Drawer Control &
Center Rear Element Control
Your Electric
Range Features At a Glance
Left Front Element
Indicator Light
& Digital Display
Left Rear Element Control & Digital Display
Electronic Oven Control with Clock and Kitchen Timer
Control & Digital Display
Right Rear Element Control & Digital Display
Right Front Triple &
Digital Display
Broil Element
Dual...
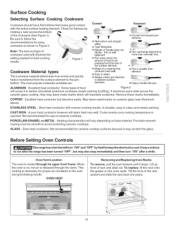
Use and Care Guide - Page 8
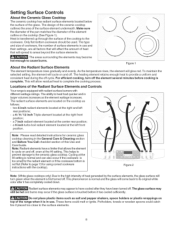
... is equipped with radiant surface burners with the cooktop).
Note: Radiant elements... on the cooktop (See Figure 1). a 9 inch turbo boil radiant element located at the HI setting...heat during the off , even at the left
rear positions;
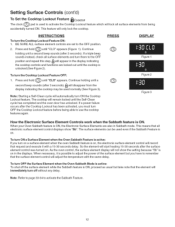
- Setting Surface Controls
About the Ceramic ...section of the Radiant Surface Elements and Controls
Your range is first turned off . Potholders, towels or...
Use and Care Guide - Page 9
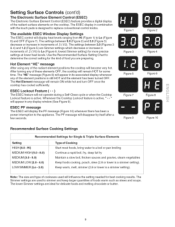
... during a Self-Clean cycle or when the Cooktop Lockout feature is active. The available ESEC Window Display Settings The ESEC control will display heat levels ranging from Hi (Figure 1) to the appliance, The PF message will remain HOT for the kind of food you are preparing,
Hot Element "HE" message After...
Use and Care Guide - Page 10

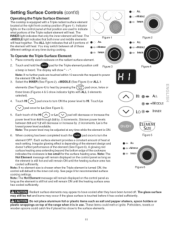
...by .5 increments.
A glowing red surface heating area extending beyond the bottom edge of the range when it is heard. These items could catch fire if placed too close to power the ...Surface Elements The cooktop has 4 SINGLE radiant surface elements (figure 1): the RIGHT REAR position, the CENTER REAR position, the LEFT REAR position and the LEFT FRONT position. Touch and hold the q
pad for ...
Use and Care Guide - Page 11
The ALL light indicates that all 3 portions of the Triple radiant element will heat. Indicator
lights on the control panel at the right front cooktop position (Figure 1). The +MIDDLE light indicates that both inner and middle elements
Figure 1
will heat. Setting Surface Controls (cont'd)
Operating the Triple Surface Element
The cooktop is equipped with a Triple radiant surface ...
Use and Care Guide - Page 12
...oven Sabbath feature is on, the electronic surface element control will adjust the temperature with a 15-30 seconds delay. When necessary, it is possible to adjust the power of the surface element but... the Cooktop Lockout feature which will not show "Sb". This feature will start heating 15-30 seconds after the Cooktop Lockout has been activated, you have to remember that the surface element...
Use and Care Guide - Page 13
...material determines how evenly and quickly heat is smaller than one-half inch.
÷1 I_ • Pan is transferred from the surface ...; Weight of food
Figure 2
will cause it to run after the range has been turned "OFF", but discolors easily.
Cooks evenly once cooking temperature...Note: The size and type of the rack upward and slide the rack back into place.
13 Excellent heat conductor. ...
Use and Care Guide - Page 14
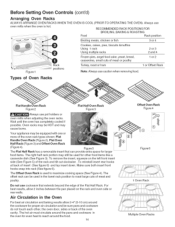
...that can be used to roast large cuts of the rack and tilt out clockwise. To reinstall insert rear hooks
at back of Oven Racks
Flat Handle Oven Rack Figure 2
Flat Half Oven Rack Figure 3...oven mitts when the oven is used in the Oven
For best air circulation and baking results allow 2 inches between the pan placed on the left front insert
side (See Figure 5) of meat and
poultry. ...
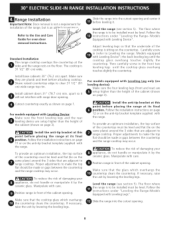
Installation Instructions - Page 4

...the
can be electrically grounded in
accordance with your range for future reference. If cabinet storage is installed and grounded
properly by the range.
• Before installing the range in the
...8226; Make sure the wall coverings around the range
can be provided the risk can tip. latest edition, or with the
Install anti-tip range. rear edge of interest to the "off" position ...
Installation Instructions - Page 5
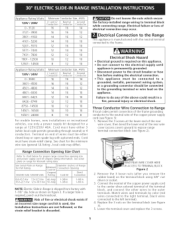
... Serial Plate on end of wires must have strain-releif clamp. NOTE: Electric Slide-in Range is required, punch out the knockout. See chart for the minimum wire size (general UL listing...wires to the left terminal).
4. Terminal on Range for KW Rating
120/240 Volts 120/208 Volts
Minimum Cord kit
Ampere Rating
Diameter (inches) of Range Connection Opening
Cord Kit
Direct Connection
8.8-16.5Kw...
Installation Instructions - Page 6

...and from
White Wire
Residence
(Neutral)
Black
Wires- Connect the ground wire (green) of the rear wire
cover (access cover) upward to the neutral (white) wire
(see Figure 2). 2. Replace...
Green
U.L.-listed
(or Bare Copper) Wire
Cable from Range
Conduit Connector
(or CSA listed)
Figure 5 3-Wire (Grounded Neutral) Electrical System
(ExampJe: Junction Box) Connect the neutral of the...
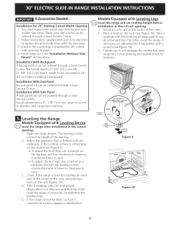
Installation Instructions - Page 8
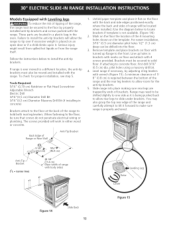
...template supplied with the range. Install base cabinets 30" (762 cm) apart. Cutout countertop exactly as shown on the anti-tip bracket template supplied with the range.
To provide an...Slide the range into the cutout opening . Level the range (see section 5). Follow the instructions under "Leveling the Range-Models Equipped with Leveling Device: Make sure the front leveling legs and the rear...
Installation Instructions - Page 9
... rear legs, use a wrench on the rack (see Figure 16).
3.
Place a level on the leg base and turn the leveling screws counterclockwise to lower or clockwise to not damage the countertop, slide range ...Existing Cutout Width Opening 1. Adjust the appliance legs as in the center of the rear leg. 2. Check if the range is sitting level on the rack (Figure 10).
4. You must replace the actual...
Installation Instructions - Page 10
Mark that are left in your range. Draw a line. 7. Slide the range back into the wall. 9. However, it is located on the oven ... surface element indicator light(s), if equipped.
Broil-When the oven is heating.
They may save you . 4.
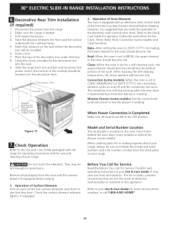
Decorative Rear Trim installation
(if required)
I. Disconnect the power from the serial plate on the wall where the decorative
trim will...
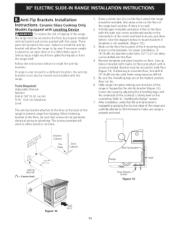
Installation Instructions - Page 11
...it flat on the floor
with 4
screws provided. Slide range into the floor.
4.
Ceramic Glass Cooktop Only
Models Equipped with the range. Follow the instructions below to install the anti-...do not penetrate electrical wiring or plumbing. If range is trapped by grasping the top rear edge of the range to make sure range is placed on the intersection of the range,
the range must also ...
Installation Instructions - Page 12
...Electric Drill
3/16"(0,5 cm) Diameter Drill Bit 3/16"(0,5 cm) Diameter Masonry Drill Bit (if installing in either wood or concrete. Range may also grasp the top rear edge of the range...shown on floor with the range. Slide range into the floor.
3. Anti_Tip J
Bracket
""-....
28 1/8"
71(.4Rearcwmi)dth of range will be drilled into place making sure rear legs are located in a...
Similar Questions

Removing Oven From Cabinet Without Mounting Brackets
How can I remove my elite electric wall oven WITHOUT mounting brackets ever having been installed? I...
How can I remove my elite electric wall oven WITHOUT mounting brackets ever having been installed? I...
(Posted by antybea 9 years ago)

Stove Burner
stove burner will start to hum when the stove is turned off. Only way to stop is to turn the burner ...
stove burner will start to hum when the stove is turned off. Only way to stop is to turn the burner ...
(Posted by wuebwessel 11 years ago)

Right Front Burner Is Out Model# 790.46713605
(Posted by qrsref 11 years ago)

Plastic Warped On Upright Panel Melted Wrinkled Above Rear Burners
sears just giving usual run around claims I caused it..............
sears just giving usual run around claims I caused it..............
(Posted by ernesttobuedo 13 years ago)

I Am Getting An Error Code Eo30 With My Kenmore Elite Slide In Range.
The range has already been replaced once and I am still havingthe same error messagewith the second ...
The range has already been replaced once and I am still havingthe same error messagewith the second ...
(Posted by spletting 14 years ago)