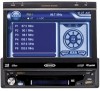
Jensen VM9213 Support Question
Jensen VM9213 Support Question
Find answers below for this question about Jensen VM9213 - Touch Screen MultiMedia Receiver.Need a Jensen VM9213 manual? We have 3 online manuals for this item!
Question posted by Lfagan9861 on November 9th, 2016
Hi I Was Trying To Find The Bypass Code
trying to find the bypass code for videos
Current Answers
Answer #1: Posted by waelsaidani1 on November 9th, 2016 6:57 AM
waelsaidani1

Member since:
May 12th, 2013 Points: 19,501,797

Member since:
May 12th, 2013 Points: 19,501,797
Related Jensen VM9213 Manual Pages
Operation Manual - Page 5
...• Screen Tilt / Angle Adjustment • Beep Tone Confirmation (On-OFF Option) • Heat Management System - Once the navigation module is a violation of the Jensen VM9213 Mobile Multimedia Receiver. Before ...• 44-Key Infrared Remote Control • Composite Video Output for an Additional Screen • Two Audio / Video Auxiliary Inputs for streaming music from shock or fire, ...
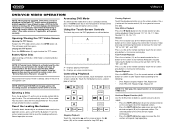
Operation Manual - Page 6
... to adjust the angle of the screen while the red tilt icon is
flashing. With the monitor closed:
• DVD Mode: Press to access the next chapter or track.
7
• TUNER Mode: Press to activate the tilt function. VM9213
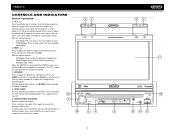
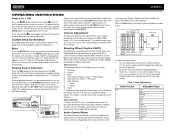
CONTROLS AND INDICATORS
Button Operation
1. TILT / >>|
VM9223
4
3
Multimedia Receiver
2
1
Press to auto-search the next...
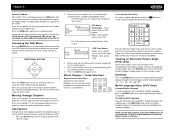
Operation Manual - Page 7
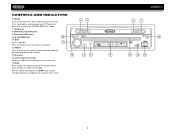
... secondary LCD screen.
4
3
6
8
VM9213
2
1
14
9
13
10 11
3
Secondary LCD Screen
10. RESET...video files.
15. IR Remote Control Receiver
9.
USB Interface Connector
Connect a USB device for playback of three settings: Full, Normal or Standby. Press repeatedly to select playing mode (TFT closed , press the DISP button to access the SOURCE MENU (TFT open).
7. Audio/Video...
Operation Manual - Page 10
VM9213
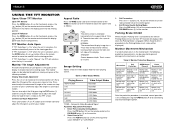
USING THE TFT MONITOR
Open/Close TFT Monitor
Open TFT Monitor Press the OPEN button (4) on the front panel or press the ( )... to "Manual", the TFT will not close when the key is turned on the remote control to adjust the downward tilt angle of the screen one step at a time. Continuous Angle Adjustment
Press and hold to the viewing position. TFT Monitor Auto Open
If "TFT Auto Open" ...
Operation Manual - Page 11
...on the front panel or the SRC button (8) on the touch screen to display the audio menu.
+14 - 0-
Steering Wheel Control (SWC)
The VM9213 is displayed on the LCD. Please refer to the instructions ...and then plug the cable into the main compartment.
EJECT
A/V INPUT
1 Right Audio 2 Left Audio 3 Ground 4 Video
3.5mm Media Cable (included)
Connect the external device to this unit via ...
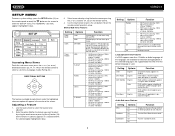
Operation Manual - Page 12
... button (12) located
on the front bottom-rightcorner of the screen or press and hold the AUDIO button (5). System Reset
To correct a system halt or other
[RESET] Button
illegal operation, use the tip of a pen
to "USER" when individual audio functions are adjusted. VM9213
NOTE: The EQ mode will automatically exit after a few seconds...
Operation Manual - Page 13
... selection during certain operations.
VM9213
SETUP MENU
To access system settings, press the SETUP button (31) on
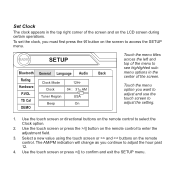
the remote control or touch the button on /off . NOTE: The AM/PM indication will appear in English when the option is displayed in the top right corner of the screen.
Audio Sub-menu Features
Setting
DRC...
Operation Manual - Page 14
...Features
If the rear-view video camera is connected, the ...Screen Calibration" function from viewing restricted disc content. VM9213
Setting
Sub Filter
Options
Function
80Hz 120Hz 160Hz
Selecting a crossover frequency sets a cut-off by choosing the "Demo" option from the SETUP MENU.
Connect the last active mobile phone by touching the CONNECT icon when disconnected. The default code...
Operation Manual - Page 17
... are outlined below. Pausing Playback Touch the play unless the recording session is finalized and the DVD is off. Keep pressing and releasing the button to increase the rate from "2X" to view video." The selected portion of the screen. VM9213
DVD/VCD VIDEO OPERATION
NOTE: When properly installed, DVD video cannot be displayed on the...
Operation Manual - Page 18
...: During VCD playback, press the AUDIO button (5) on the remote control to toggle available angles of the on-screen image. NOTE: When a VCD... again to enlarge and pan through the video image using the touch screen. Viewing an Alternate Picture Angle (DVD Only)
Some...to activate random playback and play the next random track. VM9213
Random Playback With a DVD, VCD, or CD playing, press the RDM button...
Operation Manual - Page 23

...Audiovox Corporation is fully charged before you begin.
• Try to perform pairing within a few minutes of the phone ...VM9213
BLUETOOTH OPERATION
About Bluetooth
Bluetooth is a short-range wireless radio connectivity technology that is made to download a phone book.
Bluetooth operates in use the Bluetooth functions on -screen indicators and touch key areas for sending and receiving...
Operation Manual - Page 24
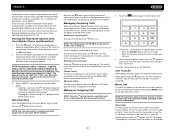
... initiate the pairing process. Call Transfer
While talking, to transfer audio from other modes by touching the MENU button on the BTM10 can be paired (please refer to the phone's instruction manual to learn how to open the direct dial screen.
1
2
3
Exit
4
5
6 Clear
7
8
9
*
0
#
2. VM9213
the telephone source. NOTE: The TALK button on the right...
Operation Manual - Page 25
... Audio Distribution Profile (A2DP) or Audio/Video Remote Control Profile (AVRCP). Functionality varies depending on :
1. The screen will display "Cannot get received record" when the feature is not available.
Touch the button to view the SETUP menu.
2. Touch the
button to view the SETUP menu. 2.
The last dialed number is a limitation of the phone, not the VM9213. Touch...
Quick Reference Guide - Page 1
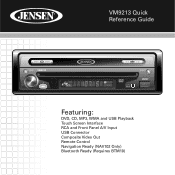
VM9213 Quick Reference Guide
Featuring:
DVD, CD, MP3, WMA and USB Playback Touch Screen Interface RCA and Front Panel A/V Input USB Connector Composite Video Out Remote Control Navigation Ready (NAV102 Only) Bluetooth Ready (Requires BTM10)
Quick Reference Guide - Page 8

... to select the highlighted option. 3. EQ User
0 - R
BASS MID TREB
User
SUB
The "FAD-BAL" portion of the screen to Right.
1.
Touch the screen to be adjusted.
2. Common User Settings
Audio Control Menu
Touch the EQ button on the left side of the screen uses a grid control.
Use the touchscreen, or press the buttons on the...
Quick Reference Guide - Page 9
... using the touch screen or >> and /|| to enter the adjustment field.
3. Use the touch screen or press the >/|| button on the LCD screen during certain operations. To set the clock, you want to adjust and use the touch screen to select the Clock option.
2. RADIO
SETUP
Bluetooth Rating Hardware P.VOL TS Cal DEMO
General Language Audio
Clock Mode...
Quick Reference Guide - Page 14
... language
out of 16 chapters/tracks on -screen control menu
B
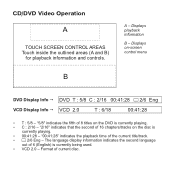
DVD Display Info " DVD T : 5/8 C : 2/16 00:41:28 2/6 Eng
VCD Display Info " VCD 2.0
T : 6/18
00:41:28
ŸT : 5/8 - "2/16" indicates that the second of 6 (English) is currently playing. ŸC : 2/16 - CD/DVD Video Operation
A
TOUCH SCREEN CONTROL AREAS Touch inside the outlined areas (A and B)
for...
Quick Reference Guide - Page 17

... entry screen 15. : Touch to view the SOURCE MENU and select a new playback source 18.
Touch to view the SETUP menu 16. EJECT
Type A USB
A / V
INPUT
Connector
SD to Equalizer level settings 17. Touch for ...SD Card
ŸThe USB port, located on the front of the radio, will read the audio/video files on the USB device automatically.
ŸTo remove the USB device, press the SRC button ...
Quick Reference Guide - Page 19
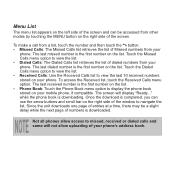
To access the Received list, touch the Received Calls menu option. The screen will not allow access to view the list. Ÿ Dialed ...screen. The last dialed number is the first number on the list. Once the download is downloading. The last missed number is the first number on the list. Touch the Dialed Calls menu option to view the list. Ÿ Received Calls: Use the Received...
Installation Guide - Page 1
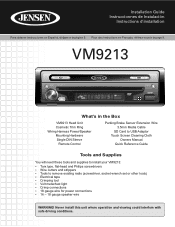
...
Remote Control
Parking Brake Sensor Extension Wire 3.5mm Media Cable
SD Card to USB Adaptor Touch Screen Cleaning Cloth
Owners Manual Quick Reference Guide
Tools and Supplies
You will need these tools and supplies to install your VM9213: Ÿ Torx type, flat-head and Philips screwdrivers Ÿ Wire cutters and strippers Ÿ Tools...
Similar Questions

Jenson Uv 10 Turns On But Blank Screen?
hi I have a jenson uv 10 hooked it up and everything was good to go, a week later it quit working go...
hi I have a jenson uv 10 hooked it up and everything was good to go, a week later it quit working go...
(Posted by Spgxexecution 8 years ago)

Touch Screen
my touch screen seems not to work to be able to set stations or clock it is all lit up and seems all...
my touch screen seems not to work to be able to set stations or clock it is all lit up and seems all...
(Posted by orender4 8 years ago)
The Touch Screen Moniter Has Stopped Working The Player Plays But Not The Screen
(Posted by mustangjason6628409 9 years ago)

My Jensen Is Not Working Properly, The Touch Screen Is Not Functioning
Hello, My Jensen Touch Screen Is Not Functioning And When I Turn On The Car The Radio Is At Full Bla...
Hello, My Jensen Touch Screen Is Not Functioning And When I Turn On The Car The Radio Is At Full Bla...
(Posted by lely279 11 years ago)
