Get support for HP g85XI - Officejet Color Inkjet Printer

HP g85XI Support Question

HP g85XI Support Question

Find answers below for this question about HP g85XI - Officejet Color Inkjet Printer.
Need a HP g85XI manual? We have 4 online manuals for this item!
Question posted by mjanousek on March 5th, 2014

Ink Cartriges

changed ink cartriges, but now they won,t align, the front window on my printer say,s press enter to align cartridges. iv,e done this about 4 times, and the same thing shows up,i even took out the cartridges,and put them in again, same thing happens, WHAT,S WRONG?

Current Answers

Answer #1: Posted by Rotiform662 on March 5th, 2014 11:39 AM
This answer was accepted by the poster of the original question.
Rotiform662

Member since:
March 5th, 2014

Points: 10,110
1,100
points
Performing a Cartridge Alignment or Alignment Fails From the front panel (Macintosh and Windows)
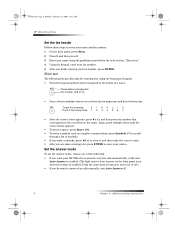
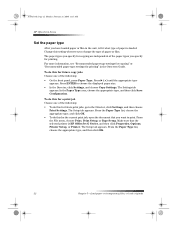
  1. Press MENU or SETUP (depending on the model).
  2. Press the right ARROW repeatedly until the display window reads Maintenance.
  3. Press ENTER.
  4. Press the right ARROW repeatedly until the display window reads Align Print Cartridges.
  5. Press ENTER. The unit will begin the alignment process and the display window will read Printing Alignment Page
  6. Verify that the alignment was successful after the page is complete.
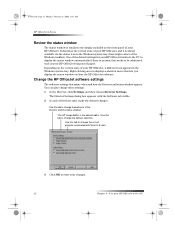
  7. Open the Director Screen in one of the following ways:
From the Director screen (Windows and HP Officejet all-in-one product only)
  • From the desktop, double-click the HP all-in-one product icon.
  • Click Start , click Programs , click HP all-in-one folder, and then click HP Director .
  1. From the Director Screen, click Settings , and then click Maintenance .
  2. Click the Align print cartridges option. A window will appear with information about aligning the print cartridges.
  3. Click Align . The unit will begin the alignment process and the display window will read Printing Alignment Page.
  4. Check the alignment page when it is completed.
  5. If all of the alignment tasks have green checkmarks beside them, click OK to close the alignment window.
  6. Click Start , click Programs , and then click the HP all-in-one product folder.
  7. Click HP Toolbox .
  8. From the HPToolboxPrintServices menu, click Alignthe Print Cartridges . A window will appear with information about aligning the print cartridges.
  9. Click Align . The unit will begin the alignment process and the display window will read Printing Alignment Page
  10. Check the alignment page when it is completed.
  11. If all of the alignment tasks have green checkmarks beside them, click OK to close the alignment window.
From the HP Toolbox (Windows and HP Officejet all-in-one product only)

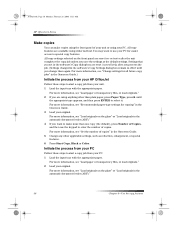
If the alignment fails

If the alignment process fails, the unit will either display the message Alignment Failed, Please Try Again or it will return to the message, Press Enter to Align Cartridges. The alignment process may also terminate prematurely.

Sensor failure

Look into the paper output tray of the unit as the alignment page is printing; a blue light should be visible periodically. If this light is not present, the unit will not be able to align and will require service.

A blank page is ejected immediately

If a blank page ejects immediately without the unit attempting to print, the unit will require service. Other errors that may occur are a Paper Mismatch or a Paper too Narrow error message. A damaged paper-type sensor lens causes this error.

Ink related failures

If a problem exists with the cartridge and ink is not printed on the page, the alignment process will fail.

NOTE: Turn on the power to access the ink cartridges. This allows the carriage to move to the center when the access door is opened. Unplug the power cord before proceeding to the cleaning steps below.

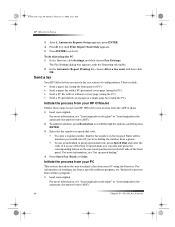
Check the following:

  1. Verify that the cartridge is not out of ink, including all three colors in the tri-color cartridge. The alignment page should look like Figure 1, including the three bands of color (cyan, magenta and yellow) toward the bottom. Another test is making a color copy of a page with various colors and black. Replace the ink cartridge if either the black or the color cartridges are not printing correctly.
  2. If this is a new ink cartridge, verify that the blue tape covering the nozzles has been removed. Do not remove the copper flexible circuit with the electrical contact points. If no tape is present, try reinserting the original cartridge and performing the alignment process before trying the new cartridge again.
  3. If the unit still will not print, remove and reinsert both ink cartridges. Verify that the cartridges are the correct part numbers for this model.

WARNING: To avoid the risk of electrical shock or damage to the unit, unplug the power cord before continuing with the cleaning steps below.

  1. Clean the ink cartridge. The ink cartridge nozzles may be clogged, or the electrical contacts may have something on them that interferes with the electrical connection. If the ink nozzles are clogged, the print may be faded or have white lines. Use the following steps to clean the ink cartridge:
    1. Clean the cartridge with a cotton swab or clean cloth slightly dampened with distilled, filtered, or bottled water. Unfiltered water may contain contaminants that can damage the print cartridges.
    2. Clean the areas on either side of the nozzle plate (Figure 2, call-out 2).
    3. Only clean the nozzle plate (Figure 2, call-out 1) as a last resort to recover the cartridge. Place the damp cotton swab on the very bottom of the ink cartridge over the nozzle plate (the shiny rectangle). Remove any ink or dirt from the bottom of the ink cartridge. Do not touch the nozzle plate with anything other than the cotton swab.
    4. Clean the electrical contacts on the ink cartridge (Figure 2, call-out 3) with a soft clean cloth lightly dampened with distilled, filtered, or bottled water. The ink cartridge ships with a protective coating on the contacts that may need to be removed to restore proper operation.
    5. Inside the HP all-in-one product, clean the contact points inside the print carriage (the cartridge holder) with a soft clean cloth lightly dampened with distilled, filtered, or bottled water. Allow them to dry for at least five minutes before reinserting the cartridge(s) to avoid damaging the HP product.

Figure 2: Cleaning the cartridge

1- The nozzle plate

2- Areas to be cleaned to remove ink or dirt

3- Cartridge electrical contacts

  1. The ink cartridge may be defective; replace the ink cartridge.
  2. If the issue is still unresolved, replace the ink cartridge that was not previously replaced and try again.
The problem still exists after try all the troubleshooting steps

If the print alignment continues to fail, there may be a problem with the unit. This may occur after inserting the wrong ink cartridge. Contact HP technical support for additional assistance.

Supporting Image

You can click the image below to enlarge

Related HP g85XI Manual Pages

HP OfficeJet G Series - (English) User Guide for Macintosh - Page 2

...the Setup Poster. 2 Use only a grounded electrical outlet when connecting the unit to change without the prior written consent of the sockets on the end of the cord, or ...connection with a qualified electrician. 3 Telephone lines can develop hazardous voltages. The OfficeJet G Series includes printer driver technology licensed from fire or electric shock. Hewlett-Packard assumes no one can...
HP OfficeJet G Series - (English) User Guide for Macintosh - Page 6

... steps to set the date and time manually. 1 On the front panel, press Menu. 2 Press 5, and then press 1. 3 After Enter date appears, enter the date and time using the front panel You can access basic fax settings from the front panel. AvMac.book Page 2 Friday, June 23, 2000 10:34 AM HP OfficeJet G Series Install the software To...
HP OfficeJet G Series - (English) User Guide for Macintosh - Page 7

... 3 Friday, June 23, 2000 10:34 AM HP OfficeJet G Series Enter text The following list provides tips for entering text using the front-panel keypad. • Press the keypad numbers that corresponds to see a letter first in uppercase and then in the name. Again, press multiple times until the correct letter appears. • To insert a space...
HP OfficeJet G Series - (English) User Guide for Macintosh - Page 23

...list, choose the appropriate type, and then click Print. Press ENTER to print. From the Paper Type list, choose the ... Office Jet G Series Printer dialog box. • To do this setting whenever you change the type of paper or...Change this for fax jobs 1 In the Director, click Toolbox. 2 In the Toolbox, click Device Configuration. AvMac.book Page 19 Friday, June 23, 2000 10:34 AM HP OfficeJet...
HP OfficeJet G Series - (English) User Guide for Macintosh - Page 24

...photo along the green border, and align the upper-right corner of your...gsm) plain paper or HP Premium Inkjet paper only. For more information, see...load a maximum of 30 originals at a time when using the ADF (fax model only),...a paper jam, do not load colored originals printed on a color laser printer, photos or photo papers, transparency film... 2000 10:34 AM HP OfficeJet G Series Load originals on the...
HP OfficeJet G Series - (English) User Guide for Macintosh - Page 40

... HP OfficeJet G Series All copy settings selected on the front panel are reset two minutes after you process the job. (Settings changed in the software’s Copy Settings dialog box remain in effect until you want to make more than plain paper, press Paper Type, press X (>) until the appropriate type appears, and then press ENTER to...
HP OfficeJet G Series - (English) User Guide for Macintosh - Page 42

Automatic Reports Setup appears, press ENTER. 4 Press X (>) until Print Report Send Only appears. 5 Press ENTER to print a report only if there is a problem ... Press 3, and then press 6. 3 After 1. The All-in-One Device Settings dialog box appears with sending or receiving a fax. AvMac.book Page 38 Friday, June 23, 2000 10:34 AM HP OfficeJet G Series Enable fax confirmation Your HP OfficeJet is...
HP OfficeJet G Series - (English) User Guide for Macintosh - Page 43

...5 Click OK to scroll through the options, and then press ENTER. 3 Enter the fax number or speed-dial code. Initiate the process from your HP OfficeJet Follow these steps to use your changes and close the dialog box. For more information, see &#...• Send a Macintosh-generated cover page as a single-page fax (using the Macintosh). • Send a color paper fax (using the front panel).
HP OfficeJet G Series - (English) User Guide for Macintosh - Page 57

...indicates the current setting. 1. Paper Size 3. Automatic Reports Setup 1. Align Print Cartridges 3. HP OfficeJet Menu 1. Fax Forwarding 4. Automatic Reduction 6. Speed-Dial Setup ENTER 5. Basic F ax Setup ENTER 6. Delete Speed-Dial 4. Fax Header 3. Restore Factory Defaults 4. Color Intensity 6. Group Speed-Dial 3. No Answer Redial 5. Error Correction Mode...
HP OfficeJet G Series - (English) User Guide for Windows - Page 10

Again, press multiple times until the correct letter appears. • To insert a space, press Space (#). • To enter a symbol, such as a hyphen or parenthesis, press Symbols (*) to scroll through a list of a name. AvPrn.book Page 6 Monday, February 28, 2000 11:13 AM HP OfficeJet G Series Set the fax header Follow these steps to enter your name and fax...
HP OfficeJet G Series - (English) User Guide for Windows - Page 11

... Windows taskbar, click Start, point to Programs, choose HP OfficeJet G Series, and then choose Uninstall Software. 2 Follow the directions on the screen. 3 If you would like to Auto Answer is on Ring appears, press X (>) to scroll to the desired number of rings. 4 After the number you want appears, press ENTER. To use these steps to change...
HP OfficeJet G Series - (English) User Guide for Windows - Page 16

... Director Settings dialog box appears, with a PC It describes the current state of your HP OfficeJet, and it is an issue that lets you display the status window or close the HP OfficeJet software. Use this tab to change other settings. 1 In the Director, click Settings, and then choose Director Settings. Use this tab...
HP OfficeJet G Series - (English) User Guide for Windows - Page 26

...is HP OfficeJet G Series, and then click Properties, Options, Printer Setup, or Printer. To do this setting whenever you change the type of the following : • On the front panel, press Paper Type...paper-type settings for the current print job, open the document that the selected printer is loaded. Press ENTER to choose the displayed paper size. • In the Director, click Settings...
HP OfficeJet G Series - (English) User Guide for Windows - Page 27

...color laser printer, photos or photo papers, transparency film, labels, envelopes, or slick-surfaced papers, such as glossy papers. • Using the ADF, you can copy and fax legal-size documents, however you are copying a photo, place the short edge of the photo along the green border, and align...:13 AM HP OfficeJet G Series Load originals on the glass You can load a maximum of 30 originals at...
HP OfficeJet G Series - (English) User Guide for Windows - Page 40

...process the job. (Settings changed in the software’s Copy Settings dialog box remain in effect until the appropriate type appears, and then press ENTER to special copy features....HP OfficeJet G Series Make copies You can make more than plain paper, press Paper Type, press X until you save the settings as reduction, enlargement, or special features. 6 Press Start Copy, Black or Color....
HP OfficeJet G Series - (English) User Guide for Windows - Page 44

... “Set up speed dialing.” 4 Press Start Fax, Black or Color. Automatic Reports Setup appears, press ENTER. 4 Press X (>) until Print Report Send Only appears. 5 Press ENTER to initiate a fax from the ADF or glass. 1 Load your HP OfficeJet to use an individual or group speed-dial code, press Speed Dial and enter the code. For more information, see “...
HP OfficeJet G Series - (English) User Guide for Windows - Page 46

... program’s File menu, choose Print. 3 In the Print dialog box, select HP OfficeJet G Series Fax as the printer, and click Print. 4 In the Send Fax dialog box, enter a name and fax number (or select from the list. Choose the color. 5 Click Send Fax Now. Click here to start faxing. 42 Chapter 9—Use...
HP OfficeJet G Series - (English) User Guide for Windows - Page 57

Press ENTER to Receive 1. Restore Copy Factory Settings 1. Send Fax Later 3. Polling to select the displayed setting. Menu Settings 5. Self-Test Report 6. Group Speed-Dial 3. Print Speed-Dial List 1. Paper Size 5. Align Print Cartridges 3. Set Language and Country ENTER ENTER ENTER ENTER ENTER ENTER ENTER ENTER ENTER Off (default) * On Letter * A4 Legal Off On (default) * ...
HP OfficeJet G85 - (English) Quick Setup Poster for Macintosh - Page 2

.... Press the ENTER key to enable the HP OfficeJet to proceed with your desktop. Click Accept to complete the software installation. Follow the instructions to accept the Software License Agreement. Note: See the Additional Setup Information in your computer. Push the color print cartridge firmly down onto the top of 2 10 Insert color print cartridge a Remove the color...
HP OfficeJet G85 - (English) Quick Setup Poster for Windows - Page 2

... on your CD-ROM drive. Push the color print cartridge firmly down into place. Follow the onscreen instructions to enter your desktop, point to touch only the ...print cartridge firmly e Lower the right print-cartridge down into place. Keypad Display 13 Print an alignment page Make sure paper is complete. The message "Press ENTER to Windows NT 4 Users: The message, "HP OfficeJet ...

Similar Questions

Ask a New Question
Use the box below to post a new question about this HP product .
Points & Prizes
  • You can earn points for nearly everything you do on HelpOwl.com
  • You can trade in those points for gift cards at leading retailers such as Amazon.com and Walmart
  • It's that simple!
See How it Works
Create a Free Account

HP Manuals

Find free HP g85XI - Officejet Color Inkjet Printer manuals and user guides available at ManualOwl.com. Try out our unique manual viewer allowing you to interact with manuals from directly within your browser!

HP Reviews

View thousands of HP user reviews and customer ratings available at ReviewOwl.com.

Contact Information

Complete HP customer service contact information including steps to reach representatives, hours of operation, customer support links and more from ContactHelp.com.

Scoreboard Ratings

See detailed HP customer service rankings, employee comments and much more from our sister site.

HP Recalls

Find comprehensive HP recall information updated hourly on RecallOwl.com.