
Genie PowerLift Support Question
Genie PowerLift Support Question
Find answers below for this question about Genie PowerLift.Need a Genie PowerLift manual? We have 1 online manual for this item!
Current Answers
Related Genie PowerLift Manual Pages
Owner's Manual - Page 1

... 11 Garage Door Opener Installation 12 Accessories 22 Maintenance 25 Troubleshooting 26 Wiring Diagram 29 Warranty information 30
COMPLETE WITH INTELLICODE® REMOTE CONTROL AND SERIES II ELECTRONICS
For 7' 6" Doors.
This Equipment meets or exceeds all Federal, State and UL 325 Safety Requirements. Please call us: 1-800-35-GENIE (354-3643) www.geniecompany.com
Please have Model...
Owner's Manual - Page 2

... Release Allows the garage door to play with an object. This is moving parts. • Operator must be opened or closed manually for emergencies or maintenance.
2
For Help, call your service representative.
2 Do Not install operator on you have any questions or do not understand an instruction, call 1-800-35-GENIE or visit www...
Owner's Manual - Page 3

... DOOR, TORSION SPRINGS SECTIONAL DOOR, EXTENSION SPRINGS
ONE-PIECE DOOR, TRACKLESS
to door mechanism. C Check door type.
Contact a Genie Factory Authorized Dealer
or dealer of garages and garage doors.
This Opener is "lightweight" (made with an automatic Garage Door Balance Detection System. KEEP FEET CLEAR OF DOOR
3' - 4'
Sectional Door
Check Step 2: CHECK GARAGE DOOR...
Owner's Manual - Page 4

... provided). • Transfer your rail is a heavily reinforced section of Travel
4
For Help, call 1-800-35-GENIE or visit www.geniecompany.com
Check Step 4: CHECK DOOR HEADER AREA
NOTE
The header is long
enough to open the garage door. Mark this point on center line. If the ceiling in your mark with Check Step 4.
C Check...
Owner's Manual - Page 5
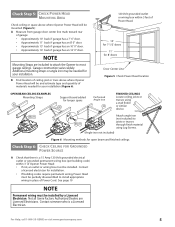
... space above where Opener Power Head will be mounted (Figure 5): A Measure from garage door center line mark toward rear
of garage: • Approximately 10' back if garage has a 7' 6" door. • Approximately 11' back if garage has an 8' 0" door. • Approximately 13' back if garage has an 10' 0" door. • Approximately 14' back if garage has an 12' 0" door.
Contact someone who...
Owner's Manual - Page 6

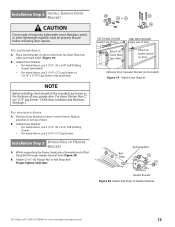
... tools to install a Genie Emergency Release Kit (GER-2). available from garage door (Figure 7). A If you open garage door from the garage door before starting the installation. A If your installation
❐ Safe-T-Beam® Sensor Mounting Bracket Extensions (dealer) ❐ Garage door opener reinforcement bracket (dealer) ❐ Garage door frame reinforcement brackets, screws...
Owner's Manual - Page 9

GARAGE DOOR OPENER ASSEMBLY
Assembly Step C1H: CONNECT RAIL TO POWER HEAD
OPEN BLUE PARTS BAG
A Turn Power Head upside down and place on collar 11B.
Finger-... (Figure11D). C Install Coupler on Retaining Clip
10
Figure 11 Attach Middle Rail Section
For Help, call 1-800-35-GENIE or visit www.geniecompany.com
9 Connect with kit.
11
11A. Slide Collar over them (Figure 11B) and (Figure...
Owner's Manual - Page 12

...
56
1/4"-20 x 3/4" Self-Drilling Screws
Hardware (orange bag)
12
For Help, call 1-800-35-GENIE or visit www.geniecompany.com GARAGE DOOR OPENER INSTALLATION
NOTE
For lightweight garage doors, make sure you have sufficient support.
• If a door spring is in Figure 18. Do Not fasten the Header Bracket to the Header Bracket be used depending on...
Owner's Manual - Page 13
... the Power Head, place threaded end of your garage door. NOTE
Before installing, check length of masonite, lightweight wood, fiberglass, metal, or other lightweight materials must be properly braced before mounting door Opener. For one-piece doors:
A Position Door Bracket on door's center line, as high as possible or on door center line, no
OR
lower than 2", use...
Owner's Manual - Page 15

...Assembly Lever.
D Adjust height of children.
C Attach both Arms together with garage door fully or partially open, garage door may leave Emergency Release Knob within reach of Emergency Release Cord Knob to ...Door Arm
36
33
Curved
34 Door Arm
Figure 23 Assemble Arms (SECTIONAL)
As long as possible
35
32
Curved
36
34 Door Arm
31 Straight Door Arm
33
For Help, call 1-800-35-GENIE...
Owner's Manual - Page 16
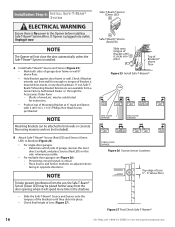
...Figure 25): • Mark both sides of garage door frame or wall 6" above floor
Figure 27 Final Check Safe-T-Beams®
16
For Help, call 1-800-35-GENIE or visit www.geniecompany.com may be substituted for... Brackets can be attached to Brackets (Figure 25): • For single-door garages. -
If Opener is plugged into outlet, Unplug it clicks into place.
• Check final height of the ...
Owner's Manual - Page 18

... allows convenient manual control of garage door. • At least 5' above with Entrapment Warning Label
18
For Help, call 1-800-35-GENIE or visit www.geniecompany.com A Wall Console (Figure 31): • Has a Security Vacation Lock Switch which disables all controls. • LED Indicator shows whether system is in dark. • Controls door Opener from working .
Owner's Manual - Page 20

... Making Force Adjustments
20
For Help, call 1-800-35-GENIE or visit www.geniecompany.com NOTE
• Little effort is disengaged.
• With garage door fully closed )
Carriage (disengaged)
Switch Magnet
Open Limit Switch Switch (door fully open completely, move , check Safe-T-Beam® System.
If door reverses after contacting floor, move Limit Switch toward Power Head...
Owner's Manual - Page 21

... the contact reverse function (Figure 36). D Test Door Opener:
• Run door up and down a few times using Wall Console.
If not, adjust Close Force Control slightly clockwise, open it again.
• Repeat steps above until garage door runs smoothly from resetting. A Open garage door using Wall Console.
• Observe that door stops and reverses within 2 seconds after it
contacts...
Owner's Manual - Page 22
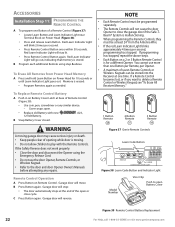
... Keypad, see "To Erase All Receiver Memory." Garage door will reverse.
1 Button Remote
48
2 Button Remote
51
3 Button Remote
49
Figure 37 Genie Remote Controls
Learn Code Button
STATUS
LEARN LEARN INDICATOR LIGHT
Figure 38 Learn Code Button and Indicator Light
Model Number
Visor Clip
Push to the door and door Opener Owner's Manuals
before attempting any similar device. - ACCESSORIES...
Owner's Manual - Page 23

... the door does not move the garage door:
-
Each door opener must be programmed to run, so stay away from the moving , close the door and disconnect it from moving door and its parts. Red LED blinks -
Learn Code Indicator LED turns off . Learn Code Indicator LED stays on next page)
For Help, call 1-800-35-GENIE or...
Owner's Manual - Page 26
...included with the door open. Keep the Remote Control away from children. 3 Always keep the moving door in sight and...GENIE or visit www.geniecompany.com
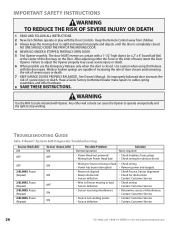
Have a Genie Factory Authorized Dealer make repairs to stop working. Any other wall console can cause the Opener... the rate of door closure and increasing the risk of severe injury or death. 7 KEEP GARAGE DOORS PROPERLY BALANCED. TROUBLESHOOTING...
Owner's Manual - Page 27

... is equipped with an automatic garage door balance detection system.
NOTE: This Opener is located under Limit Switch Brackets. Have a Genie Factory Authorized Dealer check: - Reset Opener - Do not unplug or ...clock to close. The Green LED light will not work •
•
Limit Switches • not working Safe-T-Beam® System. Contact Customer Service for further...
Owner's Manual - Page 28

... the garage door hardware or springs,contact a Genie
Factory...Opener does not run closed
• Check Wires to ensure that Carriage activates Close Limit Switch.
Wall Console Vacation Lock function does not work...Remote Control codes from Remote Control
1. Adjust as needed . • Check garage door for binding.
• Check Open Limit Switch for a short circuit and for remaining remote...
Owner's Manual - Page 29
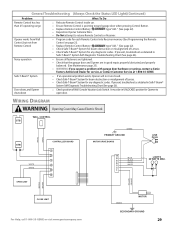
...; WARNING: If you suspect a problem with garage door hardware or springs, contact a Genie Factory Authorized Dealer for any diagnostic codes. YELLOW ORANGE
GREEN
MOTOR
SECONDARY GROUND
29
General Troubleshooting (Always Check the Status LED Light)(Continued)
Problem
What To Do
Remote Control has less than 25' operating range
Opener works from Wall Control, but not from...
Similar Questions

Powerlift Model #wr-77 - Door Arm Assembly
I have a Powerlift Model #WR-77 and need Lower Door Arm Part #20-70533 and more importantly Upper Do...
I have a Powerlift Model #WR-77 and need Lower Door Arm Part #20-70533 and more importantly Upper Do...
(Posted by andrewbstayman 2 years ago)

What Remote Do I Use For Powerlift Garage Door Opener Model Wr77 Serial No.08258
(Posted by tmski87 3 years ago)

Garage Door Opener Not Working
Green light and red light are on the safety"eye" When pushing wall, remote or key pad the screw driv...
Green light and red light are on the safety"eye" When pushing wall, remote or key pad the screw driv...
(Posted by scanty5 9 years ago)

Can I Get A Extension For A Sd9000 Genie Garage Door Opener To Lift A 16x8
(Posted by dlfabes 10 years ago)
Need Owner's Manual For Genie 900 Series Garage Door Opener To Program Remotes.
(Posted by JAmaro 11 years ago)