GE JES1656SJ Support Question
GE JES1656SJ Support Question
Find answers below for this question about GE JES1656SJ - 1.6 cu. Ft. Full-Size Microwave.Need a GE JES1656SJ manual? We have 1 online manual for this item!
Question posted by SCOTCHDC on March 19th, 2012
Will Power Be Cut In Event Door Is Opened During Cooking
The person who posted this question about this GE product did not include a detailed explanation. Please use the "Request More Information" button to the right if more details would help you to answer this question.
Current Answers
Related GE JES1656SJ Manual Pages
Owners Manual - Page 15

... rollers need to scan or scanning with warning *1 Initializing Sleeping with User Utility.
15
∫ Power turn-on sequence
1 Turn on the power of the scanner.
≥ Press the power switch. (The LED will now light.)
2 Turn on the power of the scanner as follows:
LED light Green Green (flashing) Orange Orange (flashing)
Red...
Owners Manual - Page 17

....
3 To flatten the documents, hold firmly
1
and pull them apart as necessary.
2
3
2 Carefully align the documents.
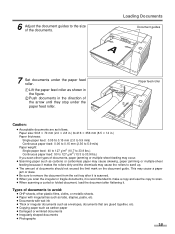
3 Adjust the document guides slightly larger than the actual size of documents to sepa- file folder) will need to scanning, remove, all the edges.
2 Hold both ends and bend the docu- Repeat these steps as...
Owners Manual - Page 18

... mark on the
right. sion tray as shown in the figure on the document guide. Exit stopper
≥ When using paper longer than their acceptable size. Paper feed roller Feed tray
Business card stopper
18 This may cause a paper jam or skew.
Loading Documents
4 When using small...
Owners Manual - Page 19
...to swell up.
≥ The amount of documents should not exceed the limit mark on the document guide.
Paper size: 50.8 k 70 mm (2.0 k 2.8 in.) to 216 k 356 mm (8.5 k 14 in the direction ... under the paper feed roller.
1 Lift the paper feed roller as follows. Types of documents to the size of the documents. Paper feed roller 1
2
Caution:
≥ Acceptable documents are glued together, etc....
Owners Manual - Page 20
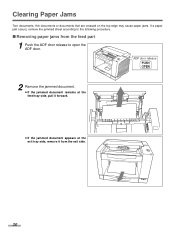
... a paper jam occurs, remove the jammed sheet according to the following procedure.
∫ Removing paper jams from the feed part
1 Push the ADF door release to open the ADF door.
2 Remove the jammed document.
≥ If the jammed document remains at the feed tray side, pull it forward.
≥ If the jammed document...
Owners Manual - Page 21
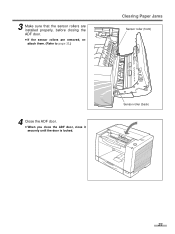
3 Make sure that the sensor rollers are installed properly, before closing the ADF door.
≥ If the sensor rollers are removed, reattach them. (Refer to page 32.)
Clearing Paper Jams
Sensor roller (front)
4 Close the ADF door.
≥ When you close the ADF door, close it securely until the door is locked. Sensor roller (back)
21
Owners Manual - Page 22
... maintain proper
scanning, clean the scanner components frequently.
22 Radiation vent
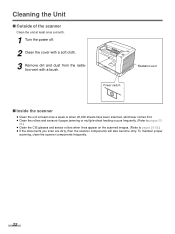
∫ Inside the scanner
≥ Clean the unit at least once a month.
1 Turn the power off.
2 Clean the cover with a soft cloth.
3 Remove dirt and dust from the radiation vent with a brush. Cleaning the Unit
∫ Outside of the scanner...
Owners Manual - Page 23
...Cleaning the Unit
2 Push the ADF door release to open the ADF door.
23
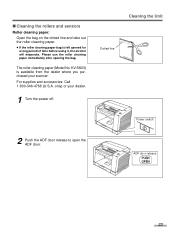
KV-SS03) is left opened for a long period of time ...opening the bag. ∫ Cleaning the rollers and sensors
Roller cleaning paper: Open the bag on the dotted line and take out the roller cleaning paper.
≥ If the roller cleaning paper bag is available from the dealer where you purchased your dealer.
1 Turn the power...
Owners Manual - Page 25
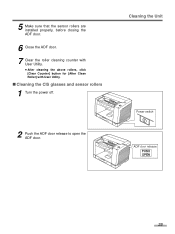
Cleaning the Unit
2 Push the ADF door release to open the ADF door.
25
5 Make sure that the sensor rollers are installed properly, before closing the ADF door.
6 Close the ADF door.
7 Clear the roller cleaning counter with User Utility. ≥ After cleaning the above rollers, click [Clear Counter] button for [After Clean Roller] with User...
Owners Manual - Page 26
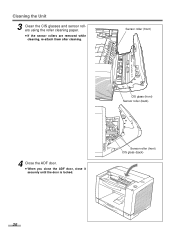
Sensor roller (front) CIS glass (back)
26
Sensor roller (front)
CIS glass (front) Sensor roller (back)
4 Close the ADF door.
≥ When you close the ADF door, close it securely until the door is locked. Cleaning the Unit
3 Clean the CIS glasses and sensor rollers using the roller cleaning paper. ≥ If the sensor rollers are removed while cleaning, re-attach them after cleaning.
Owners Manual - Page 27

Otherwise the levers may break.
27 Replacing Consumables
∫ Replacing the paper feed roller module
1 Turn the power off.
2 Push the ADF door release to open the ADF door.
3 Push the two green levers down at both ends of the paper feed roller module to unlock the paper feed rollers. ≥ When moving the ...
Owners Manual - Page 29
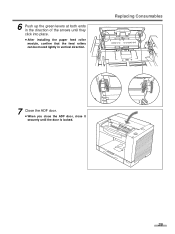
6 Push up the green levers at both ends in the direction of the arrows until the door is locked.
29 Replacing Consumables
7 Close the ADF door.
≥ When you close the ADF door, close it securely until they click into place.
≥ After installing the paper feed roller module, confirm that the feed rollers can be moved lightly in vertical direction.
Owners Manual - Page 30
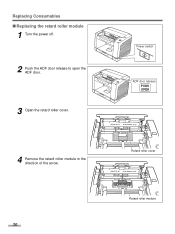
Replacing Consumables ∫ Replacing the retard roller module
1 Turn the power off. 2 Push the ADF door release to open the
ADF door.
3 Open the retard roller cover.
4 Remove the retard roller module in the direction of the arrow.
30
Retard roller cover Retard roller module
Owners Manual - Page 31

... cover. Make sure that both ends of the shaft reach the springs of the holder. Metal holder
7 Close the ADF door.
≥ When you close the ADF door, close it securely until the door is locked.
8 Clear the roller replacing counter with User Utility. ≥ Click [Clear Counter] button for [After Replace Roller...
Owners Manual - Page 32
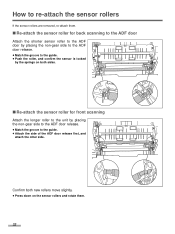
...-attach the sensor roller for back scanning to the ADF door
Attach the shorter sensor roller to the ADF door by placing the non-gear side to the ADF door release.
≥ Match the groove to the guide. ... front scanning
Attach the longer roller to the unit by placing the non-gear side to the ADF door release.
≥ Match the groove to re-attach the sensor rollers
If the sensor rollers are removed...
Owners Manual - Page 33
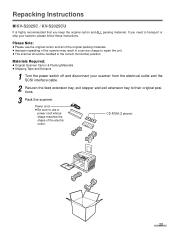
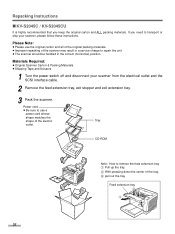
... and exit extension tray to their original positions.
3 Pack the scanner.
If you keep the original carton and ALL packing materials. CD-ROM (2 pieces)
33 Power cord ≥ Be sure to repair the unit. ≥ The scanner should be handled in a service charge to use the original carton and all of...
Owners Manual - Page 34
....
If you keep the original carton and ALL packing materials. Materials Required:
≥ Original Scanner Carton & Packing Materials ≥ Shipping Tape and Scissors
1 Turn the power switch off and disconnect your scanner, please follow these instructions. CD-ROM
Note: How to remove the feed extension tray 1 Pull up the tray. 2 With...
Owners Manual - Page 36
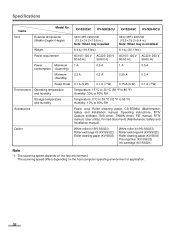
... requirement
AC100-120 V AC220 -240 V AC100-120 V AC220-240 V
50/60 Hz
50/60 Hz
50/60 Hz
50/60 Hz
Power
Maximum 1 A
consumption (Scanning)
0.5 A
1 A
0.5 A
Minimum (Standby)
0.3 A
0.2 A
0.35 A
0.2 A
Sleep mode 0.1 A ... (32 °F to 95 °F) Humidity: 10% to 80% RH
Accessories
Power cord, Roller cleaning paper, CD-ROM(s) (Maintenance, Safety and Installation manual, Operating ...
Owners Manual - Page 37
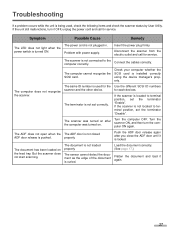
...the scanner is located to the computer correctly.
The ADF does not open when the The ADF door is not closed
ADF door release is not plugged in.
Troubleshooting
If a problem occurs while the ...the scanner and the other device. Push the ADF door release again after the computer was turned on the feed tray.
Insert the power plug firmly.
Disconnect the scanner from the electric ...
Owners Manual - Page 39
...14, 18 Feed tray capacity 35 Free rollers 24
Page
G
Green levers 27
I
Image control 35 Imprinter door pull 14 Interface 35
L
LED 13, 14, 15 Limit mark 18 Loading documents 17
O
Operating temperature and... 13, 14, 24 Paper feed roller module 27 Paper jams 20 Power consumption 36 Power cord 13, 14 Power requirement 36 Power switch 13, 14 Precautions 10
R
Radiation vent 13, 14, 22...
Similar Questions

Model #je1590wh02 Door Open Button Broken
The push button that opens the door doesn't work. How can I open the door? Is there a release somewh...
The push button that opens the door doesn't work. How can I open the door? Is there a release somewh...
(Posted by olisocook 9 years ago)

Cooking Time Difficulties
When I set the program to run for some set time and then start the microwave it will run for a short...
When I set the program to run for some set time and then start the microwave it will run for a short...
(Posted by ray80020 11 years ago)

Door Rusting
GE Model JES1656SJ02 microwave. Bottom inside of door is rusting badly. Steam also stays in patches ...
GE Model JES1656SJ02 microwave. Bottom inside of door is rusting badly. Steam also stays in patches ...
(Posted by deborahpuette 12 years ago)

My Newly Installed Microwave Oven Xl1800 Vent Door Opens And Closes All The Time
(Posted by jshurgala 12 years ago)

Microwave Problem
When the door is closed, the light is on, the turntable rotates, but there is not heat, and the clea...
When the door is closed, the light is on, the turntable rotates, but there is not heat, and the clea...
(Posted by aldenski 14 years ago)