
GE DBSR453EBWW Support Question
GE DBSR453EBWW Support Question
Find answers below for this question about GE DBSR453EBWW.Need a GE DBSR453EBWW manual? We have 2 online manuals for this item!
Question posted by RSchollerJr on January 3rd, 2017
Dryer Squeaks
Dryer squeaks for the first 2-4 seconds when the cycle starts. It sounds like a bearing squeak. It's a DBSR453EB1WW
Current Answers


Related GE DBSR453EBWW Manual Pages
Installation Instructions - Page 1

...Desired Location.
It is your Use
and Care Book for future reference. • Exhausting the dryer to the outdoors.
Connect the Power Supply (see section 3). Connect the External Exhaust (see... above 50ºF for local inspector's use.
• IMPORTANT -
Close supervision of the dryer control system. For side or bottom exhaust, see section 6. METAL DUCT (RECOMMENDED)
4" DUCT...
Installation Instructions - Page 2

...codes and ordinances, or in the absence of local codes, in . GROUNDING INSTRUCTIONS
This dryer must be electrically grounded in accordance with the NATIONAL ELECTRICAL CODE, ANSI/NFPA NO. 70...TO REMOVE ALL OF THE FOAM PIECES AROUND THE LEGS.
2 ELECTRICAL CONNECTION INFORMATION
WARNING -
Dryer must be run with the circuit conductors and connected to a grounded metal, permanent wiring system...
Installation Instructions - Page 3

...One turn . Installation Instructions
1. Turn off the circuit breaker (s) (30 amp) or remove the dryer's circuit fuse at the electrical box.
2. Remove the power cord cover located at least 4 ft.... Reinstall the cover.
WARNING: NEVER LEAVE THE COVER OFF OF THE TERMINAL BLOCK. CONNECTING DRYER USING 3-WIRE CONNECTION
IF REQUIRED, BY LOCAL CODE,
INSTALL EXTERNAL GROUND
(NOT PROVIDED) ...
Installation Instructions - Page 4

...), or into a common duct with a kitchen exhaust.
FOR STRAIGHT LINE INSTALLATION, CONNECT THE DRYER EXHAUST TO THE EXTERNAL EXHAUST HOOD USING DUCT TAPE OR CLAMP.
ELBOW HIGHLY RECOMMENDED
NOTE: ELBOWS...hazard. • Do not obstruct incoming or exhausted air. LEVEL FRONT-TO-BACK. THIS DRYER COMES READY FOR REAR EXHAUSTING. NOTE: WE STRONGLY RECOMMEND SOLID METAL EXHAUST DUCTING. STANDARD ...
Installation Instructions - Page 5

...then flexible all-metal ducting can be used as transition venting between the dryer and wall connection only. DO
ELBOW HIGHLY RECOMMENDED
NOTE: EXHAUSTING TO THE OUTDOORS ...In special installations when it will affect dry time. If the closet contains both a washer and a dryer, doors must contain a minimum of this ducting will reduce the maximum recommended duct length.
If fl...
Installation Instructions - Page 6

...tab in place through the tab on the joint between the dryer internal duct and the elbow. CAUTION: Be sure not to the dryer internal duct. Lift the tab to secure the duct in ... TO WEAR GLOVES
ADDING NEW DUCT
FIXING HOLE
PORTION "A"
REMOVE SCREW AND SAVE.
Installation Instructions
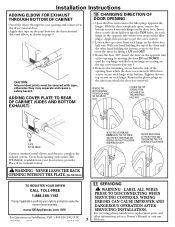
9 DRYER EXHAUST TO RIGHT, LEFT OR BOTTOM CABINET
WARNING - PROTECT YOUR HANDS AND ARMS FROM SHARP EDGES...
Installation Instructions - Page 7
... holding the bottom, remove the door from your local service provider.
TO REGISTER YOUR DRYER
CALL TOLL-FREE 1-888-269-1192
Prompt registration confirms your warranty. Insert these screws secure...). Apply firm pressure to protection under the terms of your right to get the screw started.
2. Insert the door on page 6. Installation Instructions
ADDING ELBOW FOR EXHAUST THROUGH BOTTOM OF...
Owners Manual - Page 1
...
ge.com
Safety Instructions 2-4
Operating Instructions
Control Panel 5, 6 Control Settings 7 Features 8 Loading and Using the Dryer 10 Reversing the Door 9 Venting the Dryer 11
Troubleshooting Tips . . . 12, 13
Consumer Support
Consumer Support . . . . . Back Cover Warranty 15
Owner's Manual
DBLR333 DBSR453 DBXR300 DBXR463 DHDSR45 DHDSR46 DJXR433 DLLSR33 DLSR483 DRSR483 ...
Owners Manual - Page 2

...IT COLLAPSES OR BECOMES OTHERWISE RESTRICTED IN USE OR DURING INSTALLATION.
I Properly ground dryer to these substances, namely benzene, carbon monoxide, formaldehyde and soot, caused primarily by... outside . 2 Use only rigid metal 4″ diameter ductwork
inside the dryer cabinet. Exhaust/Ducting
1 Gas dryers MUST be properly installed and located in the vicinity of potential exposure to...
Owners Manual - Page 3

... PAUSE does NOT disconnect the appliance from the remaining particles that have been cleaned in, washed in, soaked in your dryer. NOTE: Turning the Cycle Selector knob to avoid injury.
Observe all laundry aids (such as detergents, bleaches, etc.) out of the reach of combustible materials, (lint, paper, rags, etc.), gasoline, chemicals and...
Owners Manual - Page 4

.... I The interior of this appliance.
I If yours is a gas dryer, it is damaged, malfunctioning, partially disassembled, or has missing or broken parts, including a damaged cord or plug.
WARNING!
Service or performance problems caused by use either a fabric softener in the wash cycle, according to the manufacturer's instructions for those products and are...
Owners Manual - Page 5

... the type of heat used (Electric, Natural or LP gas), size of load, types of fabrics, wetness of clothes and condition of the dryer behind the door.
About the dryer control panel.
Model DVLR223
3
Model DX2300
AUTOMATIC REGULAR HEAT
2
MEDIUM HEAT
AUTOMATIC REGULAR HEAT
3
2
Models DS4500, DBSR453, DBXR463, DHDSR45 and DBXR300
Optional...
Owners Manual - Page 6

...2
Models DJXR433, DRSR483, DWSR483, DWXR483, DLSR483, DQSR483 and DZSR483
Optional features
(on the front of exhaust ducts.
6
About the dryer control panel. You can locate your model. Throughout this manual, features and appearance may vary from your model number on the label on...or LP gas), size of load, types of fabrics, wetness of clothes and condition of the dryer behind the door.
Owners Manual - Page 7

... area that are clean and dry or that has the same color as the FABRIC CARE setting you use the dryer.
Example: Drying a load of no heat tumbling.
3 Start-Close the dryer door. Timed cycles run for this load it would be the EASY CARE AUTOMATIC.
Opening the door during operation will stop the...
Owners Manual - Page 8

... some models, the signal sound level cannot be removed so wrinkles won 't set in a GE dryer. It provides approximately 15 minutes of no -heat tumbling after the clothes are other clothes in clothes.
On some models)
At the end of each cycle there is time to remove the laundry. Hook the rack over the...
Owners Manual - Page 9

...door and remove the filler plugs opposite the hinges. Insert these screws, secure each hinge on the dryer face half way. Tighten the two top screws of the opening by moving the door IN and ... removed. Apply firm pressure to get the screw started in step 1.
4 Remove the remaining screws from the side of each hinge, on the dryer face. With these screws about half way into the...
Owners Manual - Page 10

...-abrasive cleaner suitable for use .
WASH LABELS
Machine wash cycle
Normal Permanent Press/ wrinkle resistant
Gentle/ delicate
Hand wash ...from the outside that there is not covered by some laundry pretreatment soil and stain remover products.
Damage to prevent...
Fabric Care Labels
Below are sorted properly for the dryer.
Do not dry the following items: fiberglass items,...
Owners Manual - Page 11

... Installation Instructions. I Venting must conform to the below specifications. I Do not crush or collapse.
Safety Instructions
Operating Instructions
ge.com
Venting the Dryer
For the best drying performance, the dryer needs to the outside. Use only rigid metal or flexible metal 4″ diameter ductwork for exhausting to be properly vented. I Use the...
Owners Manual - Page 12

...Dryer doesn't start
Dryer doesn't heat
Dryer shakes or makes noise Greasy spots on clothes
Lint on clothes
Static occurs
Inconsistent drying times
Possible Causes Dryer is unplugged
Fuse is blown/circuit breaker is tripped
What To Do
• Make sure the dryer... washing procedures before laundering clothes. NOTE: Most electric dryers use in accordance with clean ones
Clothes were not ...
Owners Manual - Page 13

...to ensure proper tumbling. Overdrying
Letting items sit in dryer after drying. • If you are concerned about shrinkage in the dryer
• To avoid shrinkage, follow garment care labels ...DRY or DAMP DRY setting.
•Remove items when cycle ends and fold or hang immediately.
• Separate large loads into shape after cycle ends Overloading
• Select a shorter drying time. &#...
Similar Questions

Dryer Keeps Cutting Off Mid Cycle While Drying Clothes
(Posted by Mccoyurundi 1 year ago)

Time Panel Light Doesn't Illuminate And Dryer Won't Run.
first my dryer stopped running. I press the start button and I hear a click. My timer light didn't i...
first my dryer stopped running. I press the start button and I hear a click. My timer light didn't i...
(Posted by bmcsw2003ret 3 years ago)

Heating Element???
Heating element gets red but only heats half and wont dry clothes, what needs to be replaced?
Heating element gets red but only heats half and wont dry clothes, what needs to be replaced?
(Posted by amyclements 7 years ago)

I Turn The Dryer On Than In Like Five Seconds It Turns Off.
Thats it i turn it on count to five and the whole thing shuts down...
Thats it i turn it on count to five and the whole thing shuts down...
(Posted by michaelmatney64 9 years ago)

Dryer Squeaks While Running, Could It Be The Drum Slides, How Do You Repair
(Posted by dbrennen5 10 years ago)