GE GTD65EBSJWS Support Question
GE GTD65EBSJWS Support Question
Find answers below for this question about GE GTD65EBSJWS.Need a GE GTD65EBSJWS manual? We have 3 online manuals for this item!
Question posted by bmcsw2003ret on October 27th, 2020
Time Panel Light Doesn't Illuminate And Dryer Won't Run.
first my dryer stopped running. I press the start button and I hear a click. My timer light didn't illuminate. I changed out the control board as recommended by get. After changing it out it did the same thing. I then noticed that the drum band was broken. I then replaced it and reassembled the dryer. All my lights work except for the time selector light and when I press start I get "door" scrolling in the screen. I am lost. Please HELP. Thank you, Chuck.
Current Answers
Answer #1: Posted by Odin on October 28th, 2020 9:03 AM
Odin

Member since:
April 10th, 2010 Points: 41,236,680

Member since:
April 10th, 2010 Points: 41,236,680
See https://homeguides.sfgate.com/troubleshooting-ge-frontloader-dryer-80078.html. To replace the switch...
If you can't get the part from the company use the contact information at https://www.contacthelp.com/general%20electric/customer-service], you may be able to obtain the part number. Then, even without the part number,
If you can't get the part from the company use the contact information at https://www.contacthelp.com/general%20electric/customer-service], you may be able to obtain the part number. Then, even without the part number,
- Try https://encompass.com/ or https://www.diyspareparts.com/.
- Try the other online sources linked at https://ishort.ink/8cu4.
- Contact local parts dealers and used appliance dealers, who might be able to supply or maybe fix the part
- Use a search engine like Google's or Bing
- Try http://www.searchtempest.com/, which displays global listings from eBay, Craigslist, and other sources*
*(For option 5, you may want to use a free tracking program like https://www.followthatpage.com/ to save you from having to repeat your search over time.)
Hope this is useful. Please don't forget to click the Accept This Answer button if you do accept it. My aim is to provide reliable helpful answers, not just a lot of them. See https://www.helpowl.com/profile/Odin.
Related GE GTD65EBSJWS Manual Pages
Use and Care Manual - Page 1
...
Serial
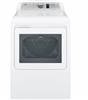
You can find them on a label on the front of the dryer behind the door.
234D2431P001
49-90536-1 04-15 GE Printed in Mexico Dryers
GEAppliances.com
Safety Instructions 2-3 Operating Instructions . . 4-11
Control Panels 5-7 Dryer Features 8 Loading and Using the Dryer. . . . . 10 Venting the Dryer 11
Troubleshooting Tips . . . 12, 13 Consumer Support
Consumer Support 16 Warranty...
Use and Care Manual - Page 2
...dryer
interior. DO NOT operate the dryer without the lint filter in death or serious injury. Pressing the Power or Start/Pause button...controls, repair or replace any part of lint, dust and dirt. Items contaminated with cooking oils may contribute to persons when using your dryer...fabric softeners or products to eliminate static unless recommended by qualified service personnel.
„ Unplug ...
Use and Care Manual - Page 3
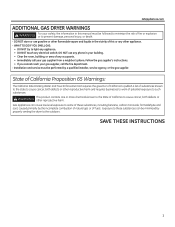
GEAppliances.com
ADDITIONAL GAS DRYER WARNINGS
WARNING
For your safety, the information in the vicinity of this manual must be minimized... low-level exposure to some of these substances, including benzene, carbon monoxide, formaldehyde and soot, caused primarily by properly venting the dryer to the State of natural gas or LP fuels. WHAT TO DO IF YOU SMELL GAS: ‡ '2127WU\WROLJKW...
Use and Care Manual - Page 5
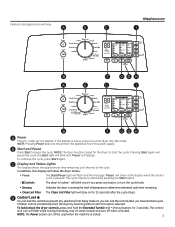
... cannot accidentally start the cycle. If the display is active, press to prevent any button or turn off when unlocked.
D Control Lock
You can lock the controls after the cycle stops. C Display and Status Lights
The display shows the approximate time remaining until the end of dampness to start the dryer by pressing the Start button.
‡ Controls
The dryer is paused...
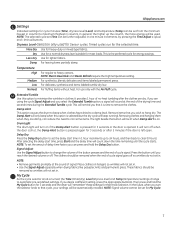
Use and Care Manual - Page 6
Important - Steam Refresh is pressed, cycle settings change when eDry is used if the previous cycle left in the Steam Refresh cycle to achieve optimum results. Sanitize or Anti-Bacterial
(depending on . Cottons For cottons and most towels and linens.
When the eDry button is recommended for 3-5 garments
NOTE: Steam cycles are not intended for...
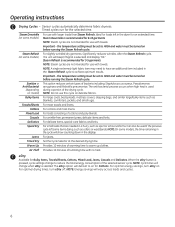
Use and Care Manual - Page 7
... change to remove the clothes. Press the button until the cycle starts. The clothes should be
removed so wrinkles will remind you wish to that you that Knob Selection. If you reach the desired volume or off so wrinkles do not set default settings. Timed cycles run for most loads.
H Extended Tumble Use this option is...
Use and Care Manual - Page 8
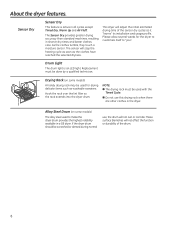
...tumble, they touch a moisture sensor. The sensor will not rust or corrode. Drum Light
The drum light is active in a GE dryer. Drying Rack (on some models)
A handy drying rack may be done by a...lint filter so the rack extends into the dryer drum.
NOTE: „ The drying rack must be used with the
Timed Cycle.
„ Do not use , the drum will stop the heating cycle as soon as it "learns...
Use and Care Manual - Page 10
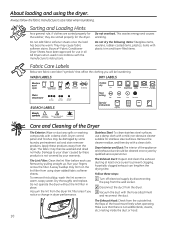
...Dryer control panel and finishes may then be damaged by...laundry pretreatment soil and stain remover products.
They may form on the lint filter from the dryer...Normal Permanent Press/ wrinkle ...time. Sorting and Loading Hints
As a general rule, if clothes are sorted properly for the washer, they are fabric care label "symbols" that affect the clothing you notice a change in all GE Dryers...
Use and Care Manual - Page 12
....
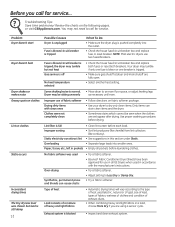
Problem Dryer doesn't start
Dryer doesn't heat
Dryer shakes or...dryers use in all GE Dryers when used in accordance with the manufacturer's instructions.
‡ 7U\DIDEULFVRIWHQHU
‡ $GMXVWVHWWLQJWRLess Dry or Damp Dry.
‡ 7U\DIDEULFVRIWHQHU
Type of heat
Load consists of a mixture of heavy and light...occurs
Inconsistent drying times The Dry dryness level was ...
Use and Care Manual - Page 13

... senses that the body of heavy fabrics (like beach towels)
Controls improperly set Lint filter is full Improper or obstructed ducting ...
Over-drying
Letting items sit in dryer after steam cycle
the cycle time.
GEAppliances.com
Problem Clothes take too long to... lighting conditions.
13 Clothes are operating.
‡'RQRWSXWPRUHWKDQRQHZDVKHUORDGLQWKHGU\HUDW a time...
Use and Care Manual - Page 14
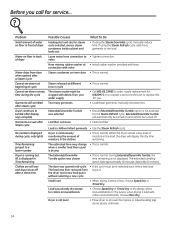
... at any time during cycle, only lights
Time Remaining jumped to a lower number Dryer is running but 00 is displayed in cycle
The steam nozzle might be turned off after a short time
Possible Causes
...
Small load
‡ :KHQGU\LQJLWHPVRUOHVVFKRRVHSpeed Dry or Timed Dry. The estimated time may change ‡ 7KLVLVQRUPDO when a smaller load than usual is drying
The ...
Use and Care Manual - Page 15
...LQWKH2ZQHU·V0DQXDO
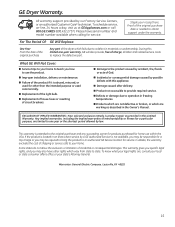
(;&/86,212),03/,(':$55$17,(6³ GE Dryer Warranty. Proof of the dryer which fails due to operation in materials or workmanship. For The Period Of:...; )DLOXUHRIWKHSURGXFWLILWLVDEXVHGPLVXVHGRU used commercially.
„ Replacement of the light bulb.
„ Replacement of house fuses or resetting of circuit breakers.
„ 'DPDJHWRWKHSURGXFW...
Installation Instructions - Page 2

...10.8 cm)
4 5/8" (11.7 cm)
STEAM WATER HOSES:
GE strongly recommends the use of the foam pieces around the legs.
Hoses degrade over time and need to be replaced every 5 years to meet GE specifications. Parts ...them away from the dryer legs. Select the power cord to remove all of factory specified parts. Installation Instructions
UNPACKING YOUR DRYER
Tilt the dryer sideways and remove the ...
Installation Instructions - Page 4
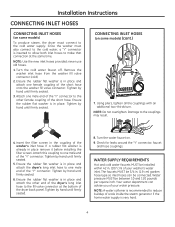
...within 42 in . (1.9 cm) garden hose-type so inlet hoses can advise you of the dryer back panel.
Your water department can be 3/4 in . (107 cm) of scale inside the steam generator ... this coupling to the fill valve connector at the same time. Tighten by hand until firmly seated.
3. Ensure the rubber flat washer is recommended to the couplings may result.
4. NOTE: Use the ...
Installation Instructions - Page 9
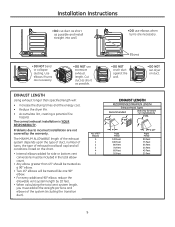
...run installations
4" DIA.
4" DIA.
4" DIA.
Cut duct as short as possible and install straight into wall.
• DO use excessive exhaust length. Problems due to incorrect installation are necessary.
• DO NOT use elbows when turns are necessary. Elbows
• DO NOT bend or collapse ducting. EXHAUST LENGTH
RECOMMENDED...times and the energy cost.
• Reduce the dryer...
Installation Instructions - Page 12
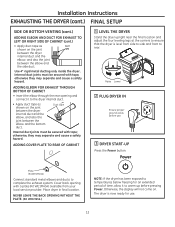
...the dryer has been exposed to temperatures below freezing for use .
3 DRYER START-UP
Press the Power button. ...DRYER IN
Ensure proper ground exists before pressing Power.
ADDING COVER PLATE TO REAR OF CABINET
1 LEVEL THE DRYER
Stand the dryer upright near the final location and adjust the four leveling legs at the corners to ensure that the dryer is now ready for an extended period of time...
Installation Instructions - Page 13
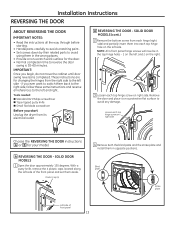
...panel...located along the left side of front panel
13 Plastic Cap (4)
4 Remove both...THE DOOR instructions A or B for changing the hinges from its electrical outlet
A...the instructions all the way through before starting.
• Handle parts carefully to ... Small flat blade screwdriver
Before you start
Unplug the dryer from the right side to reverse the...panel and set them in the wrong places....
Installation Instructions - Page 14
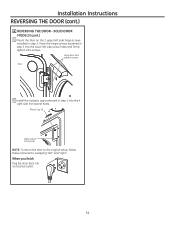
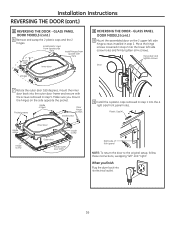
When you finish
Plug the dryer back into the lower left side screw holes and firmly tighten all 4 screws.
Plastic Cap (4)
Right side of front panel
NOTE: To return the door to the ...upper left " and "right". Move the hinge screws loosened in step 1 into the 4
right side front panel holes. Hang door and tighten screws Door
6 Install the 4 plastic caps removed in step 3 into its electrical...
Installation Instructions - Page 16
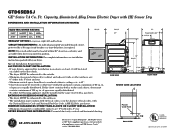
Make sure you finish
Plug the dryer back into its electrical outlet.
16
Plastic Cap (4)
Right side of front panel
NOTE: To return the door to the original setup, ...hinges on the 2 upper left side
hinge screws installed in step 2 into the 4
right side front panel holes. GLASS PANEL DOOR MODELS (cont.)
8 Mount the assembled door on the side opposite the pocket. Pocket screws
Inside...
Quick Specs - Page 1
... surfaces are : 0" both a washer equally distributed. a minimum of local codes, with your dryer. Bathroom or Bedroom Installation:
- The dryer MUST be installed in the absence of 120 sq. sDryers 5
Power Cord Hole
4-1/2
BBAaCcKkvVieieww
Listed by a 30-amp circuit breaker or a time-delay fuse, is 52".
- C loset doors must contain a5m.7incimuu.
GTD65EBSJ
Ge...
Similar Questions

Just Bought A Ge Gfds170ghww Gas Dryer. Drum Not Running
Just bought a GE GFDS170GHWW gas dryer. Plug into 120V outlet(manual said 120v). Push the power butt...
Just bought a GE GFDS170GHWW gas dryer. Plug into 120V outlet(manual said 120v). Push the power butt...
(Posted by tomzhou 8 years ago)

Dryer Doesn't Run
Dryer sound like it is running but the barrel is not turning?
Dryer sound like it is running but the barrel is not turning?
(Posted by Sanderson105 8 years ago)

No Power Is Coming To The Control Board, Power Line To Dryer Is Ok
(Posted by danama022 9 years ago)

Dryer Squeaks While Running, Could It Be The Drum Slides, How Do You Repair
(Posted by dbrennen5 10 years ago)
Ge Dsk333e Dryer Won't Run Though When The Start Button Is Pushed It Buzzes
The unit is getting power and the start button works. No wires appear to disconnected inside the uni...
The unit is getting power and the start button works. No wires appear to disconnected inside the uni...
(Posted by dmsearles 12 years ago)