Get support for Gateway NV-53A

Gateway NV-53A Support Question

Gateway NV-53A Support Question

Find answers below for this question about Gateway NV-53A.
Need a Gateway NV-53A manual? We have 9 online manuals for this item!
Question posted by lunSolong on February 7th, 2014

How To Replace Keyboard On Nv53a

The person who posted this question about this Gateway product did not include a detailed explanation. Please use the "Request More Information" button to the right if more details would help you to answer this question.

Current Answers

Answer #1: Posted by freginold on May 6th, 2014 3:54 AM
freginold

Member since:
December 20th, 2011

Points: 23,253,885
100
points
You can find instructions on taking the laptop apart starting on page 43 of the service guide. (Keyboard removal instructions start on page 62.) If you need the service guide, you can download it here:

http://tim.id.au/laptops/gateway/gateway%20nv53.pdf

Related Gateway NV-53A Manual Pages

Gateway Quick Start Guide for Windows 7 - Page 11

...type recommended by the manufacturer. Expansion Ports USB (Universal Serial Bus) - ExpressCard - Replacing Batteries Battery packs can be detected and installed automatically. Contact your computer (for example,...modem from the telephone line, the TV port from the computer (for example: keyboard, printer, scanner). USB ports allow you disconnect all national laws and regulations. ...
Gateway Quick Start Guide for Windows 7 - Page 53

... law states that used electrical and electronic products must be eliminated with screws being replaced by clips. Dispose of separately from household waste. This label allows a quick recognition... removed any product, to limit the environmental impact of all regulations. As far as keyboard, mouse, speakers, remote control, etc. Your efforts will enable the safe collection, ...
Gateway Quick Start Guide for Windows 7 - Page 55

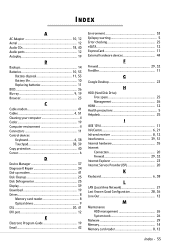
...ports 12 Autoplay 19 B Backups 14 Batteries 10, 53 Battery disposal 11, 53 Battery life 10 Replacing batteries 11 BIOS 36 Blu-ray 9, 19 Browser 23 C Cable modem 41 Cables 4, 51 ...hardware 35 Internet Connection 20 Firewall 29, 32 Internet Explorer 23 Internet Service Provider (ISP 20 K Keyboard 6, 38 L LAN (Local Area Network 21 Last Known Good Configuration 28, 36 Line-Out 12 ...
Service Guide - Page 4

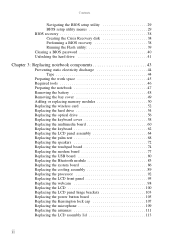
... Adding or replacing memory modules 50 Replacing the wireless card 52 Replacing the hard drive 54 Replacing the optical drive 56 Replacing the keyboard cover 58 Replacing the multimedia board 60 Replacing the keyboard 62 Replacing the LCD panel assembly 64 Replacing the palm rest 68 Replacing the speakers 72 Replacing the touchpad board 74 Replacing the modem board 77 Replacing the USB...
Service Guide - Page 5

... 129 LCD 129 Power 129 Memory 130 Sound 130 Power management 130 Devices 131 Keyboard and touchpad 131 Intermittent problems 132 Undetermined problems 133 Chapter 5: Connector locations 135 ...System board layout 136 Top view 136 Bottom view 137 Chapter 6: FRU (Field-Replaceable Unit) list 139 Introduction 140 Exploded diagram 140 FRU list 142 Appendix A: Test compatible ...
Service Guide - Page 49

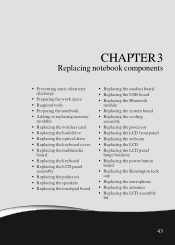
...hard drive • Replacing the optical drive • Replacing the keyboard cover • Replacing the multimedia board • Replacing the keyboardReplacing the LCD panel assembly • Replacing the palm rest • Replacing the speakers • Replacing the touchpad board • Replacing the modem board • Replacing the USB board • Replacing the Bluetooth module...
Service Guide - Page 64

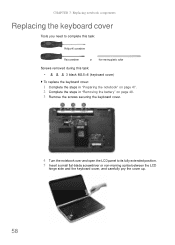
... you need to complete this task: Phillips #0 screwdriver Flat screwdriver or Non-marring plastic scribe Screws removed during this task: • 3 black M2.5×6 (keyboard cover) To replace the keyboard cover: 1 Complete the steps in "Preparing the notebook" on page 47. 2 Complete the steps in "Removing the battery" on page 48. 3 Remove the...
Service Guide - Page 65

.... 9 Insert the multimedia cable to lock the cable in place. 10 Insert the tabs on the front side of the keyboard cover into the slots located on the top corners of the "Replacing the multimedia board" procedure on page 60. 8 Secure the multimedia board, with the connector facing up . 13 Secure the...
Service Guide - Page 66

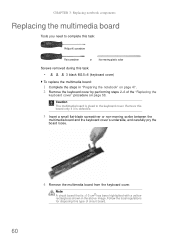
... glued to complete this task: Phillips #0 screwdriver Flat screwdriver or Non-marring plastic scribe Screws removed during this type of the "Replacing the keyboard cover" procedure on page 47. 2 Remove the keyboard cover by performing steps 2-6 of circuit board. 60 Remove this board only if it is >10 cm2 has been highlighted with...
Service Guide - Page 67

... the cover until it clicks in place. 7 Insert the tabs on the front side of the keyboard cover into the slots located on the top corners of the "Replacing the keyboard cover" procedure on page 58. The keyboard cover is correctly mounted when you can run you finger along the sides of the cover...
Service Guide - Page 68

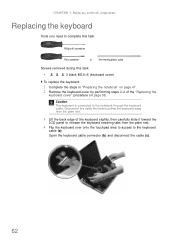
... Non-marring plastic scribe Screws removed during this cable first before pulling the keyboard away from the palm rest. 3 Lift the back edge of the "Replacing the keyboard cover" procedure on page 47. 2 Remove the keyboard cover by performing steps 2-6 of the keyboard slightly, then carefully slide it toward the LCD panel to release the...
Service Guide - Page 69

....com 5 Insert the retaining tabs of the new keyboard into the slots located on the top side of the "Replacing the keyboard cover" procedure on page 58. 9 Reinstall the battery. 63 Important The keyboard cable is correctly oriented if it is not twisted. 7 Gently press the keyboard down until it is flat all the way...
Service Guide - Page 70

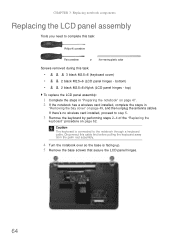
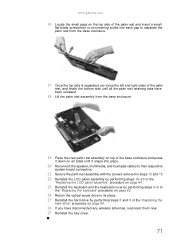
... from the palm rest assembly. 4 Turn the notebook over so the base is connected to the notebook through a keyboard cable. bottom) • 2 black M2.5×6+Nylok (LCD panel hinges - top) To replace the LCD panel assembly: 1 Complete the steps in "Preparing the notebook" on page 47. 2 If the notebook has a wireless card...
Service Guide - Page 73

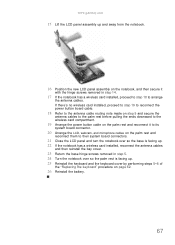
www.gateway.com 15 Lift the LCD panel assembly up . 25 Reinstall the keyboard and the keyboard cover by performing steps 5-8 of the "Replacing the keyboard" procedure on the palm rest and reconnect them to arrange the antenna cables. If there's no wireless card installed, proceed to step 19 to reconnect ...
Service Guide - Page 74

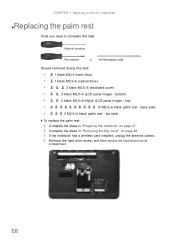
... components Replacing the palm rest Tools you need to complete this task: Phillips #0 screwdriver Flat screwdriver or Non-marring plastic scribe Screws removed during this task: • 1 black M2×5 (hard drive) • 1 black M2.5×6 (optical drive) • 3 black M2.5×6 (keyboard cover) • 2 black M2.5×6 (LCD panel hinges - base...
Service Guide - Page 75

... 5 Remove the optical drive screw. 6 Remove the keyboard cover by performing steps 2-6 of the "Replacing the keyboard cover" procedure on page 58. 7 Remove the keyboard by performing steps 3 and 4 of the "Replacing the keyboard" procedure on page 62. 8 Remove the LCD panel assembly by performing steps 5-15 of the "Replacing the LCD panel assembly" procedure on page...
Service Guide - Page 77

... and 15. 22 Reinstall the LCD panel assembly by performing steps 16-23 of the "Replacing the LCD panel assembly" procedure on page 64. 23 Reinstall the keyboard and the keyboard cover by performing steps 5-8 of the "Replacing the keyboard" procedure on page 62. 24 Return the optical screw drive in its place. 25 Reinstall...
Service Guide - Page 78

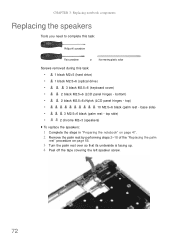
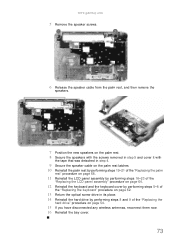
..." on page 47. 2 Remove the palm rest by performing steps 2-18 of the "Replacing the palm rest" procedure on page 68. 3 Turn the palm rest over so that ...speaker screw. 72 base side) • 3 M2.5×6 black (palm rest - CHAPTER 3: Replacing notebook components Replacing the speakers Tools you need to complete this task: Phillips #0 screwdriver Flat screwdriver or Non-marring plastic...
Service Guide - Page 79

... page 68. 11 Reinstall the LCD panel assembly by performing steps 16-23 of the "Replacing the LCD panel assembly" procedure on page 64. 12 Reinstall the keyboard and the keyboard cover by performing steps 5-8 of the "Replacing the keyboard" procedure on page 62. 13 Return the optical screw drive in its place. 14 Reinstall...
Service Guide - Page 80

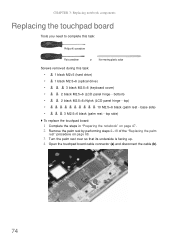
... components Replacing the touchpad board Tools you need to complete this task: Phillips #0 screwdriver Flat screwdriver or Non-marring plastic scribe Screws removed during this task: • 1 black M2×5 (hard drive) • 1 black M2.5×6 (optical drive) • 3 black M2.5×6 (keyboard cover) • 2 black M2.5×6 (LCD panel hinge - base...

Similar Questions

I Need Instructions On How To Remove/replace Keyboard Gateway Nv77h18u
Some keys are working intermittently and I want to replace the keyboard and cant find correct instru...
(Posted by makir1 10 years ago)
Ask a New Question
Use the box below to post a new question about this Gateway product .
Points & Prizes
  • You can earn points for nearly everything you do on HelpOwl.com
  • You can trade in those points for gift cards at leading retailers such as Amazon.com and Walmart
  • It's that simple!
See How it Works
Create a Free Account

Gateway Manuals

Find free Gateway NV-53A manuals and user guides available at ManualOwl.com. Try out our unique manual viewer allowing you to interact with manuals from directly within your browser!

Gateway Reviews

View thousands of Gateway user reviews and customer ratings available at ReviewOwl.com.

Contact Information

Complete Gateway customer service contact information including steps to reach representatives, hours of operation, customer support links and more from ContactHelp.com.

Scoreboard Ratings

See detailed Gateway customer service rankings, employee comments and much more from our sister site.

Gateway Recalls

Find comprehensive Gateway recall information updated hourly on RecallOwl.com.