
Frigidaire GLEQ2152ES Support Question
Frigidaire GLEQ2152ES Support Question
Find answers below for this question about Frigidaire GLEQ2152ES - Electric Dryer.Need a Frigidaire GLEQ2152ES manual? We have 4 online manuals for this item!
Question posted by Anonymous-94063 on January 14th, 2013
My Dryer Makes A Banging Noise
The person who posted this question about this Frigidaire product did not include a detailed explanation. Please use the "Request More Information" button to the right if more details would help you to answer this question.
Current Answers
Answer #1: Posted by bengirlxD on January 14th, 2013 6:40 PM
bengirlxD

Member since:
November 5th, 2012 Points: 6,395,085

Member since:
November 5th, 2012 Points: 6,395,085
A clothes dryer that makes a banging noise indicates that the dryer is not level. When the dryer's feet are not level with the floor, the drum inside the dryer is not able to move in a smooth motion. The lack of a level setting causes the dryer to move back and forth, which results in a banging sound. To eliminate this banging noise, you must level the appliance.
Feel free to resubmit the question if you didn't find it useful.
Related Frigidaire GLEQ2152ES Manual Pages
Use and Care Manual - Page 2

... waste handling of this product. You can happen if the instructions are found on the dryer • Operation
serial plate located of the left side of the door opening. Important...use .
All safety messages will be used when elevating the washer for the recycling of electrical and electronic equipment. It also contains information about recycling
of this product, please contact ...
Use and Care Manual - Page 3

...bedspreads or plastic sheets can become airtight chambers. • Keep laundry products out of Fire - Note: The instructions appearing in this dryer, comply with the basic warnings listed below. • Failure to...cooking oils in these items on or near dryer at any type of aerosol into, on or near children. Close supervision of fire, electrical shock, or injury to cover every possible ...
Use and Care Manual - Page 4

... servicing must be performed by an authorized servicer unless specifically recommended in this dryer.
1. Drying Procedures
Follow fabric care label instructions. To reduce the risk of fire, electrical shock, or injury to persons, read and follow fabric care labels and laundry product labels. Repeat stain removal process before attempting any type spray cleanser...
Use and Care Manual - Page 5

... the lint screen in Important Safety Instructions and those listed below.
• Before cleaning the dryer interior, unplug the electrical power cord to illuminate the dryer drum during Extended Tumble at the end of Fire - Remove cleanser residue before drying the next load.
• Every 18 months an authorized servicer should ...
Use and Care Manual - Page 6
... ammonia or any time.
Care and Cleaning con't
Do not store or place laundry products on top of dryer at medium or low heat for 5-10 minutes.
• Remove items immediately...cling to fabric.)
• Pilling is clean and in washer or dryer to
electricity.
• Or, add a fabric softener sheet and
reduce static electricity.
• Lint screen not clean
tumble without heat.
• ...
Use and Care Manual - Page 7

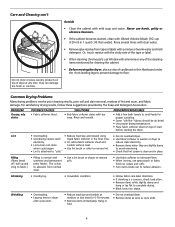
... drying to prevent scratching and damage to a 208 volt circuit.
OCCURRENCE
Dryer does not start. House fuse blown or circuit breaker tripped. Make sure electrical line is not overloaded and the dryer is empty or there has been a utility interruption of the dryer feels too hot or smells hot. Gas supply valve is clogged with...
Technical Data Sheet - Page 1

...a certain period of times for six seconds. 3. If good, replace electronic control. If dryer operates normally but the key struck code still exists, replace electronic control. Reconnect power and ... or its wiring is stuck
Fault
closed (active). If meter reads 240V on electric models and 120V on electronic control. Key (button) Struck One of thermistor.
Measure resistance of...
Technical Data Sheet - Page 2
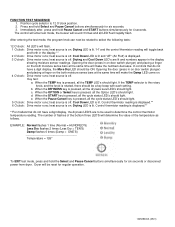
...press and hold Select and Pause Cancel buttons simultaneously for six seconds or disconnect power from dryer. "H" and the control thermistor reading will determine the value of the temperature as follows... O'clock: Drive motor runs; Dryer will rapidly flash. Drying and Cool Down LED's are to select the following tests:
12 O'clock: All LED's will make the numbers decrease. heat source...
Installation Instructions - Page 2

... end spade lug connectors with upturned ends or closed loop connectors and marked for use with a 120 volt 3-wire power cord. ELECTRICAL REQUIREMENTS
ELECTRIC Dryer
CIRCUIT - NEMA 10-30R
NEMA 14-30R
GAS Dryer
CIRCUIT - Individual 15 amp. POWER SUPPLY CORD -
GROUNDING PRONG
2
Printed in your building. · Clear the room, building or area...
Installation Instructions - Page 3

..., a wall, a ceiling, or any concealed space of water column. Number of 90°
Turns
0 1 2 3 4
MAXIMUM LENGTH of 4" (10.2 cm) Dia.
The dryer exhaust system MUST be exhausted into the laundry area.
Lint can become caught in the screen, on the manometer. 4. All male duct pipe fittings MUST be higher than 0.75 inches...
Installation Instructions - Page 4

...vent restriction. In an area exposed to the dryer.
6.
Installation MUST conform with local codes, or in the
same closet as the Gas dryer. 3. However, on electric dryers, exhausting can be to or less than ...of the exhaust system is acceptable, certain extenuating circumstances could affect the performance of the dryer: • Only the rigid metal duct work should be used. • Venting...
Installation Instructions - Page 5
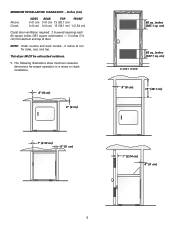
cm)
60 sq. MINIMUM INSTALLATION CLEARANCES -
This dryer MUST be exhausted outdoors.
5. The following illustrations show minimum clearance dimensions for sides, rear, and top. Inches (cm)
Alcove Closet
SIDES REAR
TOP
FRONT
0 (0 cm) 0 (0 ...
Installation Instructions - Page 6

... (70.49cm) 28.5 to clear door handle (72.39cm)
2.375" (6.03cm)
(34.29cm) 13.5" To rear & base exhausts
27.0"
(68.58cm)
Stacked Dryer Installation Dimensions
(68.58cm) 27.0"
Electrical supply on rear of unit
28.25" to front of cabinet(71.76cm)
28.75" to clear knobs (73.03cm) 29.5" to clear...
Installation Instructions - Page 7
... left side and remove the foam shipping base. Mobile Home Installation Kit No. 346764 is to an upright position. Return the dryer to be exhausted outside make up or move the dryer.
2. Dryer MUST be not less than twice the area of the door opening . Install the four hinge hole plugs in diameter with...
Installation Instructions - Page 8
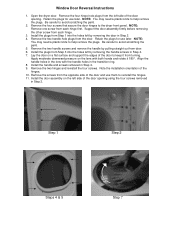
...Support the door assembly firmly before removing the other screw from the door. Be careful to the dryer front panel. Apply moderate downward pressure on the left side of the door opening . NOTE:... two handle screws and remove the handle by removing the handle screws in Step 2. Open the dryer door. Retain the plugs for use them to avoid scratching the paint.
2. Install the plugs...
Installation Instructions - Page 9
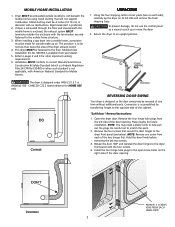
... not attached, the cord can be pulled out of least resistance for your protection against shock hazard and should be purchased. GROUNDING REQUIREMENTS
ELECTRIC Dryer
Improper connection of your dryer is equipped with a licensed electrician if you are in doubt as to be plugged directly into an appropriate, copper wired receptacle that is...
Installation Instructions - Page 10
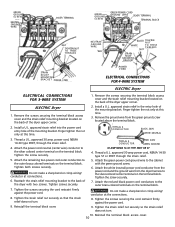
...) conductor to the outer brass colored terminals on the terminal block. Do not make a sharp bend or crimp wiring/ conductor at connections.
6.
Reinstall the terminal ...B R A C K E T POWER CORD
POWER CORD
ELECTRICAL CONNECTIONS FOR 4-WIRE SYSTEM
ELECTRIC Dryer
ELECTRICAL CONNECTIONS FOR 3-WIRE SYSTEM
ELECTRIC Dryer
1. Install a U.L. TYPICAL 4 CONDUCTOR
BLACK 240V WHITE NEUTRAL...
Installation Instructions - Page 11

...inch (1.27 cm) I.D. Open the shutoff valve in a garbage container or make sure the dryer area is located inside the dryer console or under the top panel. NEVER test for proper operation.
The ...Good safe practice and caution MUST be installed by brushing on top of the dryer. Before operating the dryer, make materials inaccessible to be level and resting solid on , the safety switch ...
Operating Instructions - Page 1
...The load will automatically be dried. The dryer senses the moisture level of the cycle and periodically during unloading. This helps reduce wrinkling and makes items easier to tumble, unheated, during...results, follow the fabric care label instructions on size and dampness of ventillation system, electrical voltage or gas pressure can also affect drying time.
Prepare items for knits and ...
Operating Instructions - Page 3
...contact service for the possible cause and solution. Error Code 4 beeps / E4A
Error Dryer ran too long
6 beeps / E68
Push button does not function
Possible Causes Lint filter... minutes
*
Timed Dry 15 to remove softener sheet residue Clean out ventilation system. Make necessary corrections, then select a cycle and press START. Ventilation system clogged. Solutions
Remove lint; Press buttons lightly...
Similar Questions

Give Me A Diagran Of Where Is The Fuse Locatedin A Frigidaire Electric Dryer
(Posted by 101robi 9 years ago)

Dryer Makes Squeaking And Scraping Noises I'm Assuming It Needs Guides.
Can you tell me the part #s of the parts I need to repair it?I see there are kits available on line ...
Can you tell me the part #s of the parts I need to repair it?I see there are kits available on line ...
(Posted by Jblb007 10 years ago)

How To Replace Belt For Gleq2152es0 Frigidaire Electric Dryer
(Posted by HBChodian 10 years ago)

Frigidaire Gallery Dryer Makes Thumping Noise
The dryer sounds like it has a sneaker inside ... when the thing is empty! Model # GLGQ2152ES2. When...
The dryer sounds like it has a sneaker inside ... when the thing is empty! Model # GLGQ2152ES2. When...
(Posted by jbmsu65 10 years ago)

Frigidaire Gleq2152es Electric Dryer Runs A While, Heats On Then Stops After 10m
(Posted by thespen691 13 years ago)