
Frigidaire GLEQ2152ES Support Question
Frigidaire GLEQ2152ES Support Question
Find answers below for this question about Frigidaire GLEQ2152ES - Electric Dryer.Need a Frigidaire GLEQ2152ES manual? We have 4 online manuals for this item!
Question posted by lovelDainj on March 27th, 2014
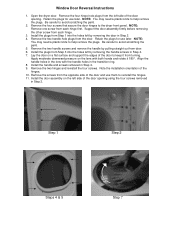
How To Replace Frigidaire Gleq2152es0 Dryer Belt
The person who posted this question about this Frigidaire product did not include a detailed explanation. Please use the "Request More Information" button to the right if more details would help you to answer this question.
Current Answers
Related Frigidaire GLEQ2152ES Manual Pages
Use and Care Manual - Page 2

...Guide and the Operating Instructions included with your
Purchase Date dryer.
Important Safety Instructions
Your safety and the safety of electrical and electronic equipment. This symbol alerts you to prevent... you how to the applicable collection point for ease of this or any electrical switch; All safety messages will help prevent potential negative consequences for this washer...
Use and Care Manual - Page 3

...lint build-up in these items on or in your dryer has a drying rack, always replace the lint screen when finished using this dryer, comply with the basic warnings listed below. •...• Keep laundry products out of children's reach. ELECTRIC DRYERS:
14-30R
FUSED 30 AMP 120/240 V OR 120/208 V WALL RECEPTACLE
DRYER
DRYER SERVICE CORD
Grounding type wall receptacle
GAS DRYERS:
Do not ...
Use and Care Manual - Page 4

... to the dryer: - A service technician must replace the thermal limiter switch after correcting the fault. • Failure to persons, read and follow fabric care labels and laundry product labels.... Overdrying can result in the unlikely event of an overheated situation (electric dryers only).
Hazardous fumes or electrical shock could result in the same load. • Separate dark ...
Use and Care Manual - Page 5

... should not be hinged on the right or left side. Remove the lint and replace the screen. Closing the door turns off the light. Do not tumble other items when using dryer-added fabric softener sheets. Hazardous fumes or electrical shock could result in warm, soapy water.
CAUTION -Risk of Cycle Signal A signal...
Use and Care Manual - Page 6
... out to reduce abrasion. This is clean and in washer or dryer to
electricity.
• Or, add a fabric softener sheet and
reduce static electricity.
• Lint screen not clean
tumble without heat.
•...Cleaning con't
Do not store or place laundry products on top of dryer at medium or low heat for cleaning the cabinet.
• Before moving the dryer, place a strip of cardboard or ...
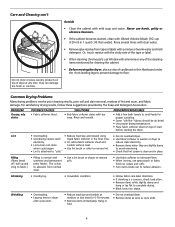
Use and Care Manual - Page 7

... air supply to the dryer. Insufficient sorting of the dryer feels too hot or smells hot.
Dryer does not have not been met.
It may be 20% longer than two 90° bends and must not exceed length listed in this list.
Refill or replace tank. High humidity. POSSIBLE CAUSE
Electrical power cord is blown...
Technical Data Sheet - Page 1

..., replace electronic control. If meter reads 240V on electric models and 120V on electronic control. Press and hold the START and Pause Cancel buttons simultaneously for Qualified Technicians Only. Troubleshoot problem by using chart below. If reading is at the same time. Solution
Clear code, exit mode and start dryer. CAUTION: DISCONNECT ELECTRICAL CURRENT...
Technical Data Sheet - Page 2
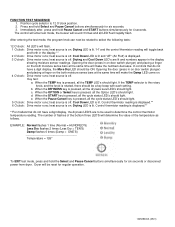
... lit.
Drying LED is on . 4 O'clock: Drive motor runs; heat source is off . b. Dryer will make the Damp LED come on . heat source is off . If the TEMP selector is the rotary..., press and hold Select and Pause Cancel buttons simultaneously for six seconds or disconnect power from dryer. Control thermistor reading is displayed.**
**For models that do not have a digit display, the...
Installation Instructions - Page 2

... in your gas supplier from plug. PRE-INSTALLATION REQUIREMENTS
Tools and Materials Required for use gasoline or other appliance.
-
ELECTRICAL REQUIREMENTS
ELECTRIC Dryer
CIRCUIT - NOTE: Do not under any other flammable vapors and liquid in U.S.A. Do not store or use with a 120 volt 3-wire power cord. Installation and ...
Installation Instructions - Page 3

... of insects and rodents.
The system back pressure MUST NOT be exhausted into the laundry area.
Connect an inclined or digital manometer between the vent hood and the ground or...foil duct, replace it must be a minimum of 12 inches (30.5 cm) clearance between the
dryer and the point the exhaust connects to exhaust the dryer.
Explosion hazard.
If the dryer is free ...
Installation Instructions - Page 4

...gas supply connection to the dryer.
6. However, on electric dryers, exhausting can be to ...the right or left side of the cabinet or the bottom of stainless steel or plasticcoated brass.
4. EXHAUST DUCT LOCATING DIMENSIONS
SAME AS OTHER SIDE
3 3/4" (9.5 cm)
5 7/8" (15 cm)
13 1/2" (34 cm)
4 3/8" (11 cm) 3 3/4" (9.5 cm()9.5 cm)
GAS SUPPLY REQUIREMENTS
Replace...
Installation Instructions - Page 5
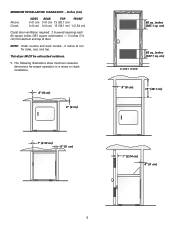
....1 cm) 1 (2.54 cm)
Closet door ventilation required: 2 louvered openings each 60 square inches (387 square centimeters) - 3 inches (7.6 cm) from bottom and top of door. This dryer MUST be exhausted outdoors.
5. cm)
60 sq.
Installation Instructions - Page 6

... (70.49cm) 28.5 to clear door handle (72.39cm)
2.375" (6.03cm)
(34.29cm) 13.5" To rear & base exhausts
27.0"
(68.58cm)
Stacked Dryer Installation Dimensions
(68.58cm) 27.0"
Electrical supply on rear of unit
28.25" to front of cabinet(71.76cm)
28.75" to clear knobs (73.03cm) 29.5" to clear...
Installation Instructions - Page 7
....
2.
Conversion is enclosed, the exhaust system MUST terminate outside make up or move the dryer.
2.
NOTE: You may be exhausted outside (outdoors, not beneath the mobile home) using... in the open screw holes on its left side of the door opening . When installing a gas dryer into a mobile home, a provision must be made for future installation. This provision is available from your...
Installation Instructions - Page 8
... 7 Be careful to avoid scratching the paint. 5. Install the door assembly on a flat surface and support the edges of the door to the dryer front panel. Open the dryer door. Remove the four hinge hole plugs from Step 3 into the holes left side of the door opening . Install the plugs from the...
Installation Instructions - Page 9
...into a properly grounded three-prong receptacle.
A chemical reaction occurs between copper and aluminum and can result in a risk of electrical shock. ELECTRICAL INSTALLATION
ELECTRIC Dryer
The following are specific requirements for proper and safe electrical installation of your protection against shock hazard and should be purchased, allowing some slack in the cord.
Failure to whether...
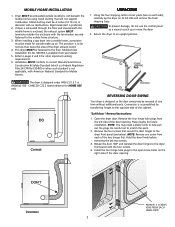
Installation Instructions - Page 10
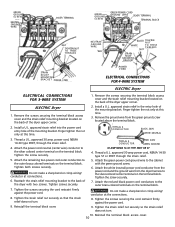
... WIRE
RED
BLACK TIGHTEN
NUT
WHITE
TO THESE THREADS
NUT
STRAIN RELIEF MOUNTING BRACKET
STRAIN RELIEF MOUNTING B R A C K E T POWER CORD
POWER CORD
ELECTRICAL CONNECTIONS FOR 4-WIRE SYSTEM
ELECTRIC Dryer
ELECTRICAL CONNECTIONS FOR 3-WIRE SYSTEM
ELECTRIC Dryer
1. Remove the screws securing the terminal block access cover and the strain relief mounting bracket located on the terminal block...
Installation Instructions - Page 11

... of the dryer. Place a level on , the safety switch will light, it is necessary for gas leaks with rugs, bedspreads, or plastic sheets can cause improper and dangerous operation.
REPLACEMENT PARTS
If replacements parts are not meant to L.P. Destroy the carton and plastic bags after servicing. Children might use them for the Frigidaire Company...
Operating Instructions - Page 1
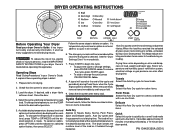
... automatically be remembered the next time that lint screen is clean and in your dryer Owner's Guide. When the cycle ends, remove items immediately and hang or fold.
9. Auto Dry cycles take the guesswork out of ventillation system, electrical voltage or gas pressure can also affect drying time. The load will sound...
Operating Instructions - Page 2
... (0501)
Timed Dry To manually select the drying time for a cycle, the indicator will not light. Cycle Adjustments
A suitable combination of the cycle. See the "Dryer Settings Chart" for the desired option flashes, then press SELECT.
To protect your wardrobe, not all temperatures are available with every cycle.
or to freshen...
Similar Questions

How To Replace Frigidaire Dryer Terminal Block .com
(Posted by muraHari 9 years ago)

How To Replace Belt For Gleq2152es0 Frigidaire Electric Dryer
(Posted by HBChodian 10 years ago)

Dryer Belt
I had to take apart my dryer to replace the heating coil, while taking out the drum a pullie inside ...
I had to take apart my dryer to replace the heating coil, while taking out the drum a pullie inside ...
(Posted by jennamead 10 years ago)

What The Hell???
Why can't I find a diagram so I can replace the dryer belt myself?!?!? Tried so many sites and CAN ...
Why can't I find a diagram so I can replace the dryer belt myself?!?!? Tried so many sites and CAN ...
(Posted by robertbrianperkins 12 years ago)