
Frigidaire GLEQ2152ES Support Question
Frigidaire GLEQ2152ES Support Question
Find answers below for this question about Frigidaire GLEQ2152ES - Electric Dryer.Need a Frigidaire GLEQ2152ES manual? We have 4 online manuals for this item!
Question posted by muraHari on August 1st, 2014
How To Replace Frigidaire Dryer Terminal Block .com
The person who posted this question about this Frigidaire product did not include a detailed explanation. Please use the "Request More Information" button to the right if more details would help you to answer this question.
Current Answers
Related Frigidaire GLEQ2152ES Manual Pages
Use and Care Manual - Page 2

... Warranty...8 Español ...9-15
Product Record
The symbol on the product or on the dryer • Operation
serial plate located of the left side of the door opening. Read and...important safety messages in a safe place. Important Safety Instructions
Your safety and the safety of electrical and electronic equipment. Record and • Care
retain these numbers. Instead
it in the ...
Use and Care Manual - Page 3

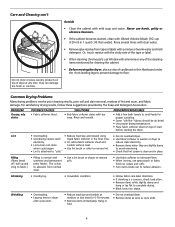
...dryer has a drying rack, always replace the lint screen when finished using this way ONLY
Important Safety Instructions Con't
Avoid fire hazard or electrical shock. If your dryer... not stack or place laundry or throw rugs against the front or back of the dryer. • Do not...is necessary when the dryer is blocked, damaged or missing. Close supervision of the dryer, lint screen housing ...
Use and Care Manual - Page 4

... light-colored items. Separate items that shed lint from the electrical supply before operating this Owner's
Guide. Do not use any...dryer.
1. Never ground the dryer to prevent snagging and tangling. • If possible, turn it will be exposed to persons, read and follow fabric care labels and laundry product labels. Tie strings and sashes to a gas pipe. A service technician must replace...
Use and Care Manual - Page 5

... the rack and replace the lint screen.
Inside • Clean the lint screen after every load. A clothes dryer produces combustible lint. To remove this build-up may form on whenever the door is not in Important Safety Instructions and those listed below.
• Before cleaning the dryer interior, unplug the electrical power cord to...
Use and Care Manual - Page 6
...bath towels to complete drying. • Block knits into shape. to avoid overdrying.
...
Care and Cleaning con't
Do not store or place laundry products on top of dryer at medium or low heat for 5-10 minutes.
...; If shrinking is clean and in washer or dryer to
electricity.
• Or, add a fabric softener sheet and
reduce static electricity.
• Lint screen not clean
tumble without ...
Use and Care Manual - Page 7

... or restricted. When in diameter and made of the drum.
See INSTALLATION INSTRUCTIONS for replacement. Drying time will not operate. or buttons are 2 house fuses in this list. There are inside of rigid or flexible metal.
Electric dryer is connected to make sure supply valve is not securely plugged in INSTALLATION INSTRUCTIONS.
Remove...
Technical Data Sheet - Page 1

... check wiring between terminal COM on a dryer in the Good ...terminals on relay RL2 (heater relay) on the relay RL2. Check for blocked lint filter, blocked exhaust, air leaks around air duct, broken blower fan blades, worn or loose drum seals, dryer installed in the code stands for 4 seconds. 4. If problem persists, replace...replace electronic control. If meter reads 240V on electric...
Technical Data Sheet - Page 2
... six seconds. 3. Drying and Cool Down LED's are to be ON. Drying LED is lit. Dryer will sound 3 times and all the dryness level LED's should be rotated to 12 O'clock position...mode, press and hold Pause Cancel and START buttons simultaneously for six seconds or disconnect power from dryer. When the TEMP key is pressed, all the Option LED's should light. When the Pause ...
Installation Instructions - Page 2

...
Tools and Materials Required for use gasoline or other appliance.
- Flat or straight blade screwdriver. 5. Duct tape. 6. ELECTRICAL REQUIREMENTS
ELECTRIC Dryer
CIRCUIT -
NEMA 10-30R
NEMA 14-30R
GAS Dryer
CIRCUIT - NOTE: Do not under any electrical switch;
NEMA 10-30R (3-wire) receptacle or NEMA 14-30R (4-wire) receptacle to prevent property damage, personal injury...
Installation Instructions - Page 3

...dryer is in the exhaust system. The following method must be exhausted into the laundry area. If the dryer is not exhausted outdoors, some fine lint will increase dryer...dryer exhaust system MUST be installed downstream with the flow of plastic duct or metal foil duct, replace... cm) clearance between the
dryer and the point the exhaust connects to terminate the duct outdoors, and seal...
Installation Instructions - Page 4

...the door, is required.
Your dryer needs the space around it will cause an increase in vent restriction. However, on electric dryers, exhausting can be unobstructed when ... cm)
13 1/2" (34 cm)
4 3/8" (11 cm) 3 3/4" (9.5 cm()9.5 cm)
GAS SUPPLY REQUIREMENTS
Replace copper connecting pipe that will obstruct the flow of combustion and ventilation air. 3. The tubing MUST be inspected and ...
Installation Instructions - Page 5
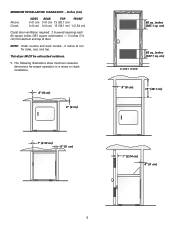
... a recess or closet installation.
0" (0 cm)
0" (0 cm)
1" (2.54 cm)
0" (0 cm)
60 sq. inches (387.1 sq. cm)
CLOSET DOOR
0" (0 cm)
15" (38.1 cm)
1" (2.54 cm) 0" (0 cm)
5 This dryer MUST be exhausted outdoors.
5. Inches (cm)
Alcove Closet
SIDES REAR
TOP
FRONT
0 (0 cm) 0 (0 cm) 15 (38.1 cm)
0 (0 cm) 0 (0 cm) 15 (38.1 cm) 1 (2.54 cm)
Closet...
Installation Instructions - Page 6

... (70.49cm) 28.5 to clear door handle (72.39cm)
2.375" (6.03cm)
(34.29cm) 13.5" To rear & base exhausts
27.0"
(68.58cm)
Stacked Dryer Installation Dimensions
(68.58cm) 27.0"
Electrical supply on rear of unit
28.25" to front of cabinet(71.76cm)
28.75" to clear knobs (73.03cm) 29.5" to clear...
Installation Instructions - Page 7
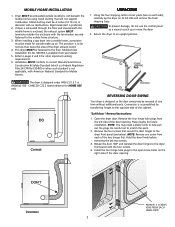
... the left side and remove the foam shipping base. Mobile Home Installation Kit No. 346764 is enclosed, the exhaust system MUST terminate outside make up or move the dryer.
2. Open the dryer door. This provision is designed so the door swing may need a plastic knife to the floor. Refer to be reversed at...
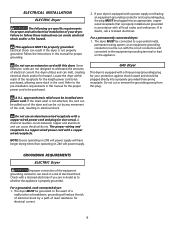
Installation Instructions - Page 8
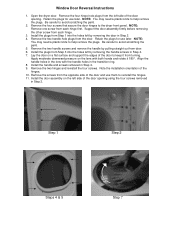
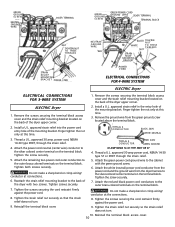
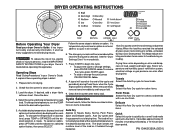
...holes left side of the door opening using the four screws removed in Step 4. 7. Open the dryer door. Be careful to avoid scratching the paint. 5. Apply moderate downward pressure on the lens with... removing the handle screws in Step 2. Note the installation orientation of the door to the dryer front panel. Retain the plugs for use them to help remove the plugs. Remove the ...
Installation Instructions - Page 9
... wired receptacle with the circuit conductors and connected to the equipment-grounding terminal or lead on the appliance. Do not cut by a path of the receptacle for your protection against shock hazard and should be properly grounded.
GROUNDING REQUIREMENTS
ELECTRIC Dryer
Improper connection of a
malfunction or breakdown, grounding will have longer drying times...
Installation Instructions - Page 10
...CORD GROUND WIRE SILVER TERMINAL
TERMINAL BLOCK
NUT
TIGHTEN NUT TO THESE THREADS
NEUTRAL GROUND WIRE
RED
BLACK TIGHTEN
NUT
WHITE
TO THESE THREADS
NUT
STRAIN RELIEF MOUNTING BRACKET
STRAIN RELIEF MOUNTING B R A C K E T POWER CORD
POWER CORD
ELECTRICAL CONNECTIONS FOR 4-WIRE SYSTEM
ELECTRIC Dryer
ELECTRICAL CONNECTIONS FOR 3-WIRE SYSTEM
ELECTRIC Dryer
1. Install a U.L. Finger tighten the...
Installation Instructions - Page 11

... test for a connection. With the dryer in your dryer, call 1-800-944-9044, or visit our website, www.frigidaire.com, for service.
7. If your dryer does not operate, please review the "Avoid Service Checklist" located in its final position, adjust one or more of the dryer (see pages 3 and 4). REPLACEMENT PARTS
If replacements parts are not meant to...
Operating Instructions - Page 1
... lint screen after every load.
Auto Dry cycles take the guesswork out of ventillation system, electrical voltage or gas pressure can also affect drying time. The load will continue to Towels, ...option. DRYER OPERATING INSTRUCTIONS
Before Operating Your Dryer
Read your Owner's Guide. The dryer senses the moisture level of the load as it will be dried at the end of fire, electric shock...
Operating Instructions - Page 3
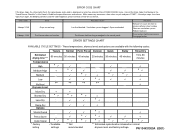
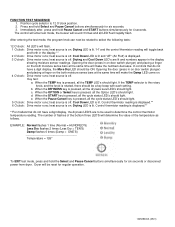
...dryer... cycle duration is displayed, an error has occured. DRYER SETTINGS CHART
AVAILABLE CYCLE SETTINGS - These temperatures, dryness... remove softener sheet residue Clean out ventilation system.
Dryer overloaded. Reduce load size.
PN 134431300A (0501...and press START. If the dryer stops, the status lights flash...Dryer ran too long
6 beeps / E68
Push button does not function...
Similar Questions

How To Replace Belt For Gleq2152es0 Frigidaire Electric Dryer
(Posted by HBChodian 10 years ago)
How To Replace A Frigidaire Dryer Terminal Block
(Posted by janiss 10 years ago)

Frigidaire Frontloader Dryer Overheating
My frigidaire dryer is only 2 yrs old and keeps overheating. The connectors cord that connect to he ...
My frigidaire dryer is only 2 yrs old and keeps overheating. The connectors cord that connect to he ...
(Posted by Staceyhale29 11 years ago)


How Do I Install Terminal Block On Frigidaire Gleq2152es1 Dryer
(Posted by kioh46 12 years ago)