Dynex DX-L32-10A Support Question
Dynex DX-L32-10A Support Question
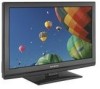
Find answers below for this question about Dynex DX-L32-10A - 32" LCD TV.Need a Dynex DX-L32-10A manual? We have 4 online manuals for this item!
Question posted by craigkshawhigh on November 25th, 2014
Input (av)
My tv will show, but in the left corner when I mash the INPUT button the tv will not stop rolling and stop on AV. I do not have insurance coverage. Katie
Current Answers
Answer #1: Posted by TommyKervz on December 19th, 2014 4:25 AM
TommyKervz

Member since:
January 10th, 2013 Points: 17,776,803

Member since:
January 10th, 2013 Points: 17,776,803
Sounds like the input button is damaged. it must be taken to a proffetional technicien to repair it.
Related Dynex DX-L32-10A Manual Pages
Warranty (English) - Page 1
HOW LONG DOES THE COVERAGE LAST? The Warranty Period lasts for a television with a screen 25 inches or larger, call 1-888-BESTBUY. or (2) ...; Abuse • Negligence • Commercial use • Modification of any part of the product • Plasma display panel damaged by this warranty that requires service, terms of this warranty apply. To obtain in-home warranty service for one (1)...
User Manual (English) - Page 2
... device 12 Connecting a computer 12 Connecting headphones 13 Connecting an audio amplifier 13
Turning on your TV for the first time 13
Understanding the basics 14
Turning your TV on or off 14 Selecting the video input source 14 On-screen menu overview 14 Navigating the menus 15 Selecting a channel 15 Adjusting the...
User Manual (English) - Page 3
... time settings 28
Setting the clock 28 Setting the sleep timer 28
Adjusting menu settings 29
Selecting the menu language and transparency 29 Labeling an input source 30 Restoring default settings 30
Troubleshooting 31
Video and audio 31 Remote control 31 General 31
Maintenance...
User Manual (English) - Page 5
... and cables so that they cannot be pulled or grabbed by curious children. Use only a TV stand rated for the weight of your TV.
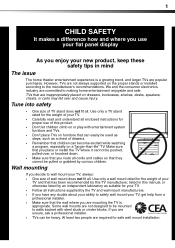
• Carefully read and understand all enclosed instructions for proper use your flat panel display
As you enjoy your new product, keep these safety tips in this manual, or otherwise...
User Manual (English) - Page 6

... defeat the safety purpose of time, unplug it is left unattended and unused for long periods of glass. Power source Operate your TV. 2
Important safety instructions
Important safety instructions
CAUTION RISK ...when unused
for long periods of the polarized or
grounding-type plug. Handling the LCD panel • Your TV's screen is made of time.
14 Refer all instructions.
5 Do not use ...
User Manual (English) - Page 7
...the screen as practical. Important safety instructions
3
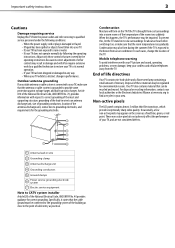
Cautions
Damage requiring service Unplug this TV from the power outlet and refer servicing to qualified service personnel under the following...LCD panel contains almost 3 million thin film transistors, which provide exceptionally sharp video quality.
When this happens, the TV's performance may also form during the summer if the TV...
User Manual (English) - Page 8
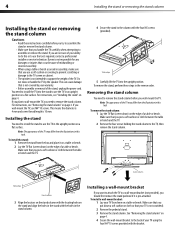
... to the back of a table or bench. See "Removing the stand column" on the edge of the TV. If you should first remove the stand pedestal if it on a table or bench.
2 Lay the TV flat (screen down ) on
page 4.
4 Secure the wall-mount bracket to the column with the four M5 screws...
User Manual (English) - Page 9
... mode.
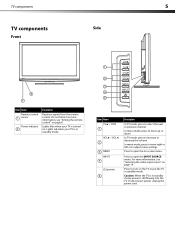
1
2 3 4 5
Item Name CH / CH
1
VOL / VOL 2
3 MENU INPUT
4
(power) 5
Description
In TV mode, press to adjust menu settings. Caution: When the TV is turned on page 14. In menu mode, press to move right or left or to select the next or previous channel.
TV components
5
TV components
Side
Front
2 1
Item Name Remote control
1 sensor...
User Manual (English) - Page 10
... audio amplifier" on page 12. For more information, see "Connecting an antenna, cable TV, or satellite TV box" on page 13.
VGA 3 AUDIO / PIC
Connect a computer to
4 and...not use . 6
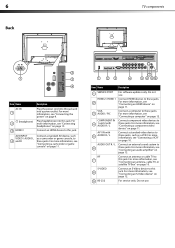
Back
TV components
2
1
3
4
Item Name
Description
AC IN 1
2
(headphone)
3 HDMI 3
Plug the power cord into this jack and into this jack. AV2 INPUT
Connect a standard AV device, such
VIDEO / ...
User Manual (English) - Page 11
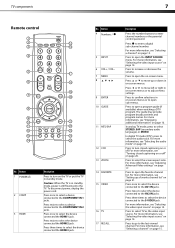
...information, see "Selecting a channel" on -screen menu. Button 1 POWER
2 COMP
3 HDMI
Description
Press to select TV as the video input source. Caution: When the TV is in on page 14. Press twice to select a.... Press once to select the device connected to move left or right in on page 21.
For more information, see "Selecting the video input source" on -screen menus or to the COMPONENT IN...
User Manual (English) - Page 14
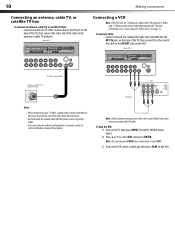
... jacks on the VCR.
To connect a VCR: • Connect one end of a standard AV cable (not included) into the AV1 IN jacks on the TV, then press INPUT. To play the VCR: 1 Turn on the back of the TV, then connect the other end of the cable to reduce interference and noise that may...
User Manual (English) - Page 15
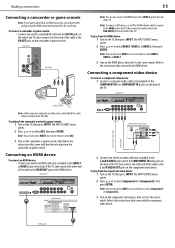
...
Component video device
2 Connect one or more times to play from the camcorder or game console. The INPUT SOURCE menu opens. 2 Press or to select HDMI 1, HDMI 2, or HDMI 3, then press ENTER. Side of TV
AV CAble
Camcorder
Note: You can also press VIDEO one end of an audio cable (not included) to...
User Manual (English) - Page 16

... from the computer: 1 Turn on the computer.
For more times to the AUDIO OUT jack on the TV, then press INPUT. To connect an S-Video device: 1 Connect one end of a VGA cable (not included) to the...S-Video, then press ENTER. To play video from the S-Video device: 1 Turn on the TV, then press INPUT. To connect a computer:
1 Connect one end of an S-Video cable (not included) to the S-VIDEO...
User Manual (English) - Page 17
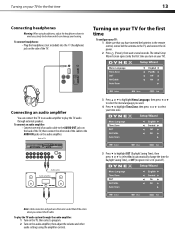
... cable to the AUDIO IN jacks on the audio amplifier. To play the TV audio through the audio amplifier: 1 Turn on the TV, then select a program. 2 Turn on the audio amplifier, then adjust ...(to select the menu language you connect the AV cable. To connect headphones: • Plug the headphones (not included) into the (headphone) jack on the side of TV
Audio cable Audio amplifier
3 Press or to ...
User Manual (English) - Page 18
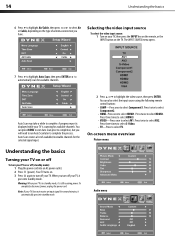
Selecting the video input source
To select the video input source: 1 Turn on your TV, then press the INPUT key on the remote, or the INPUT button on or off (standby mode): 1 Plug the power cord into an AC power outlet. 2 Press (power). The INPUT SOURCE menu opens.
7 Press to highlight Auto Scan, then press ENTER or to...
User Manual (English) - Page 20

...-Lets you set menu language and menu
transparency. • VGA Settings-Lets you adjust picture settings to optimize
a computer display. • Input Label-Lets you label a device connected to your
TV's input jacks. • Restore Default-Lets you turn off all sound. For example, 5.1 indicates sub-channel 1 of information, such as weather forecasts...
User Manual (English) - Page 21
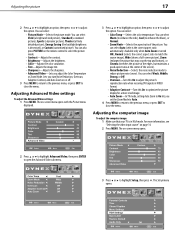
...Overscan-Turn this On to optimize the picture display for a more information, see "Selecting the video input source" on the remote control to close the menu. The on-screen menu opens with the ...1 Press MENU. Adjusting the computer image
To adjust the computer image: 1 Make sure that your TV is decreased), or Custom (customized picture). Color Temp
Adaptive Contrast
3 Press or to close the ...
User Manual (English) - Page 23
...
Parental Controls
2 Press or to Off.
Notes:
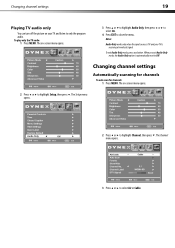
Audio Only works only when the input source is TV and your TV and listen to select Air or Cable. When you exit Audio Only mode, the ...On.
4 Press EXIT to highlight Setup, then press . To exit Audio Only mode, press any button. Changing channel settings
Automatically scanning for channels
To auto scan for channels: 1 Press MENU. The ...
User Manual (English) - Page 26
...are to highlight Channel, then press . The on or off: 1 Press MENU. The on TV.
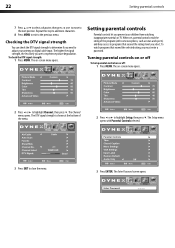
22
Setting parental controls
7 Press or to select a character, then press or to move to...Press MENU. To watch programs that exceed the ratings level you prevent your antenna or digital cable input. Setting parental controls
Parental controls let you select. Turning parental controls on or off
To turn ...
User Manual (English) - Page 36
... television reception, which the receiver is no guarantee that came with the cloth. If surfaces are approximate. Standard Television ...radio communications. Type Panel TV system Receiving channels
Audio multiples Audio out
Power requirement Power consumption
Dimensions (W × H × D with stand)
Weight Input ports
Output ports Control ports
LCD TV 32-inch TFT LCD NTSC-M, ATSC VHF...
Similar Questions

What Receiver Can I Hook Up To My New 32 Lcd Tv For Surround Sound
(Posted by jmsmive 9 years ago)

Picture Is Out But There Is Sound. On A Dynex Tv Modle No. Dx32l200a12
(Posted by Anonymous-118342 10 years ago)

Volume Increases On Its Own
I have a DYNEX 32" LED-LCD Tv's volume keeps increasing without me touching the remote. This starded...
I have a DYNEX 32" LED-LCD Tv's volume keeps increasing without me touching the remote. This starded...
(Posted by sammysaur 11 years ago)

Where Can You Purchase The Main Boards For The Dx-lcd32-09- 32' Lcd Tv
(Posted by ricked30 12 years ago)

How Do I Hook Up My Dvd Player To My Dynex Lcd-tv Model# Dx-l32-10c
I have no manual with my TV and do not know which oulets to plug in my red white yellow plugs. There...
I have no manual with my TV and do not know which oulets to plug in my red white yellow plugs. There...
(Posted by sannymacneil 13 years ago)