Get support for Dynex DX-32L100A13

Dynex DX-32L100A13 Support Question

Dynex DX-32L100A13 Support Question

Find answers below for this question about Dynex DX-32L100A13.
Need a Dynex DX-32L100A13 manual? We have 10 online manuals for this item!
Question posted by texaspygmy on August 10th, 2013

How Do You Turn Off The Menu Pop-up When Showing Pictures?

When showing .jpg pictures on the screen, how do you turn OFF the menu options that pop up on the screen for several seconds EVERY time you go to the next picture??!! I want to be able to show pictures without anything popping up on the screen. Thanks!

Current Answers

Answer #1: Posted by StLFanMan on September 24th, 2013 9:35 AM
This answer was accepted by the poster of the original question.
StLFanMan

Member since:
August 14th, 2013

Points: 1,576,405
1,100
points
You can create a slideshow to view pictures, which gives you options of controlling how photos are displayed. Details on how to do this are outlined in the User Manual on page 35. You can download a copy of the User Manual here, under the Support/Downloads tab: http://www.dynexproducts.com/products/televisions/DX-32L100A13.html

To customize slideshow settings:

1 Switch to USB mode (see “Switching to USB mode” on page 32).

2 Press MENU. The USB menu opens.

3 Press _ to access the Photos menu. Photos is highlighted.

4 Press ENTER to access the USB Photos menu. The USB Photos menu opens.

5 Press _ or _ to highlight Settings, then press ENTER. The USB Photos Settings menu opens.

6 Press _ or _ to highlight an option, then press ENTER. You can select:

Repeat—To repeat the slideshow when it reaches the end. You can select On or Off.

Shuffle—To display the photos in random order.

You can select On or Off.

Speed—To set the amount of time a photo is displayed before the next photo is shown. You can select 4 sec, 6 sec, or 8 sec.

Transition—To select the way photos transition when moving to the next file in the slideshow.

You can select:

None—for no transition effect.

Fade to Black—to fade the screen to black between photos.

Vertical Wipe—to wipe the screen from top to bottom between photos.

Horizontal Wipe—to wipe the screen from left to right between photos.

Random—To randomly select a transition effect.

7 Press EXIT to close the menu.

Related Dynex DX-32L100A13 Manual Pages

User Manual (English) - Page 2

ii Dynex DX-32L100A13 32" LCD TV Contents CHILD SAFETY 1 Important Safety Instructions 2 Warning 2 Caution...time 17 Understanding the basics 18 Turning your TV on or off 18 Selecting the video input source 18 Using the on-screen menus 18 Navigating the menus 19 Selecting a channel 19 Adjusting the volume 19 Viewing program information 19 Adjusting the picture 19 Adjusting the TV picture...
User Manual (English) - Page 9

...player" on page 11, or "Using HDMI" on -screen menu. Press to open the on page 11. 10 USB ... 1 (headphone) Connect headphones to these jacks. TV components Front DX-32L100A13 5 Back and Side # Item 1 MENU 2 INPUT 3 VOL+/VOL- 4 CH /CH 5 (Power)...connection)" on page 18. When your TV is in standby mode. Turns off (standby mode). For more information, see "Using composite video...
User Manual (English) - Page 10

... information" on -screen menu. This function is off (Standby mode). Press to turn your TV is not available on -screen menu. In analog TV..., Standard, Energy Savings, or Custom. 6 DX-32L100A13 TV components Remote control # Button 9 ZOOM 10 PICTURE 11 SLEEP 12 AUDIO 13 (Power) 14... select HDMI1, twice to select HDMI2, and three times to select a device connected to the last viewed ...
User Manual (English) - Page 12

...to the cable-in amplifier. If the picture quality is still displayed as SD, thus the picture quality will not be using HDMI: 1 Turn off your TV and all connected equipment... poor picture quality, you should I use any audio cables. Many high-definition (HD) channels upscale standard-definition (SD) content. Note An HDMI cable carries both audio and video. 8 DX-32L100A13 Making ...
User Manual (English) - Page 17

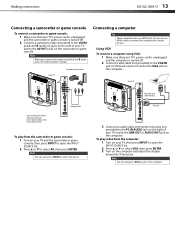
...are often color-coded to connect the computer for a better picture. Note You can also press VIDEO to select the device. Making connections DX-32L100A13 13 Connecting a camcorder or game console To connect a ..., then press ENTER. Composite cable To play video from the camcorder or game console: 1 Turn on the camcorder or game console. Audio cable with stereo mini plug VGA cable 3 Connect ...
User Manual (English) - Page 18

... JPEG pictures. Notes • • • • Never remove the USB flash drive or turn off . 2 Connect an HDMI cable (not provided) to one of the HDMI jacks on your TV and the computer, then press INPUT to open the INPUT SOURCE list. 2 Press or to select USB, then press ENTER. 14 DX-32L100A13...
User Manual (English) - Page 21

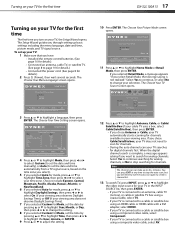
...; Connected the power cord. (See page 8 for details.) 2 Press (Power), then wait several seconds. Setup Wizard Choose your viewing area. Turning on your TV for the first time DX-32L100A13 17 Turning on your TV for the first time The first time you turn on the time zone you select). 5 If you will need to highlight a language, then press ENTER...
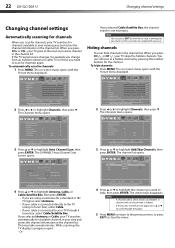
User Manual (English) - Page 22

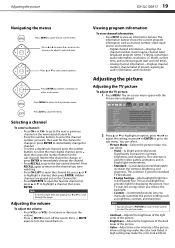
... MENU Back EXIT Exit Settings menu (TV mode) Picture Parental Controls Time Closed Caption Menu ...source. 18 DX-32L100A13 Understanding the basics Understanding the basics Turning your TV on or off To turn your TV on...options USB menu (USB mode) MENU Back EXIT Exit Photos Picture Audio Settings Channels USB Move Select MENU Back EXIT Exit View photos from the actual screens...
User Manual (English) - Page 23

... or to turn off the sound. Your TV uses less energy when you reduce this backlight. • Custom-(customized picture) Lets you want, then wait...picture. • Color-Adjusts the color intensity of the picture. Note You can also press PICTURE on -screen menu. A high setting may make the color look faded. Adjusting the picture DX-32L100A13 19 Navigating the menus Press MENU...
User Manual (English) - Page 24

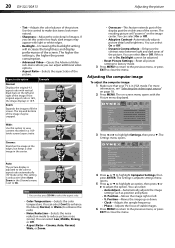
...picture. The on-screen menu opens with vertical black bars on page 18. 2 Press MENU. The Settings-Computer settings menu opens. 5 Press or to highlight an option, then press or to fill the screen. Aspect ratio option Example Normal: Displays the original 4:3 aspect ratio with the Picture menu... the color temperature. 20 DX-32L100A13 Adjusting the picture • Tint-Adjusts the...
User Manual (English) - Page 25

... Exit 3 Press or to highlight an option, then press or to 5 seconds. The Channels menu opens. You can also press AUDIO on weak stereo broadcasts. • Stereo-for digital audio signals. To play TV audio only: 1 Press MENU. The picture turns off the picture on the remote control one or more times to Off. To exit audio only...
User Manual (English) - Page 26

The on -screen menu opens with a check mark is connected to your program list 4 Press or to highlight the channel you want to close the menu. Hiding channels You can hide channels in the channel list. Picture Picture Mode Contrast Brightness Color Tint Sharpness Backlight Advanced Video Reset Picture Settings Move Select Audio Settings Channels USB Energy Savings...
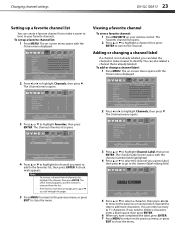
User Manual (English) - Page 27

... options MENU Back EXIT Exit 3 Press or to your remote control. To add or change a channel label: 1 Press MENU. Notes • • To remove a channel from the list. You can also relabel a channel that is not already labeled, you want to label, then press to go to highlight Channels, then press . Changing channel settings DX-32L100A13...
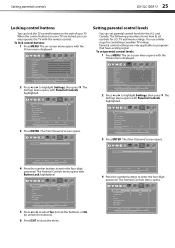
User Manual (English) - Page 29

... Move Select Set TV parental controls Audio Settings Channels USB MENU Back EXIT Exit 3 Press ENTER. Setting parental controls DX-32L100A13 25 Locking control buttons You can only operate the TV with Button Lock highlighted. The Settings menu opens with the Picture menu displayed. The following procedure shows how to set controls for controlling Canadian TV ratings...
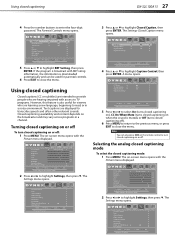
User Manual (English) - Page 31

Using closed captioning DX-32L100A13 27 4 Press the number buttons to highlight Settings, then press . Picture Audio Button Lock Block Unrated TV System Lock US Canada Change Password RRT Setting Reset RRT Settings No Channels USB Move Select MENU Back Lock or unlock the buttons on -screen menu opens with access to TV programs. However, this feature...
User Manual (English) - Page 33

... USB Energy Savings 65 47 65 0 55 26 MENU Back EXIT Exit 2 Press or to highlight Settings, then press . To set the clock: 1 Press MENU. The on -screen menu opens with the Picture menu displayed. The Settings-Time menu opens. The Settings-Time menu opens. The Settings menu opens. Adjusting time settings DX-32L100A13 29 Adjusting time settings Setting the clock To set the sleep...
User Manual (English) - Page 39

... 60 seconds, then plug the cord back in "Programming a different universal remote control" on page 16. • See instructions and a table of your TV. Troubleshooting DX-32L100A13 35 Problem Solution Dotted lines or stripes appear on the screen. • Make sure that the antenna or cable TV is normal. Try turning off one device at a time...
User Manual (English) - Page 43

... to obtain warranty service? Dynex Televisions DX-32L100A13 39 One-year limited warranty Dynex Televisions Definitions: Dynex Products ("Dynex") ...product in the United States and Canada at its sole option): (1) repair the Product with the Product. This warranty... terminates if you purchased the Product at no charge with a screen 42 inches or larger, in some countries. AA, AAA, ...
Quick Setup Guide (English) - Page 2

... Choose your Time Setting Mode Auto Time Zone Pacific Daylight Savings Time Year 2010 Month 01 Day 01 Time 12 : 00 AM Next Move Select MENU Back EXIT Exit If Automatic,options are automatically set to highlight Home Mode or Retail Mode, then press OK/ENTER. AUDIO Selects the audio mode. The Choose your Picture Mode screen opens...
Important Information (English) - Page 4

... To avoid interference with your TV picture and sound, operating problems, or... static charges. Try turning off one device at...by following the operating instructions. Troubleshooting DX-32L100A13 3 • If your TV ... Unplug the power cord, wait 60 seconds, then plug the cord back in its...on the screen as practical. These non-... control directly at a time to find a recycler ...

Similar Questions

What Size Wall Mount Screws
I have a DX-32L100A13 tv and a DX-TVM112 mount. Neither the 6m or 4m screws that come with the mount...
(Posted by johng52 11 years ago)
Adjusting Dynex Dx-26ld150 Tv/dvd Combo Screen Display
Have Dynex DX-26LD150 TV/DVD Combo. How to adjust screen display. Bottom part of picture is cut off....
(Posted by wsquadrito 12 years ago)
Ask a New Question
Use the box below to post a new question about this Dynex product .
Points & Prizes
  • You can earn points for nearly everything you do on HelpOwl.com
  • You can trade in those points for gift cards at leading retailers such as Amazon.com and Walmart
  • It's that simple!
See How it Works
Create a Free Account

Dynex Manuals

Find free Dynex DX-32L100A13 manuals and user guides available at ManualOwl.com. Try out our unique manual viewer allowing you to interact with manuals from directly within your browser!

Dynex Reviews

View thousands of Dynex user reviews and customer ratings available at ReviewOwl.com.

Contact Information

Complete Dynex customer service contact information including steps to reach representatives, hours of operation, customer support links and more from ContactHelp.com.

Scoreboard Ratings

See detailed Dynex customer service rankings, employee comments and much more from our sister site.